Taking screenshots on Windows 11 has become easier than ever, with multiple built-in methods designed to capture exactly what appears on screen. Whether capturing the entire display, a specific window, or a custom area, Windows 11 provides several straightforward options that work in seconds.
Most people find that learning just two or three screenshot methods covers nearly every situation. The key is to understand which tool works best for each scenario. Windows 11 includes traditional keyboard shortcuts alongside modern tools like the Snipping Tool, giving users flexibility based on their needs.
The operating system has evolved significantly from previous versions, offering more intuitive screenshot capabilities that cater to different use cases. From quick captures for sharing online to detailed annotations for professional documentation, Windows 11 handles everything efficiently. Understanding these methods transforms how users interact with their computers, making it easier to communicate ideas, save important information, and create tutorials.
Using the Print Screen Key for Quick Screenshots
The Print Screen key remains the fastest way to capture screenshots. This method works best when speed matters more than precision, capturing everything visible on the monitor in a single keystroke.
The Print Screen approach has been part of Windows for decades, yet it continues to serve as a reliable foundation for screenshot functionality. This traditional method requires no additional software or complex setup, making it accessible to anyone with a keyboard. The simplicity of pressing a single key or key combination provides instant results, though the captured content requires pasting into another application before saving.
Full Screen Capture
Pressing the Print Screen key (often labeled as ‘PrtScn’ or ‘PrtSc’) captures the entire screen and copies it to the clipboard. From there, paste the image into any application that accepts images.
Watch this: How to Screenshot on Windows 11 – Using the Print Screen Key for Quick Screenshots
- Press the ‘PrtScn’ key on the keyboard

- Open an image editor, document, or email
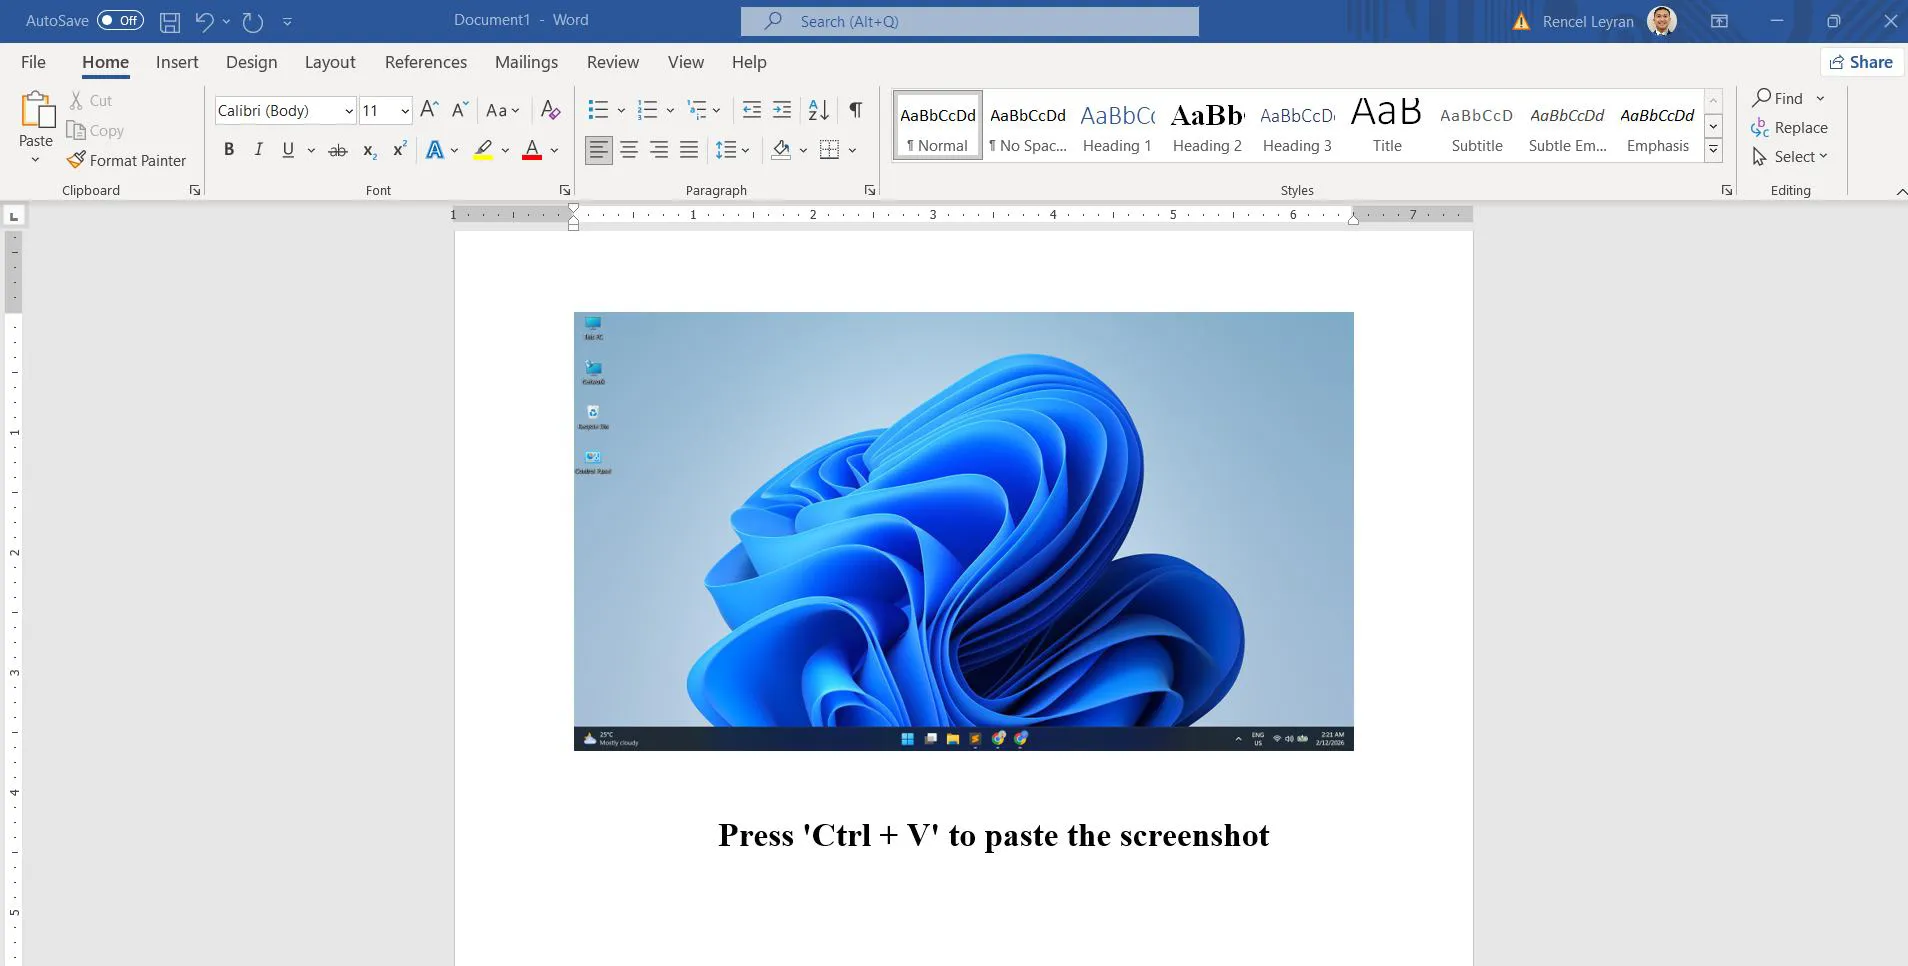
- Press ‘Ctrl + V’ to paste the screenshot
- Save the file in the preferred format
This method proves particularly useful when capturing multiple screenshots in quick succession. Since each capture goes to the clipboard, users can paste them into different applications or documents without managing multiple files. The approach works seamlessly with word processors, presentation software, email clients, and graphic design programs.
Quick Screenshot with Snipping Tool Shortcut
The fastest way to capture a specific area or window involves using the built-in Snipping Tool shortcut. This method combines speed with precision, offering immediate control over what gets captured.
Watch this: How to Screenshot on Windows 11 – Using Snipping Tool Shortcut
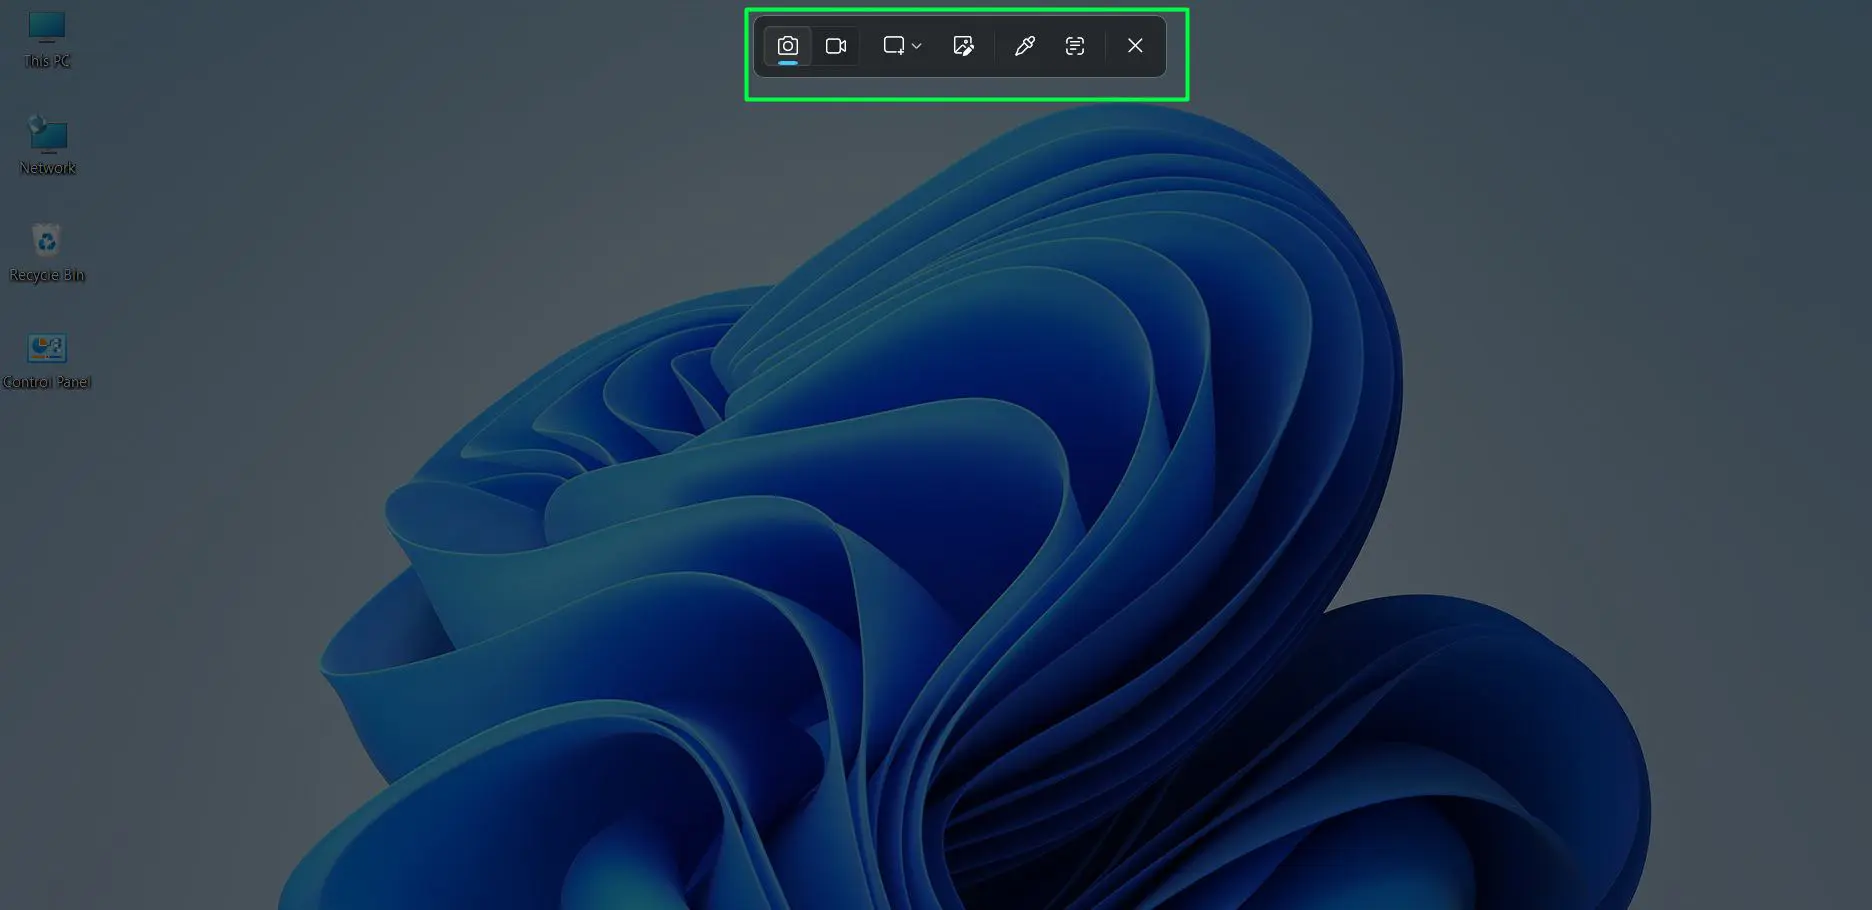
- Press ‘Windows Key + Shift + S’ simultaneously

- The screen dims and a toolbar appears at the top
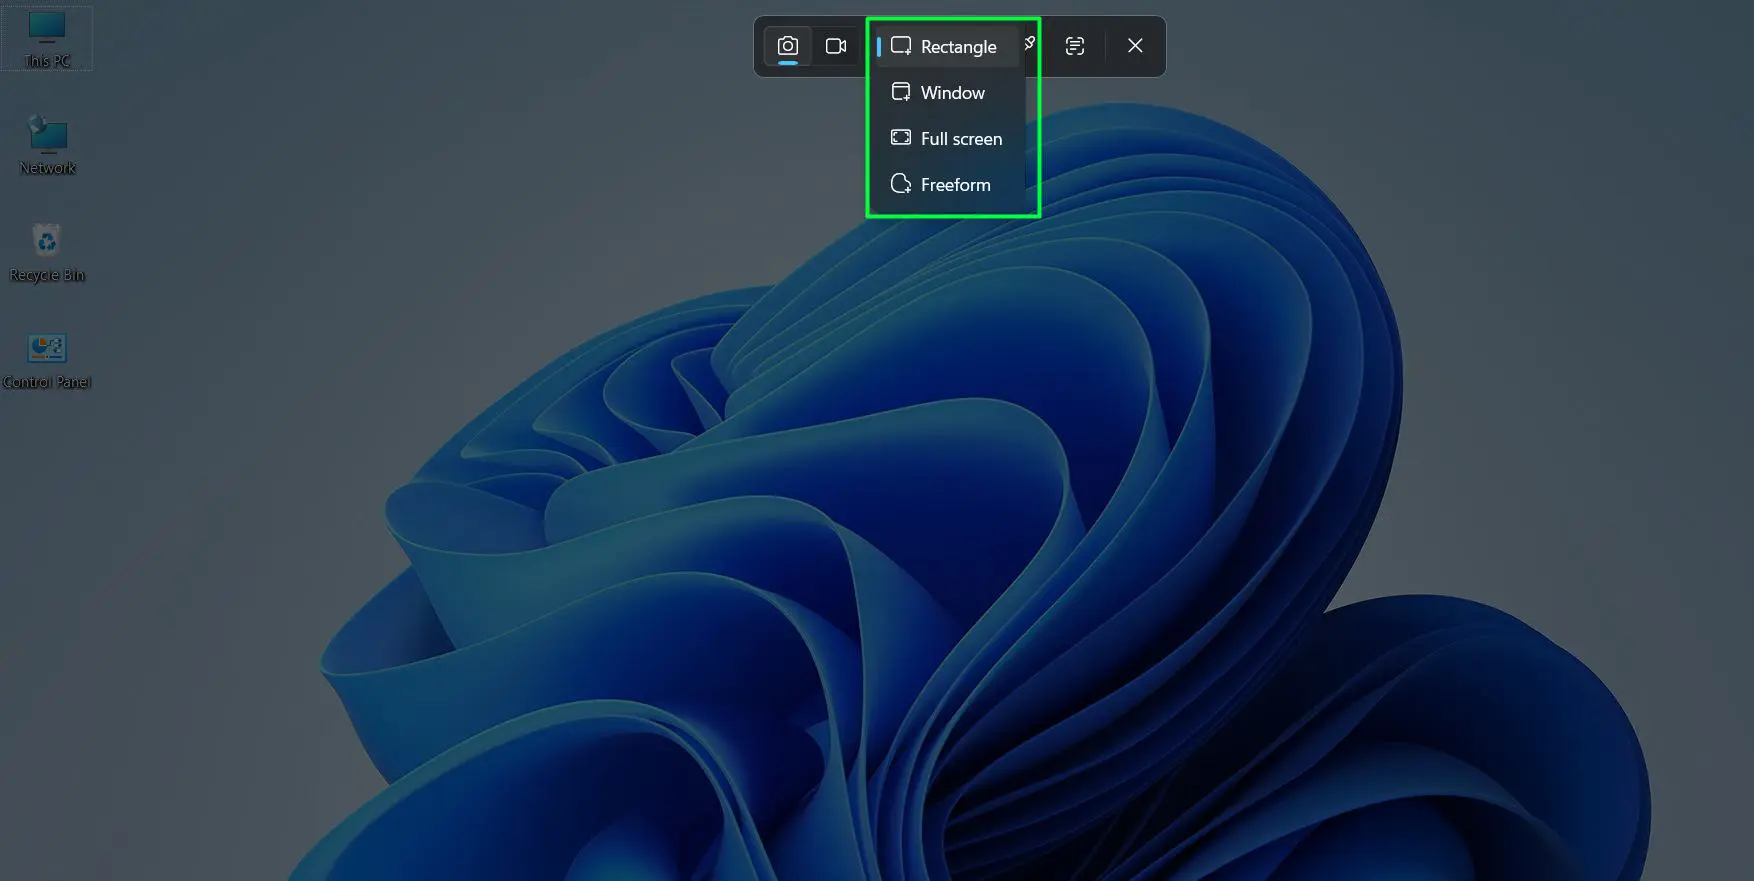
- Choose from rectangular, freeform, window, or fullscreen options
- Select the desired area or window to capture
- The screenshot copies automatically to the clipboard and automatically saved
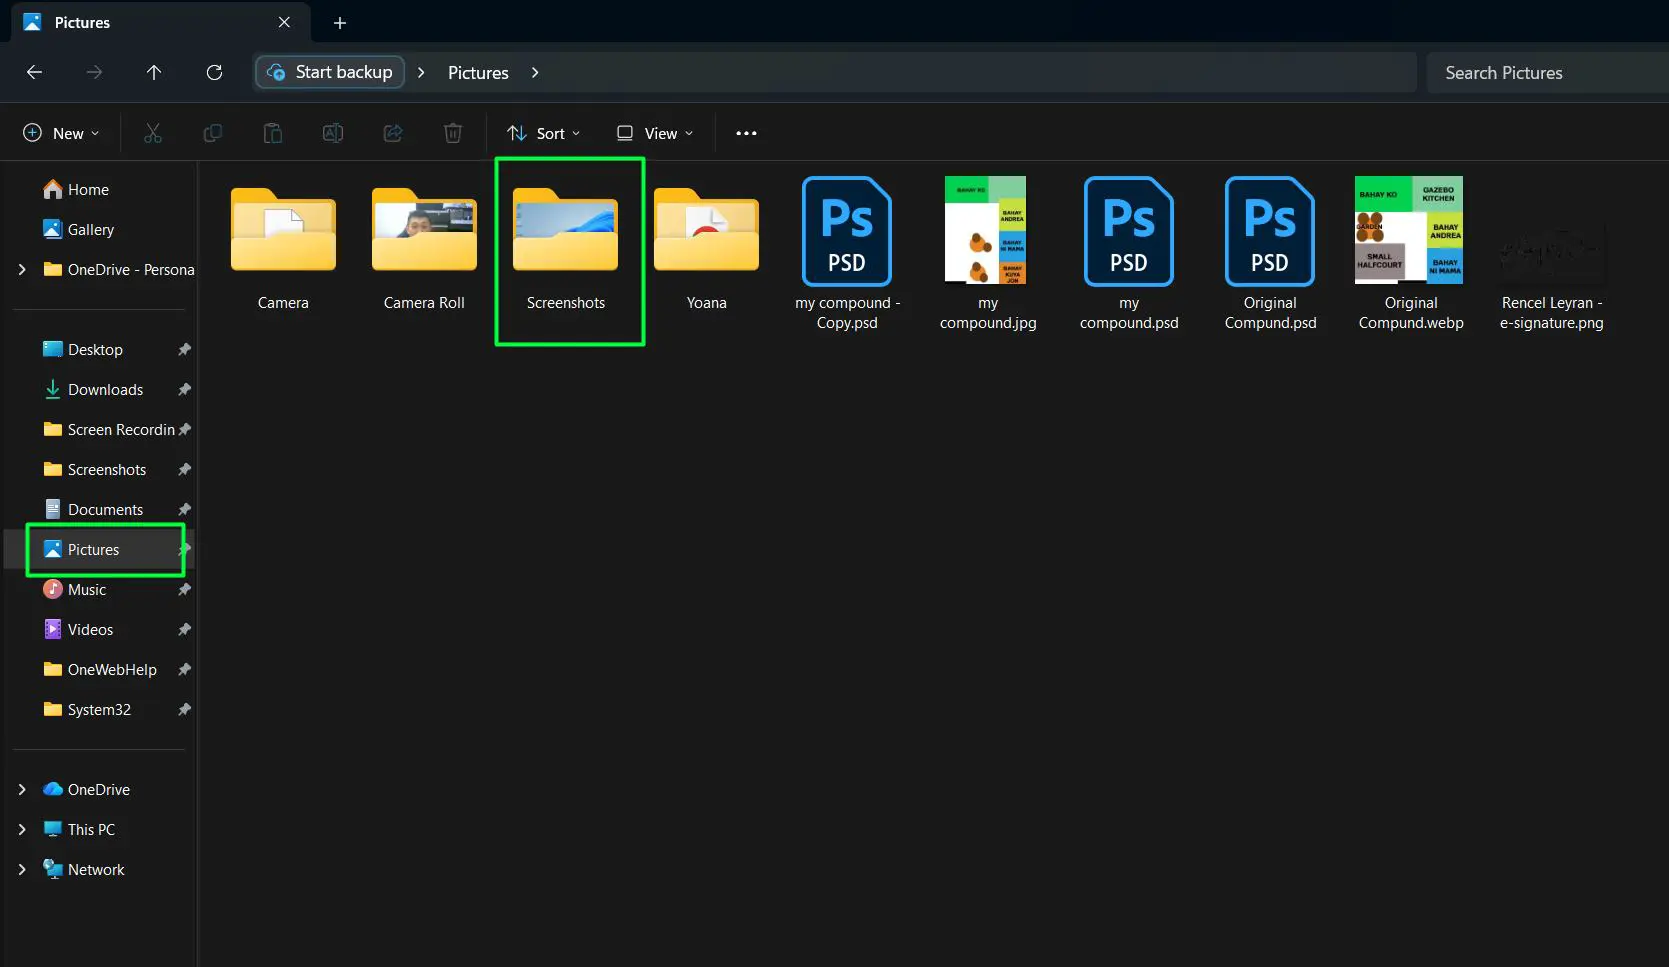
- Open File Manager, select Pictures, then open the Screenshots folder to find your screenshot.
- Or you can Press ‘Ctrl + V’ to paste the screenshot to an image editor, document, or email
The beauty of this shortcut lies in its versatility. Rather than committing to one capture type, the toolbar presents all available options simultaneously. This flexibility means users can decide on the capture method after triggering the shortcut, adapting to the specific content being captured. The notification that appears after capturing provides quick access to editing tools, allowing for immediate annotations or adjustments before sharing.
Auto-Save Screenshot to Files
Automatically saving screenshots directly to a folder saves time and keeps the clipboard free for other tasks. This method eliminates the need to paste and manually save each capture.
- Press ‘Windows Key + PrtScn’ together
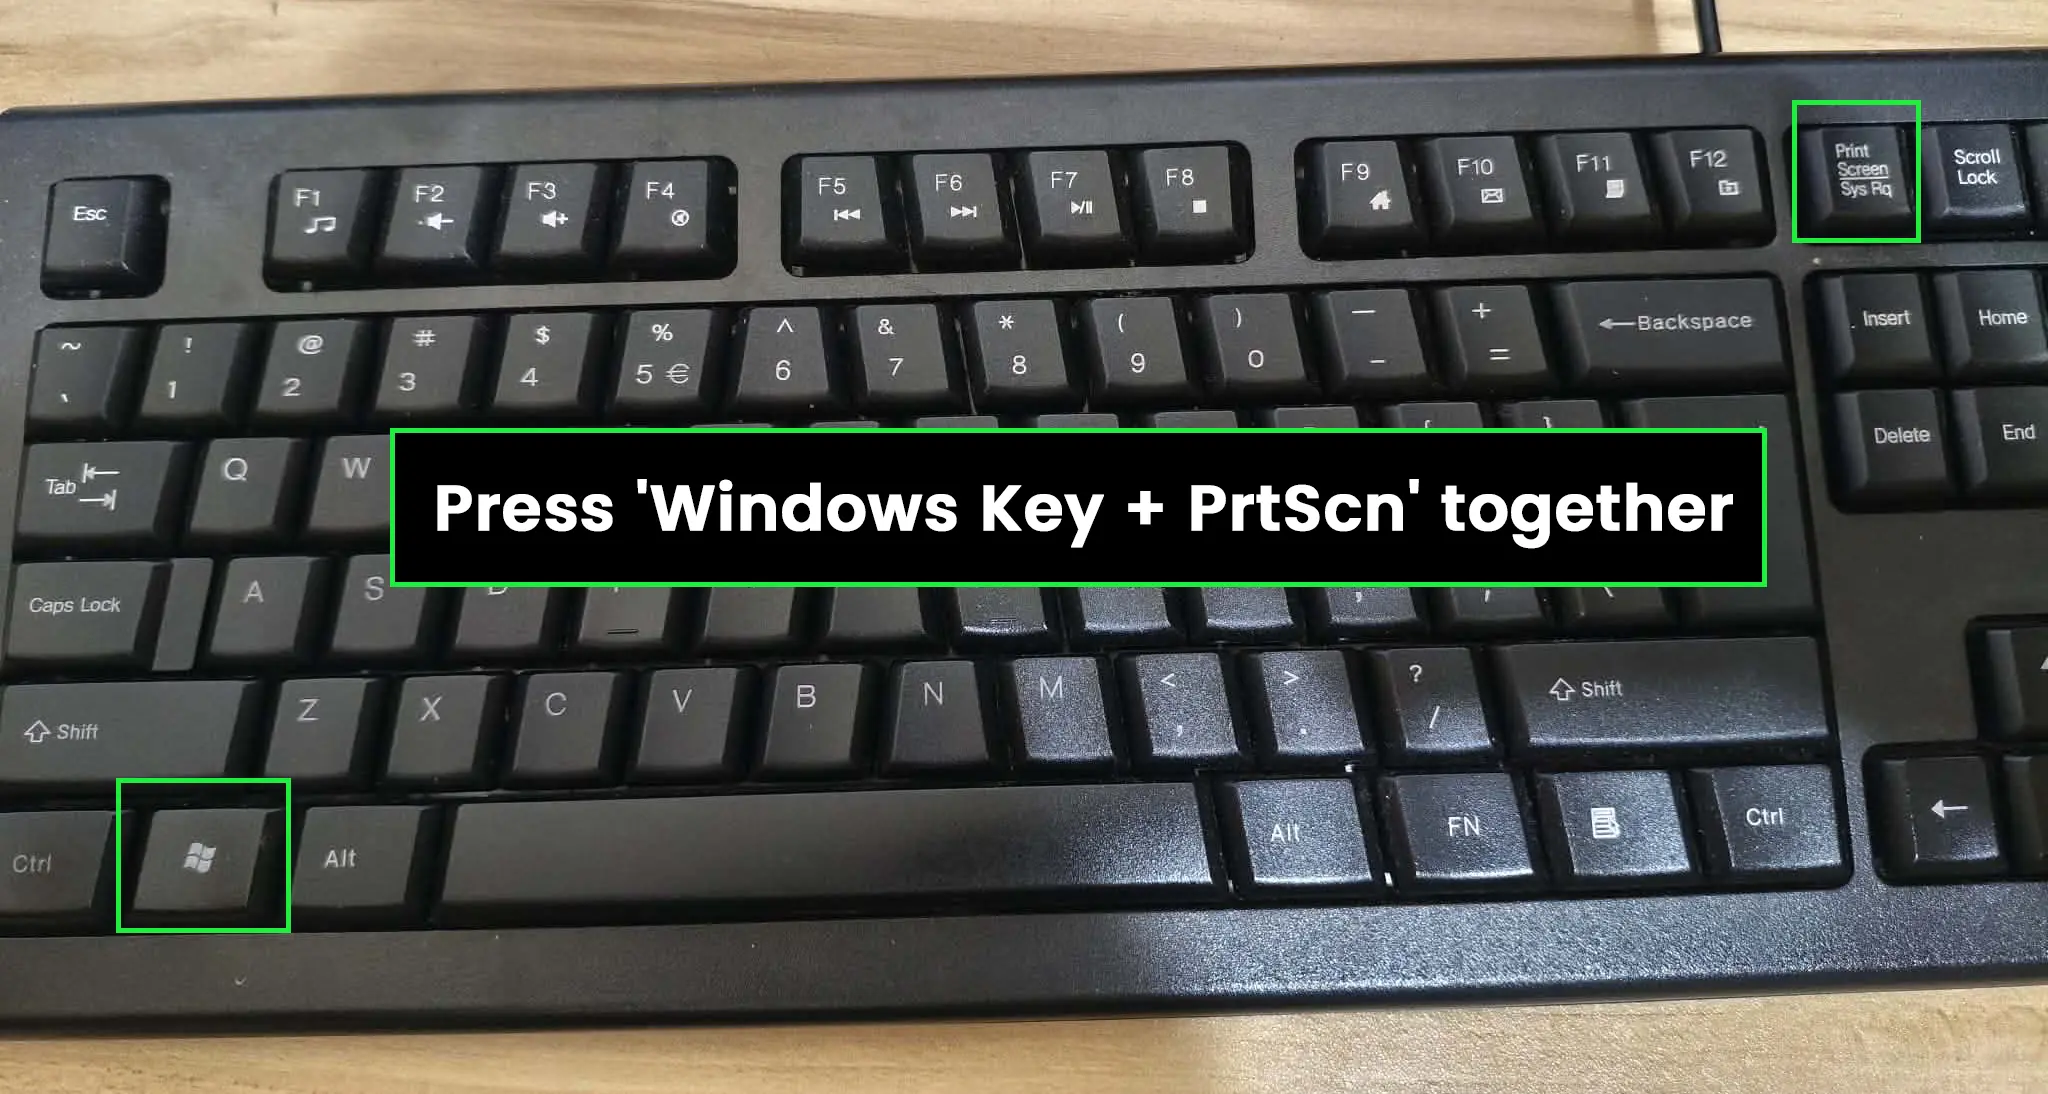
- The screen briefly dims to confirm the capture
- Navigate to ‘This PC > Pictures > Screenshots’ folder
- Find the automatically saved screenshot file
The automatic saving feature proves invaluable when taking multiple screenshots for documentation or tutorial creation. Each screenshot receives a sequential filename with a timestamp, preventing overwrites and maintaining a clear chronological order. This organization makes it easier to locate specific captures later, especially when working on projects that require numerous screenshots over time.
Snipping Tool for Precise Screenshots
The Snipping Tool offers more control than keyboard shortcuts, allowing users to select specific screen areas, add annotations, and choose capture modes. This works best when precision and editing matter.
Windows 11 has modernized the Snipping Tool with a cleaner interface and enhanced functionality. The tool now integrates seamlessly with the operating system, providing professional-grade screenshot capabilities without requiring third-party applications. This integration ensures consistent performance and compatibility across all Windows 11 systems.
Opening the Snipping Tool
Several methods provide quick access to this versatile screenshot utility built into Windows 11. The multiple access points ensure users can launch the tool regardless of their current workflow or preference.
- Press ‘Windows Key + Shift + S’ for instant access
- Click the Start button and type ‘Snipping Tool’
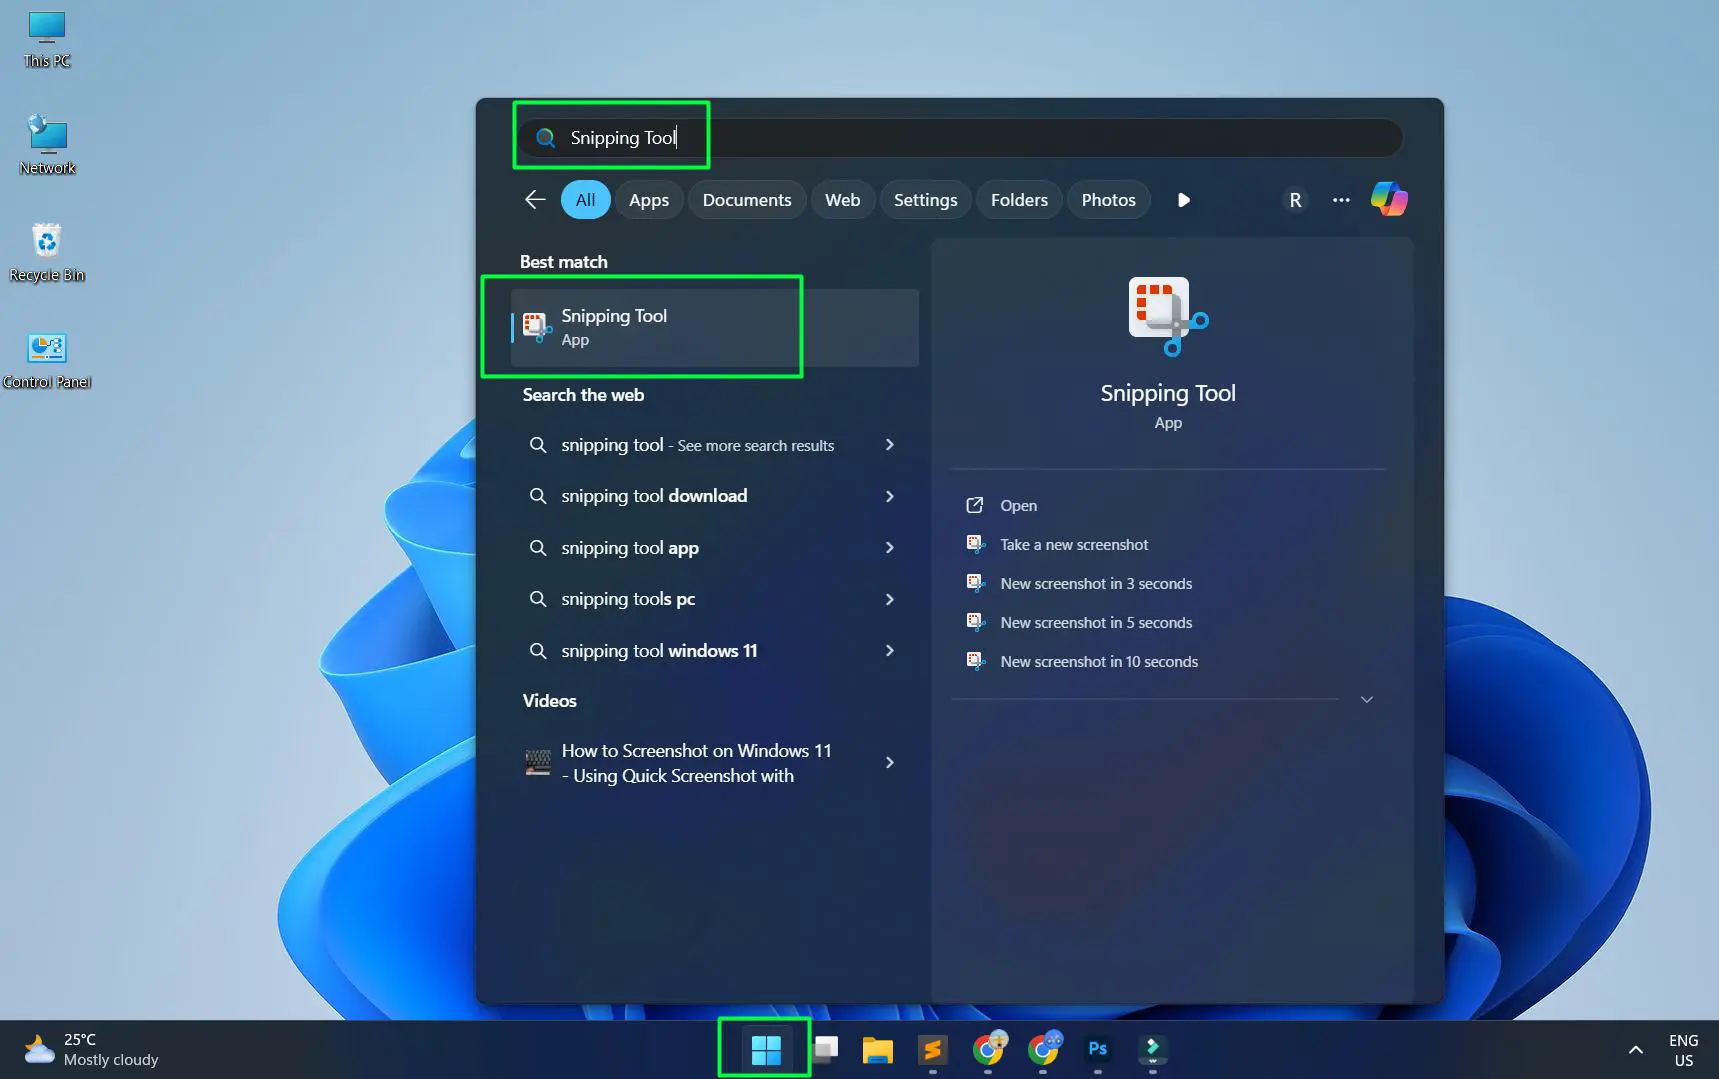
- Select the Snipping Tool from search results
- Pin it to the taskbar for easier future access
Pinning the Snipping Tool to the taskbar creates a permanent, visible shortcut that requires just a single click. This approach benefits users who take frequent screenshots as part of their daily workflow, eliminating the need to remember keyboard shortcuts or search for the application repeatedly.
Rectangular Snip Mode
Rectangular snips capture custom-sized areas, perfect for grabbing specific portions of the screen without extra content. This mode represents the most commonly used screenshot type, offering precision without complexity.
- Open the Snipping Tool using ‘Windows Key + Shift + S’
- The screen dims and a toolbar appears at the top
- Click the rectangular snip icon (first option)
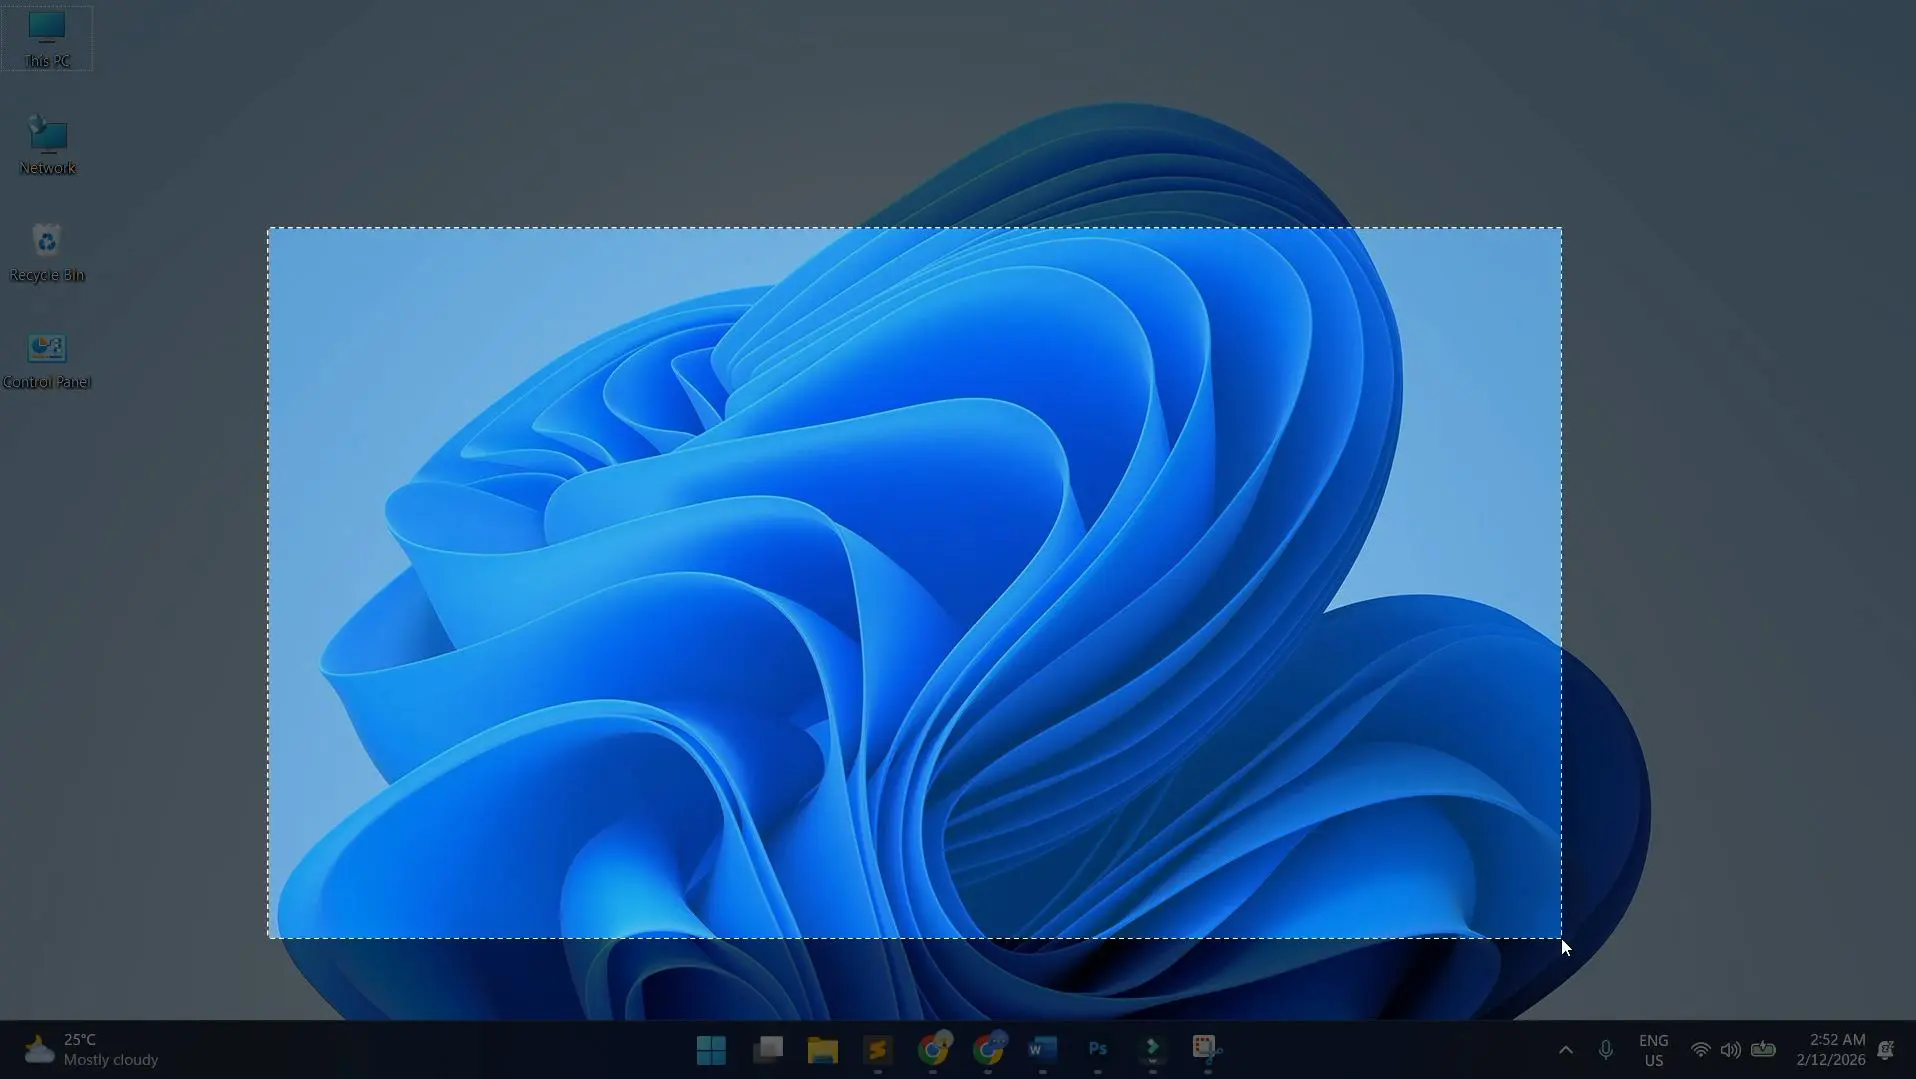
- Click and drag to select the desired area
- Release the mouse to capture the selection
- The screenshot appears in the Snipping Tool window
Rectangular snips excel at capturing charts, graphs, specific paragraphs, or interface elements without including surrounding clutter. The visual feedback during selection shows exactly what will be captured, preventing mistakes and ensuring the first attempt succeeds. This immediate confirmation saves time compared to capturing, reviewing, and recapturing when the initial screenshot misses important details.
Freeform Snip Mode
Freeform snips allow drawing irregular shapes around the content to capture, useful for excluding unwanted screen elements. This advanced mode provides maximum flexibility for complex capture scenarios.
- Launch the Snipping Tool with the keyboard shortcut
- Click the third icon ‘Snipping Area’
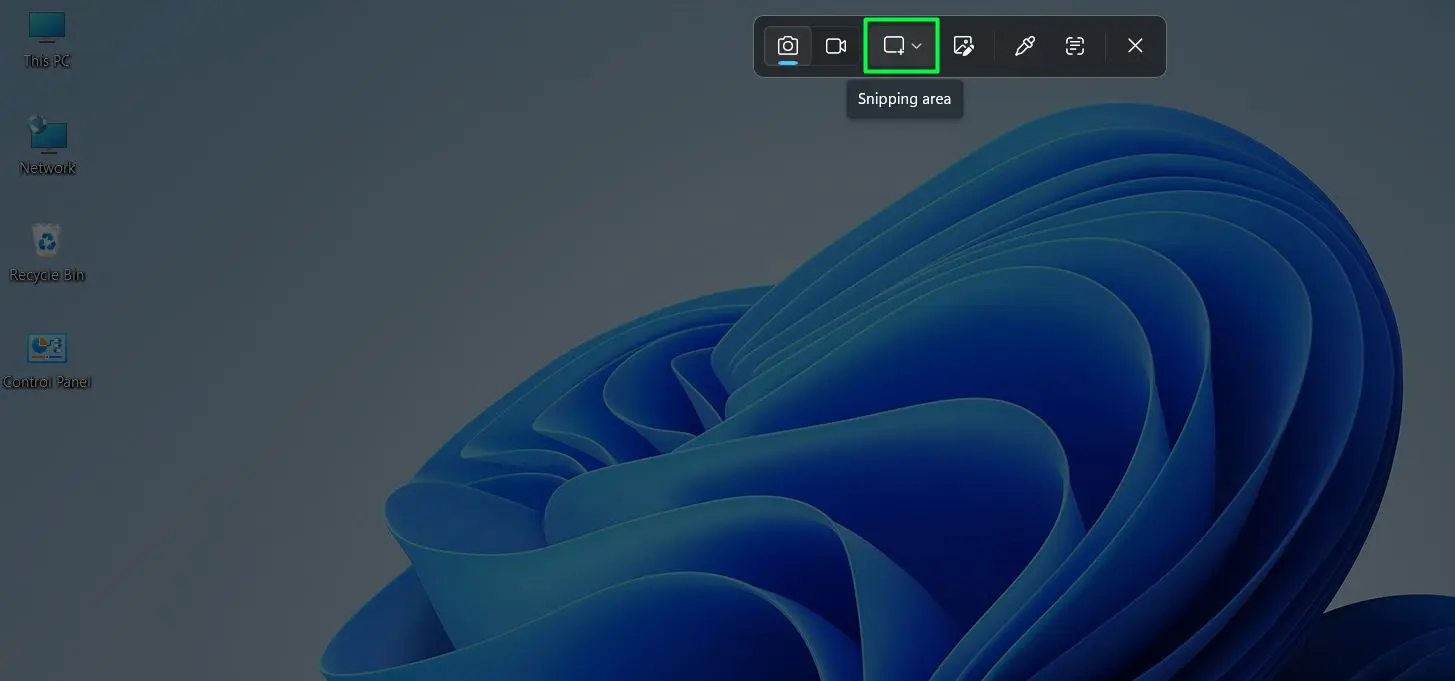
- Select ‘Freeform’
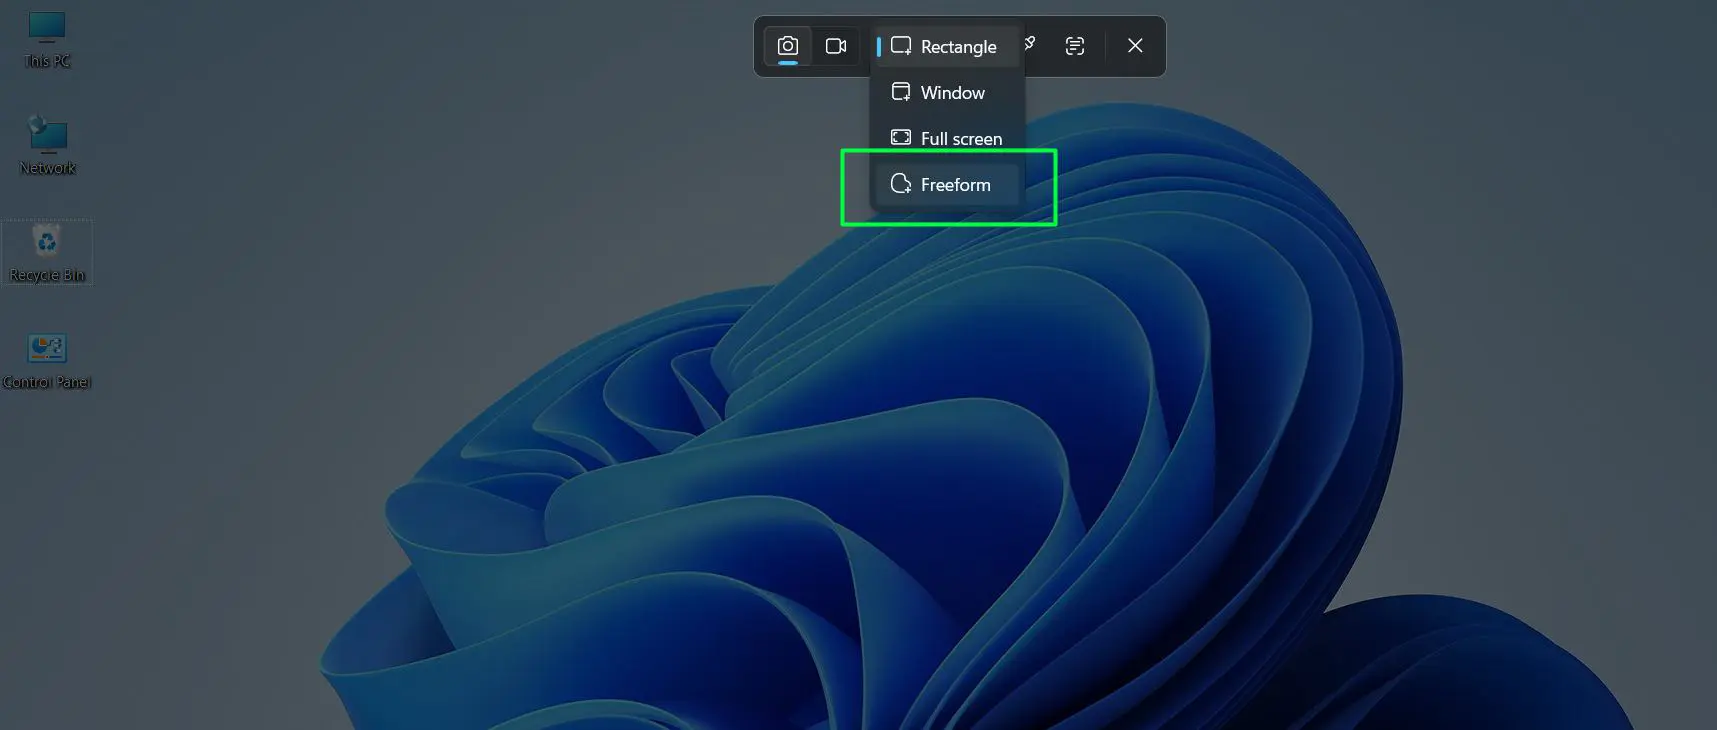
- Click and hold while drawing around the desired area
- Release to complete the capture
- Edit or save the screenshot as needed
The freeform option shines when capturing irregular shapes, circular elements, or content that does not fit neatly into rectangular boundaries. This proves particularly valuable when creating visual documentation that needs to highlight specific non-rectangular interface elements or when excluding sensitive information that appears adjacent to the desired content.
Window Snip Mode
Window snip automatically captures individual windows with clean edges, perfect for documenting specific applications without background clutter. This intelligent mode recognizes window boundaries and captures them precisely.
- Activate the Snipping Tool with ‘Windows Key + Shift + S’
- Click the third icon ‘Snipping Area’
- Select ‘Window’
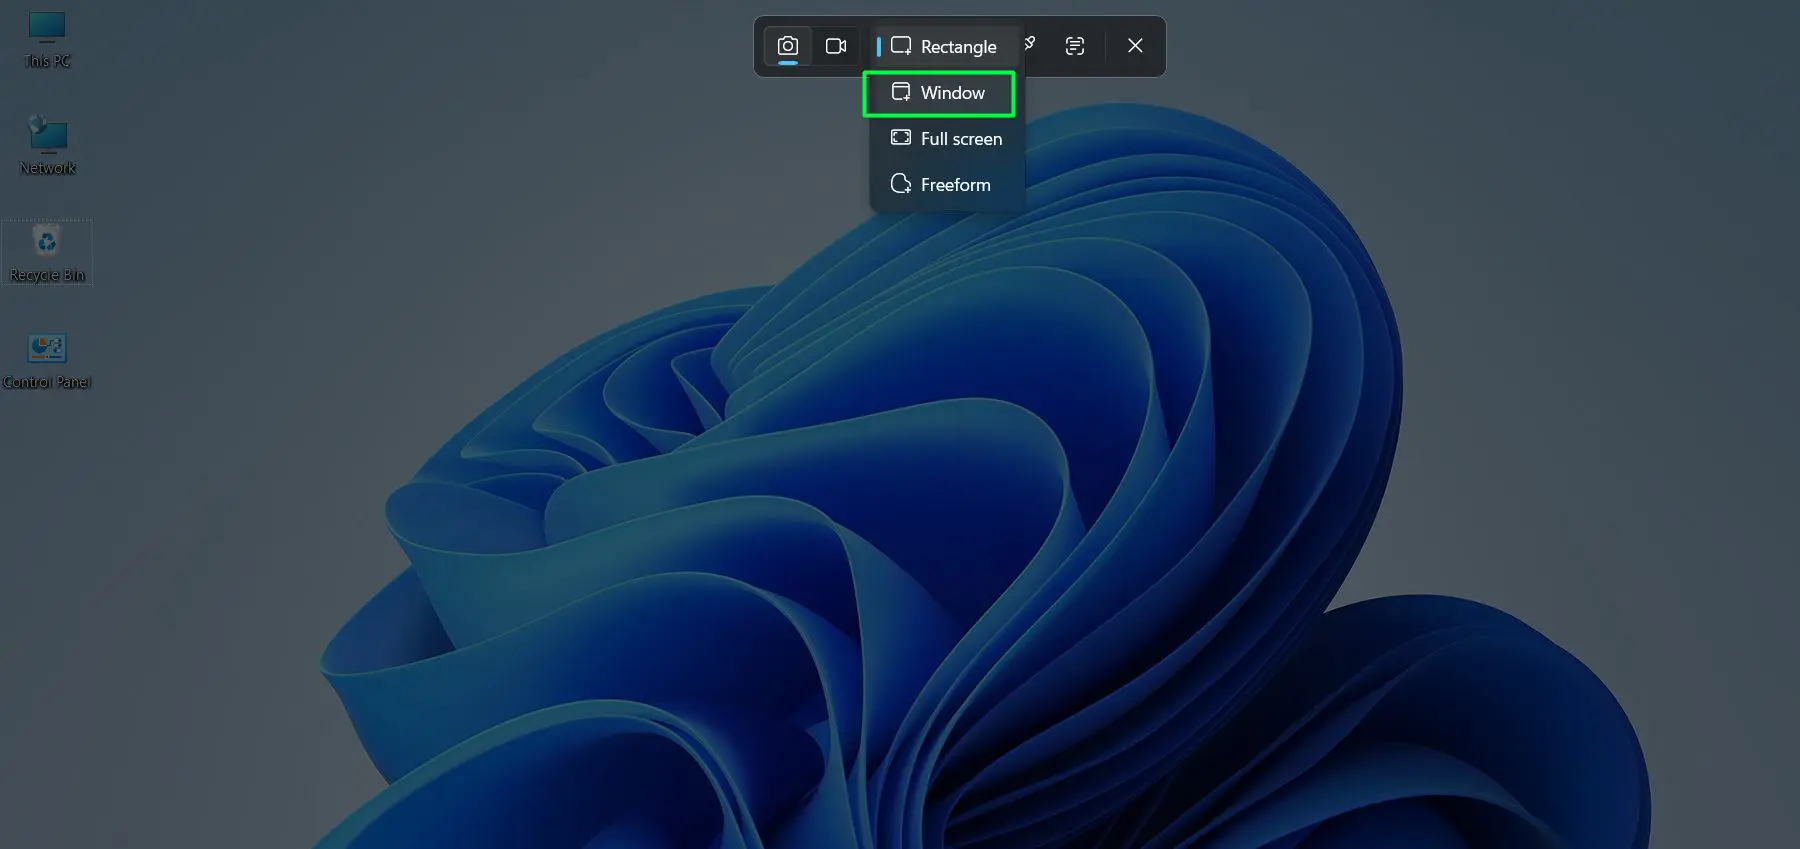
- The selected window appears in the editor
Window snip eliminates the need for cropping or editing out desktop backgrounds and other windows. The tool automatically detects window boundaries, including those with rounded corners or transparent effects, ensuring clean, professional screenshots every time. This feature works equally well with full-screen applications, floating windows, and dialog boxes.
Fullscreen Snip Mode
Fullscreen snip captures everything visible across all monitors, then opens it in the Snipping Tool for immediate editing. This mode provides the benefits of full-screen capture with the editing capabilities of the Snipping Tool.
- Open the Snipping Tool
- Click the third icon ‘Snipping Area’
- Select ‘Fullscreen’
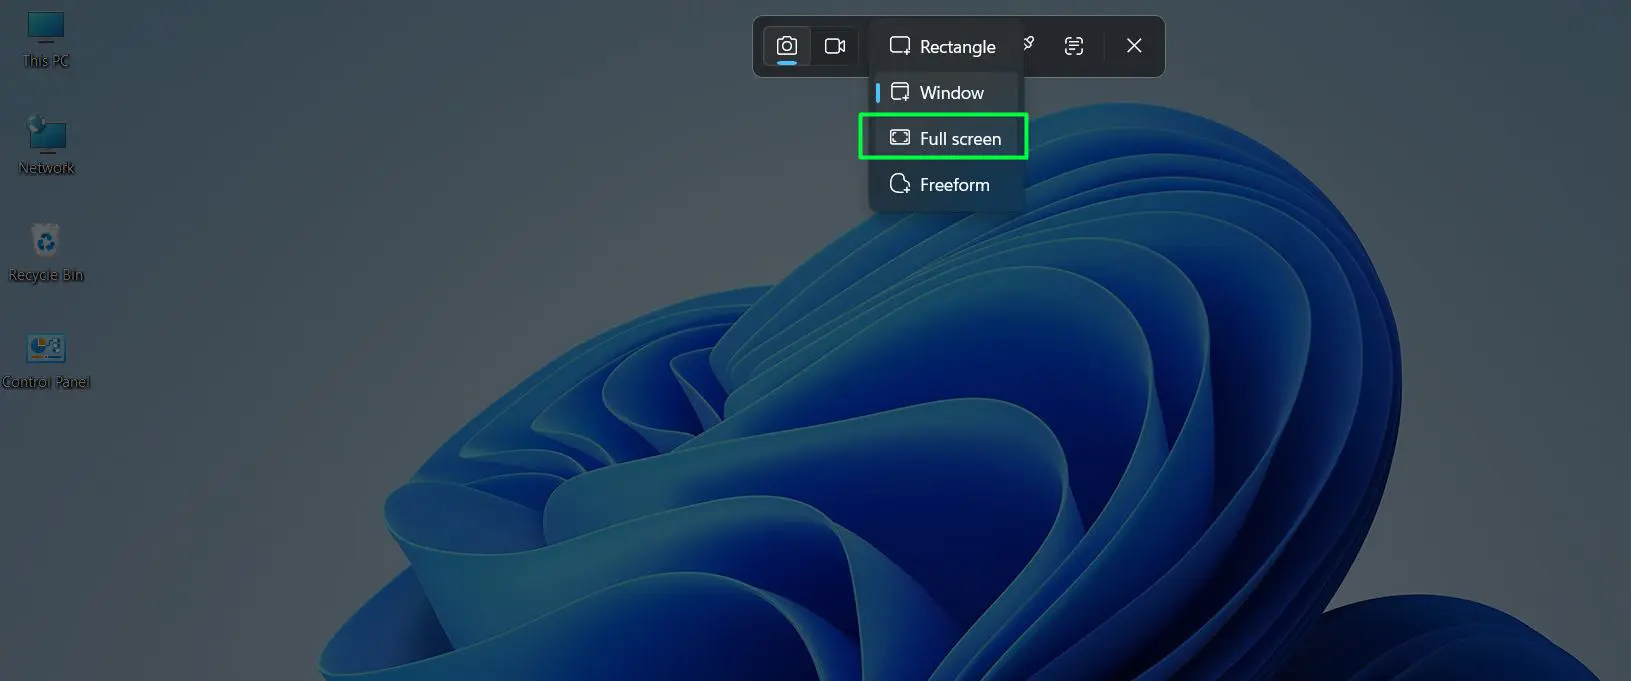
- The entire screen captures instantly
- Make edits or save directly from the tool
For users with multiple monitors, fullscreen snip captures all displays as a single wide image. This proves useful when documenting multi-monitor setups or capturing panoramic views of complex workflows that span multiple screens. The captured image opens immediately in the editor, allowing for quick annotations or highlights before sharing.
Pro-Tip: The Snipping Tool includes a delay timer (3 or 10 seconds) accessible from its settings. This feature proves invaluable when capturing dropdown menus, tooltips, or other elements that disappear when clicking away. Set the delay, trigger the menu or tooltip, and let the tool capture it automatically.
Xbox Game Bar for Gaming Screenshots
The Xbox Game Bar captures screenshots during gameplay or while using any application, originally designed for gamers but useful for everyone. This overlay tool provides additional functionality beyond simple screenshots.
- Press ‘Windows Key + G’ to open the Game Bar
- Click the camera icon in the capture widget
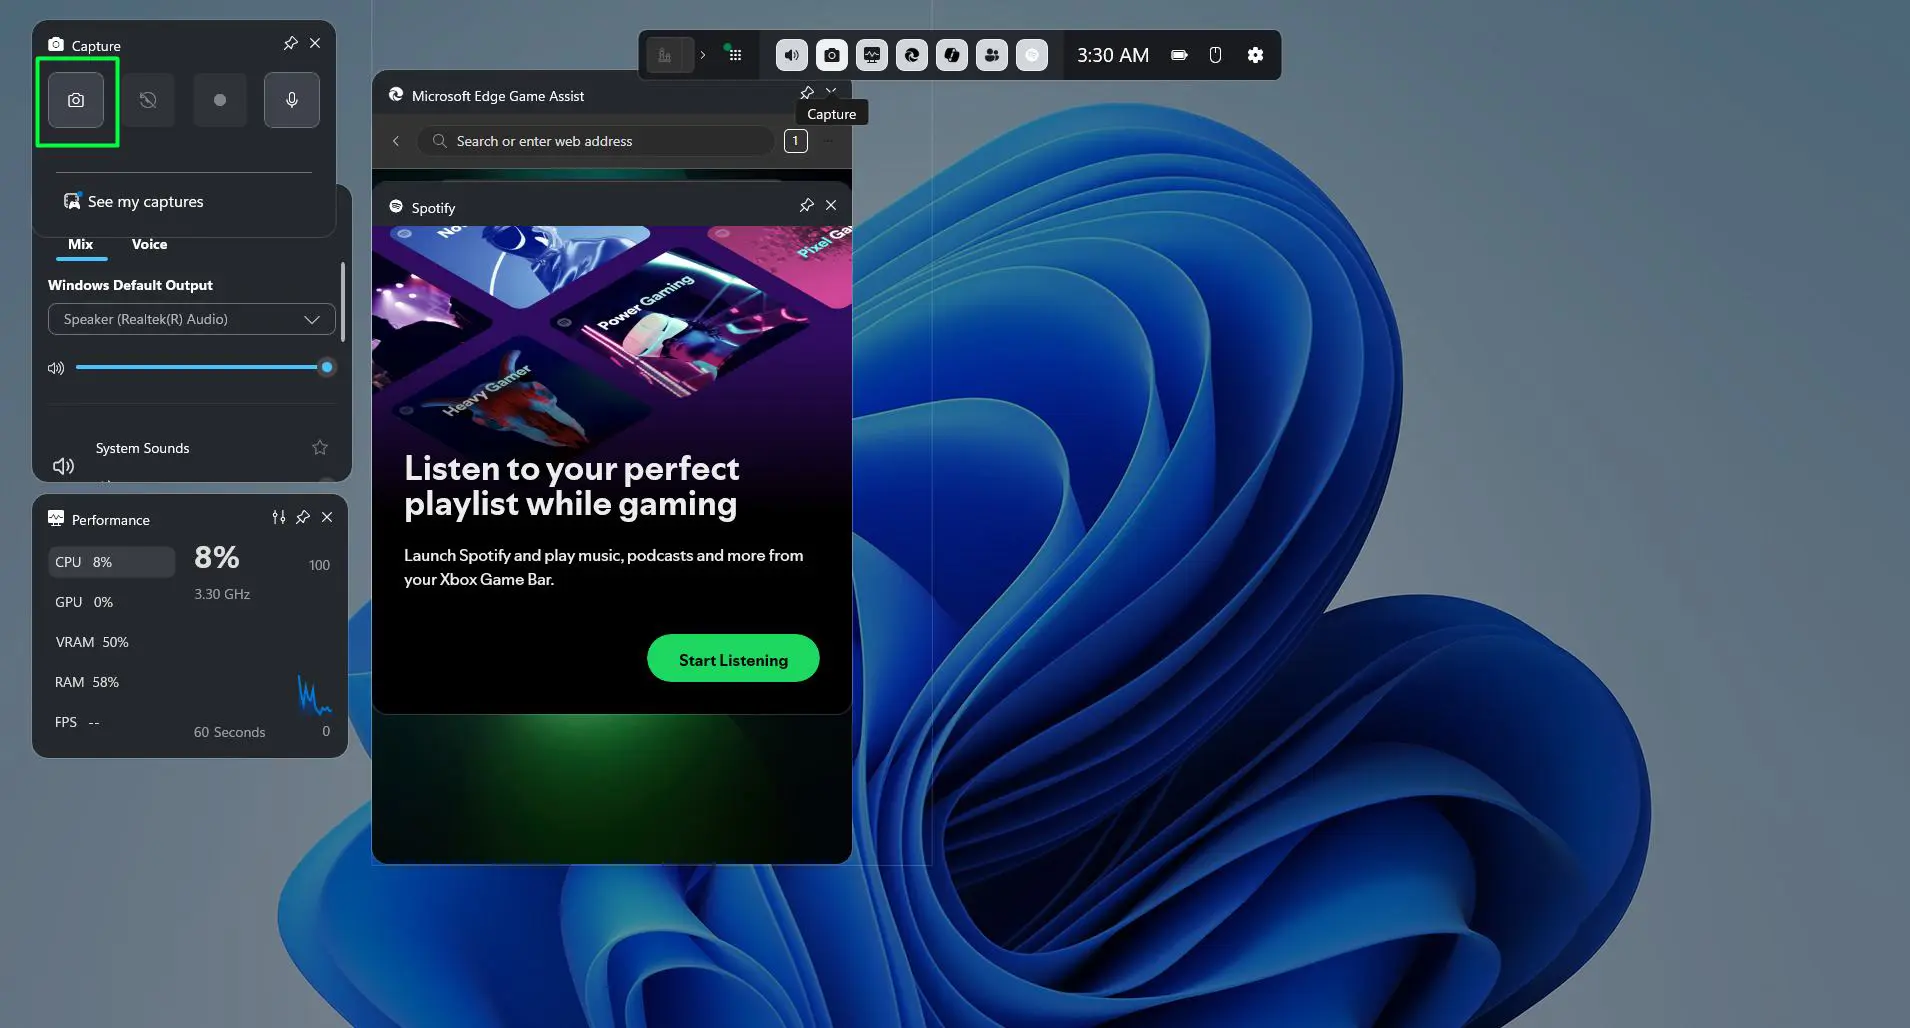
- Alternatively, press ‘Windows Key + Alt + PrtScn’ directly
- Find saved screenshots in ‘This PC > Videos > Captures’
This works best when recording gaming sessions or capturing full-screen applications where other methods might interfere with the experience. The Game Bar operates as an overlay, meaning it does not minimize or interrupt the active application. This non-intrusive approach makes it ideal for capturing moments during live streams, video calls, or any scenario where switching windows would disrupt the workflow.
The Game Bar also includes performance monitoring widgets, audio controls, and screen recording capabilities, making it a comprehensive tool for content creators and gamers. Screenshots taken through the Game Bar automatically include metadata about the game or application, helping organize large collections of captures.
Editing and Saving Your Screenshots
After capturing a screenshot, Windows 11 provides several options for editing and saving the image in various formats. These built-in editing capabilities reduce the need for external software in many common scenarios.
Using Snipping Tool Editor
The built-in editor offers basic annotation tools without requiring additional software. These tools cover most common editing needs for screenshots.
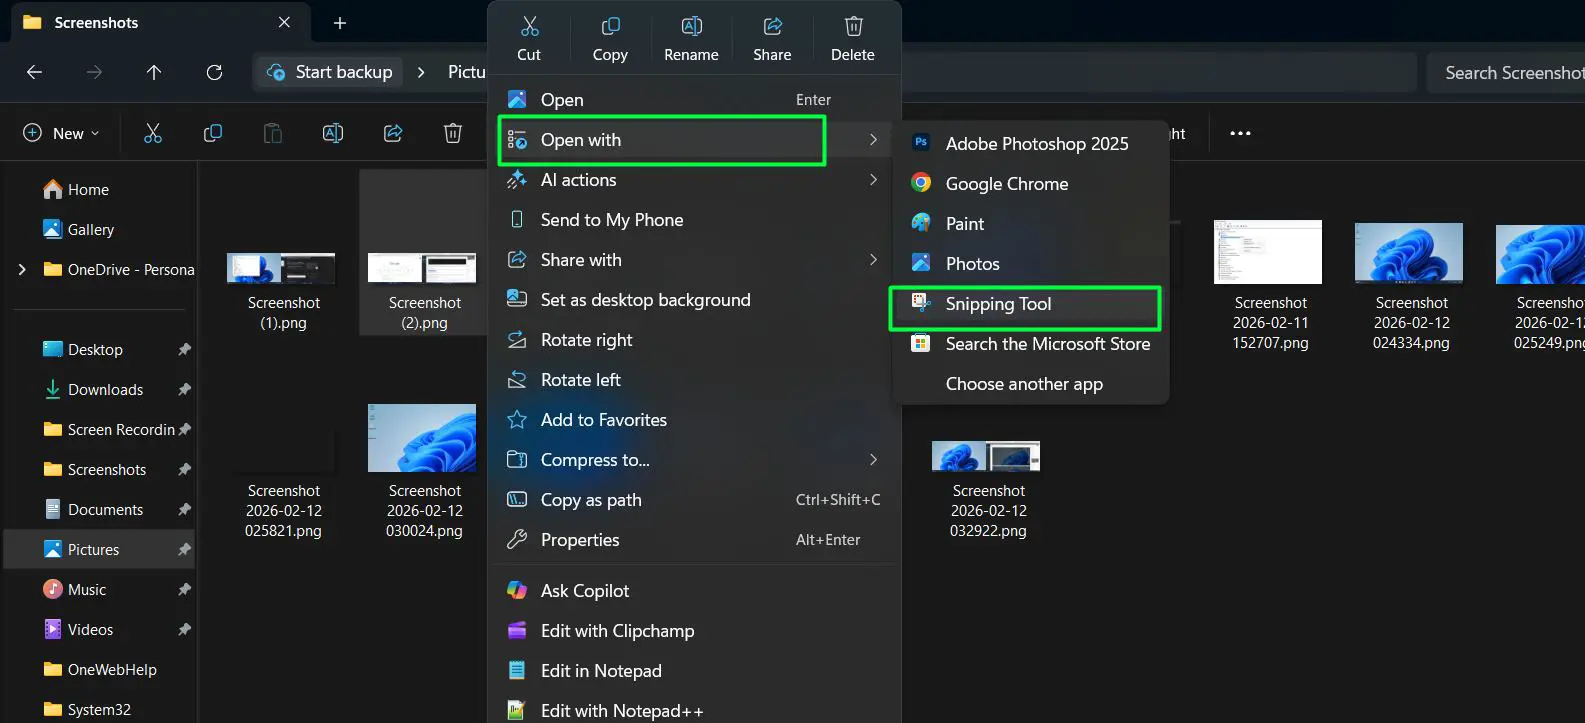
- Right click the captured screenshot and select ‘Open With’ and choose ‘Snipping Tool’
- Use the pen tool to draw or highlight
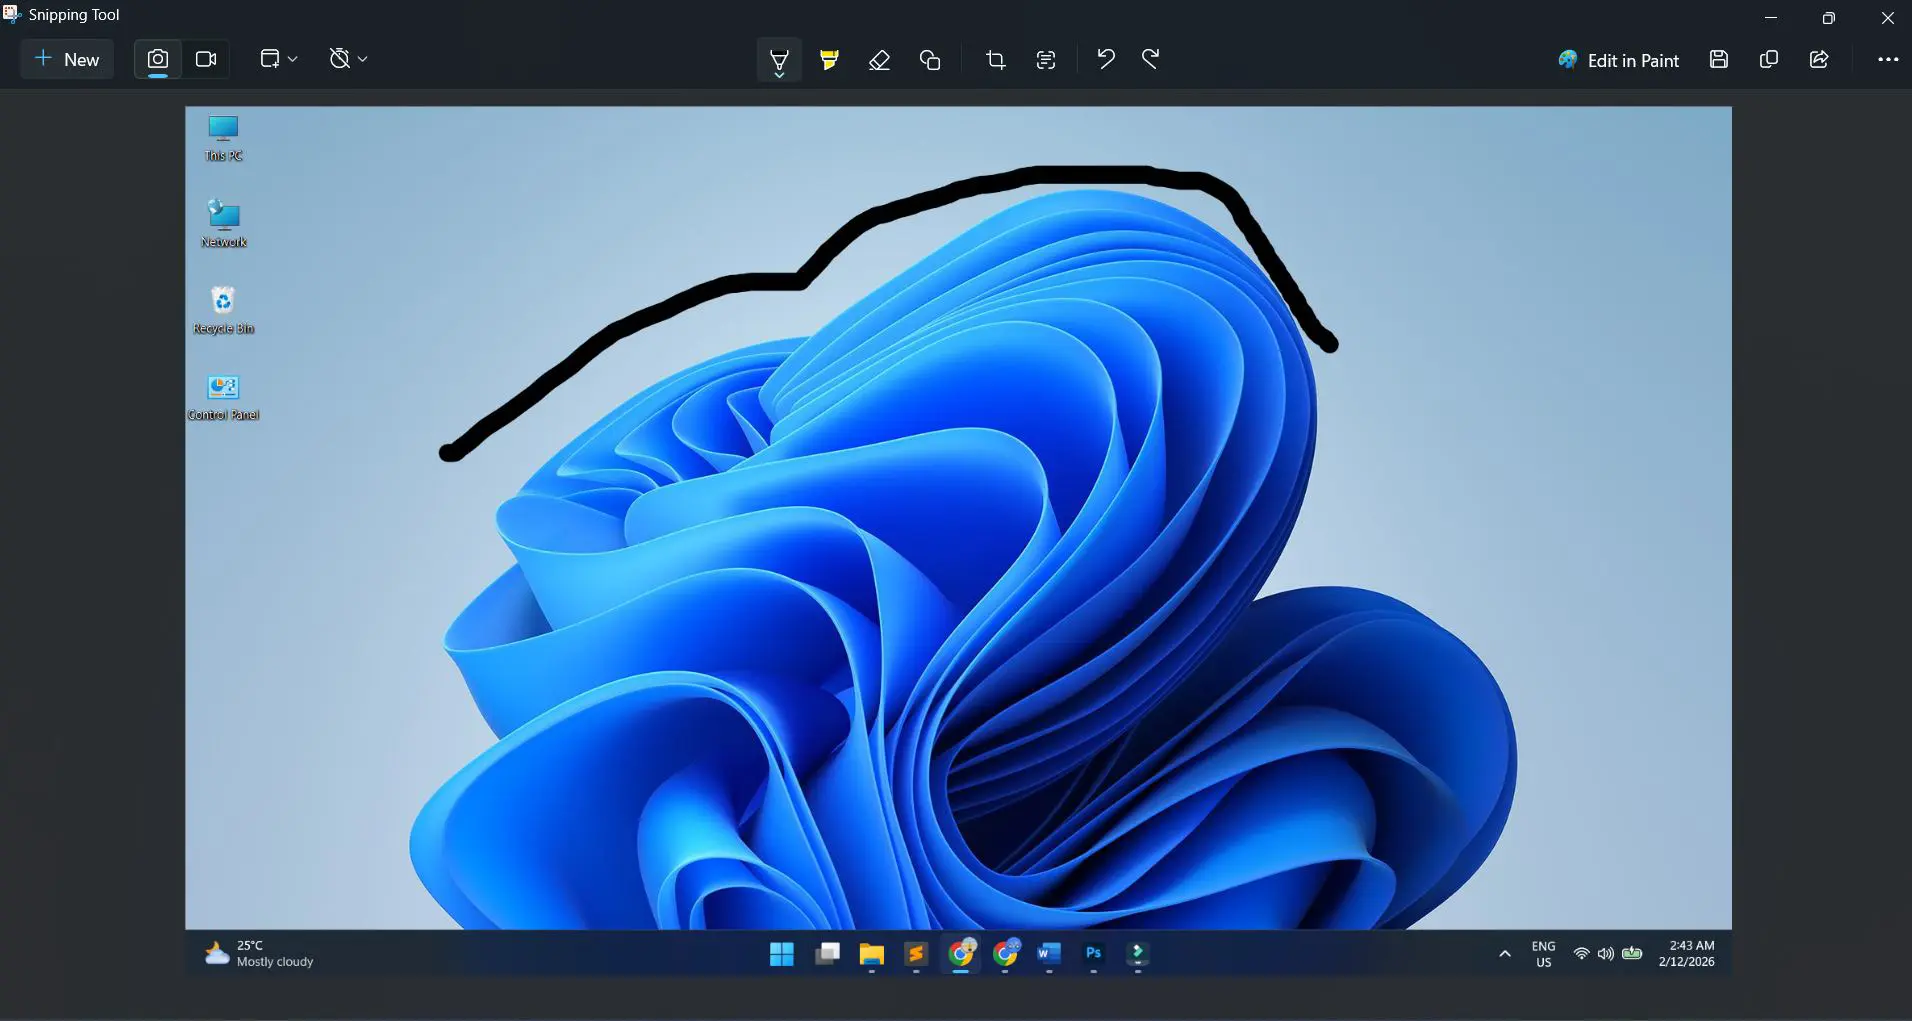
- Add text annotations with the text tool
- Crop the image using the crop function
- Click the save icon to store the file
The editor supports multiple pen colors and thicknesses, allowing for clear visual communication. Highlights draw attention to important elements, while arrows and shapes guide viewers through complex screenshots. The text tool accepts custom fonts and sizes, ensuring annotations remain legible at different display sizes.
Choosing File Formats
Different file formats serve different purposes. PNG maintains quality for sharing and editing, while JPG creates smaller files for email attachments. Understanding format differences helps optimize screenshots for their intended use.
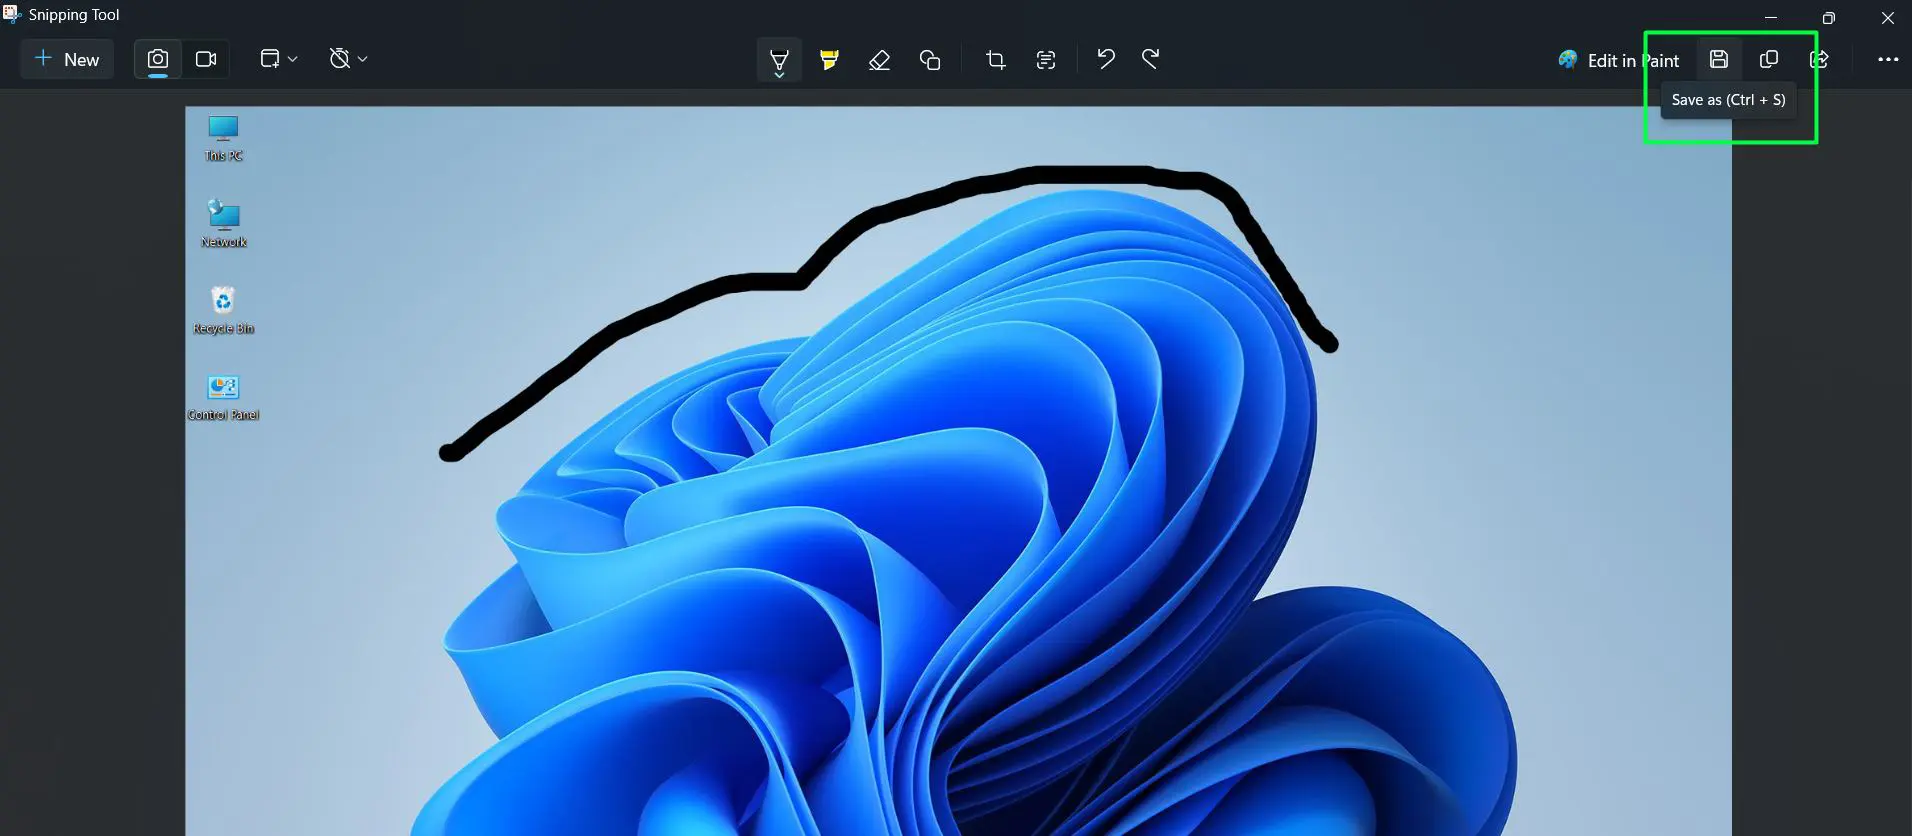
- Click ‘Save As’ icon in Snipping Tool located in top right corner of the screen
- Choose between PNG, JPG, or GIF formats
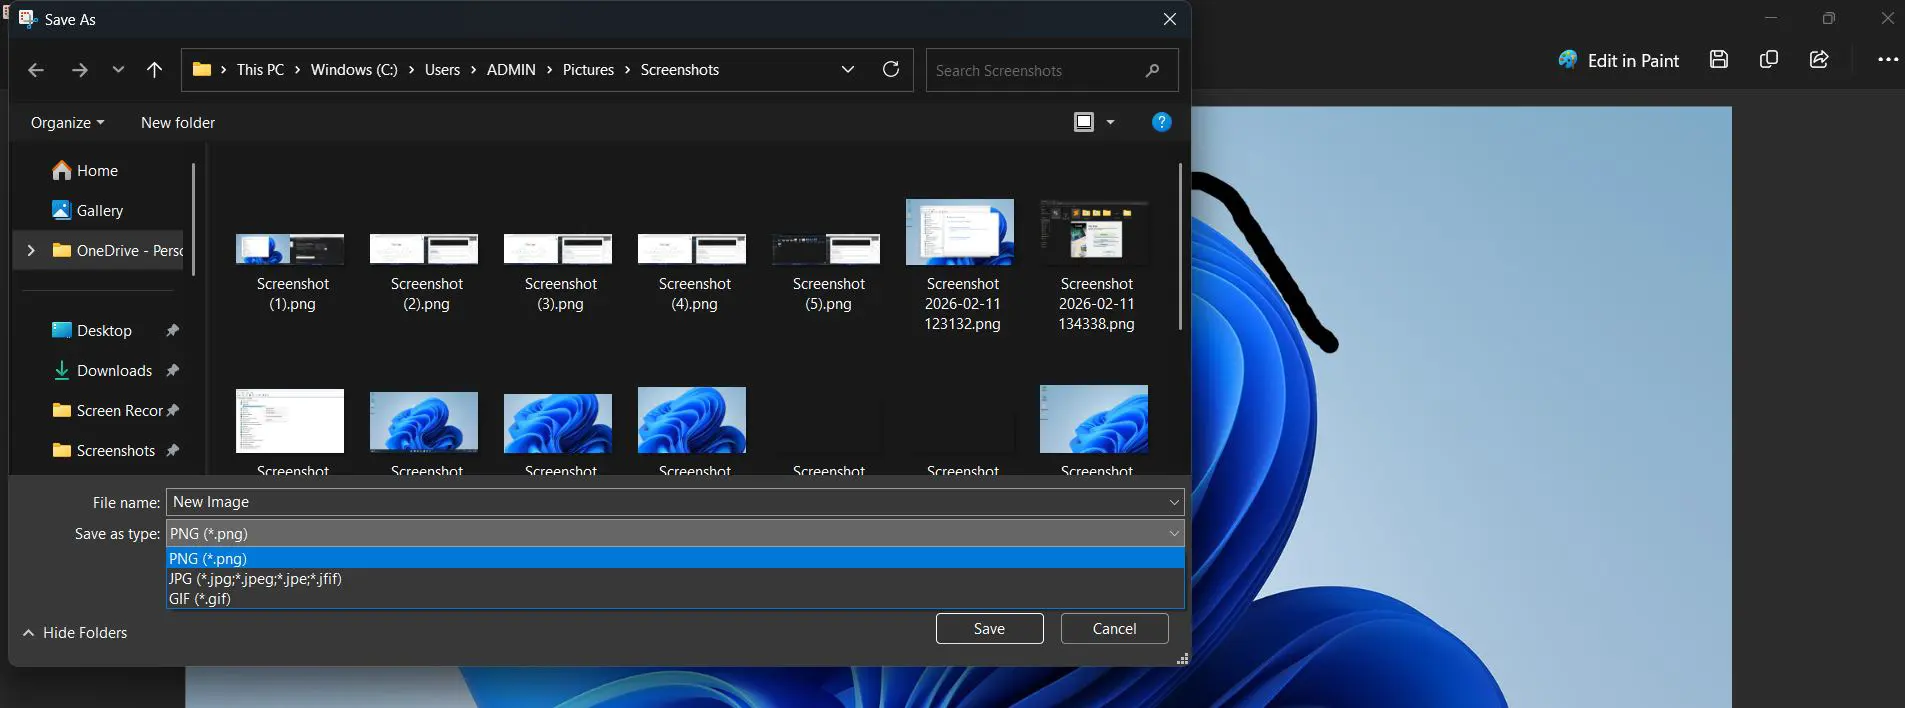
- Select the destination folder
- Name the file appropriately
- Click ‘Save’ to confirm
PNG files support transparency, making them ideal for screenshots that will be layered over other content or used in presentations. JPG compression reduces file size significantly, which matters when emailing multiple screenshots or uploading to websites with file size limits. GIF format works for simple animations or when compatibility with older systems is required.
Pro-Tip: PNG format preserves text clarity and sharp edges better than JPG, making it the superior choice for screenshots containing text, diagrams, or interface elements. JPG works better for photographs or images where file size matters more than perfect clarity.
Copying Screenshots to Clipboard
Sometimes pasting directly into documents or emails proves faster than saving files. This workflow eliminates intermediate steps when the screenshot serves an immediate purpose.
- After capturing with Snipping Tool, click the copy icon
- Open the destination application
- Press ‘Ctrl + V’ to paste
- The image appears instantly without creating a file
The clipboard approach works exceptionally well for collaborative work where screenshots need to be shared quickly through chat applications or inserted into shared documents. Since no file gets created, there are no storage concerns or file management overhead. The screenshot exists only where needed, streamlining the workflow considerably.
Advanced Screenshot Tips and Techniques
Mastering advanced techniques elevates screenshot quality and efficiency. These methods help create more professional documentation and solve common screenshot challenges.
Consider the lighting and color calibration of the display before taking screenshots for professional use. Monitors with incorrect color settings produce screenshots that look different on other devices. Adjusting brightness and contrast ensures screenshots appear consistent across various viewing platforms.
Organizing screenshots systematically prevents chaos when working with dozens or hundreds of images. Creating dedicated folders for different projects, using descriptive filenames, and adding dates helps locate specific screenshots months later. Some users develop naming conventions that include project codes, version numbers, or content descriptions.
When capturing sensitive information, remember that screenshots preserve everything visible on screen, including browser tabs, notification badges, and taskbar icons. Review each screenshot before sharing to ensure no confidential information appears inadvertently. The Snipping Tool editor provides cropping and obscuring tools to redact sensitive details when necessary.
Frequently Asked Questions
What is the fastest way to take a screenshot on Windows 11?
The fastest method is pressing ‘Windows Key + Shift + S’, which instantly opens the Snipping Tool overlay. This allows selecting the capture area immediately without launching a separate application. For full-screen captures, ‘Windows Key + PrtScn’ saves the screenshot automatically to the Pictures folder in one step.
Where do screenshots get saved on Windows 11?
Screenshots taken with ‘Windows Key + PrtScn’ save automatically to ‘This PC > Pictures > Screenshots’ folder. Xbox Game Bar screenshots save to ‘This PC > Videos > Captures’ folder. Snipping Tool screenshots require manual saving to a chosen location, unless copied directly to the clipboard.
Can screenshots be taken of a single monitor in a multi-monitor setup?
Yes, using the Snipping Tool with rectangular or fullscreen snip mode allows capturing individual monitors. Simply select only the desired monitor area when choosing the capture region. The ‘Windows Key + PrtScn’ method captures all monitors simultaneously as one wide image.
How do screenshots capture dropdown menus or tooltips?
Use the Snipping Tool’s delay timer feature found in its settings. Set a 3 or 10-second delay, start the capture, then quickly trigger the dropdown menu or tooltip. The tool captures the screen automatically after the delay expires, preserving elements that would otherwise disappear.
What file format works best for screenshots?
PNG format provides the best quality for screenshots containing text, user interfaces, or sharp edges. JPG creates smaller files suitable for photographs or when file size matters more than perfect quality. The Snipping Tool supports both formats along with GIF for simple animations.
Can screenshots be edited after saving them?
Yes, saved screenshots can be reopened in the Snipping Tool or any image editing software for further modifications. Right-click the screenshot file, select ‘Open with’, and choose Snipping Tool or another editor. All editing features remain available regardless of when the screenshot was originally captured.