Before upgrading to Windows 11, the first thing to do is check if the device actually supports it. Microsoft has a strict list of hardware requirements, and skipping this step can leave the system stuck mid-upgrade or running an unsupported installation. This Windows 11 Compatibility Checker guide walks through exactly how to find each spec on a Windows 10 PC and what the results mean.
Quick Summary: Windows 11 Minimum Requirements
- Processor: 1 GHz or faster, 2 or more cores, on the compatible CPU list
- RAM: 4 GB minimum
- Storage: 64 GB minimum (SSD strongly recommended)
- Graphics Card: DirectX 12 compatible, WDDM 2.0 driver
- TPM: Version 2.0 required
- Firmware: UEFI, Secure Boot capable
- Display: 720p or higher, at least 9 inches diagonal
Where to Find All Your PC Specs in One Place
Before diving into individual checks, there is a single screen in Windows that shows all the key specs at once. This is the fastest starting point – no need to download anything or open multiple tools.
- Step 1: Click the Start button and open Settings (the gear icon).
- Step 2: Click on System in the left sidebar.
- Step 3: Scroll down and click About at the bottom of the System menu.
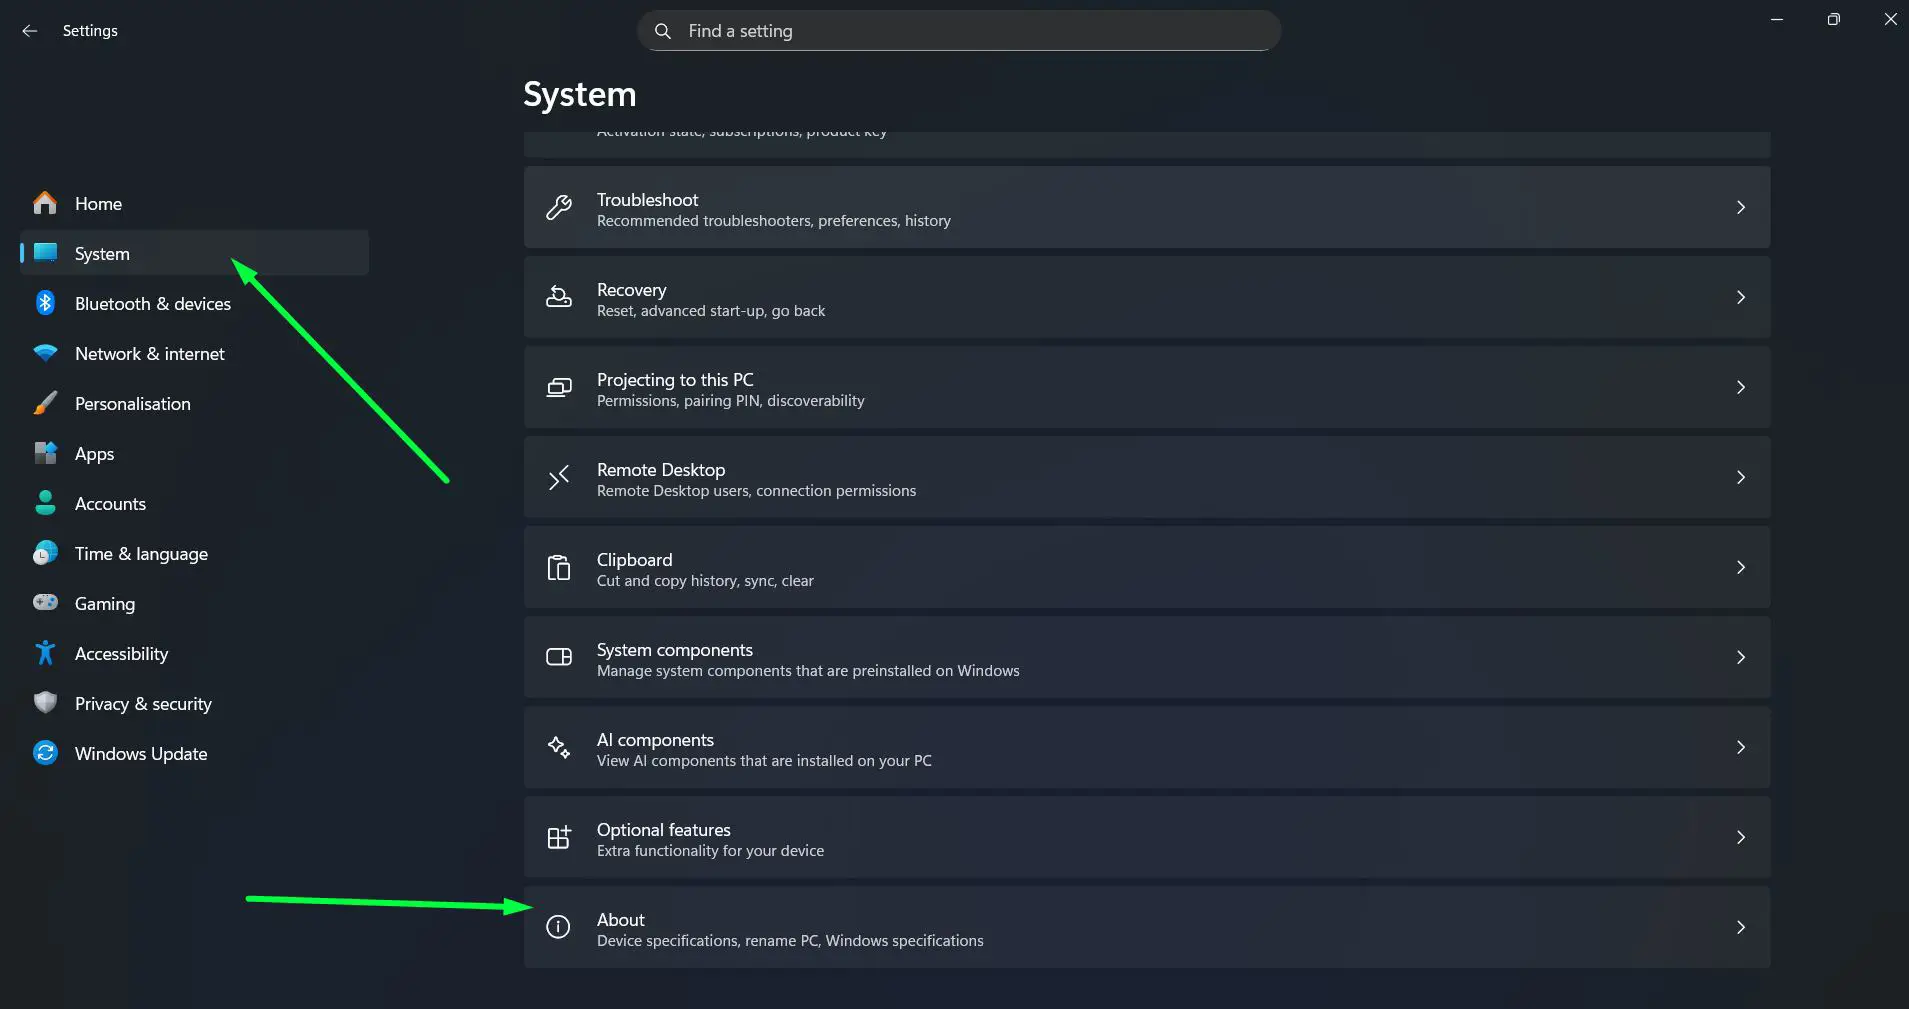
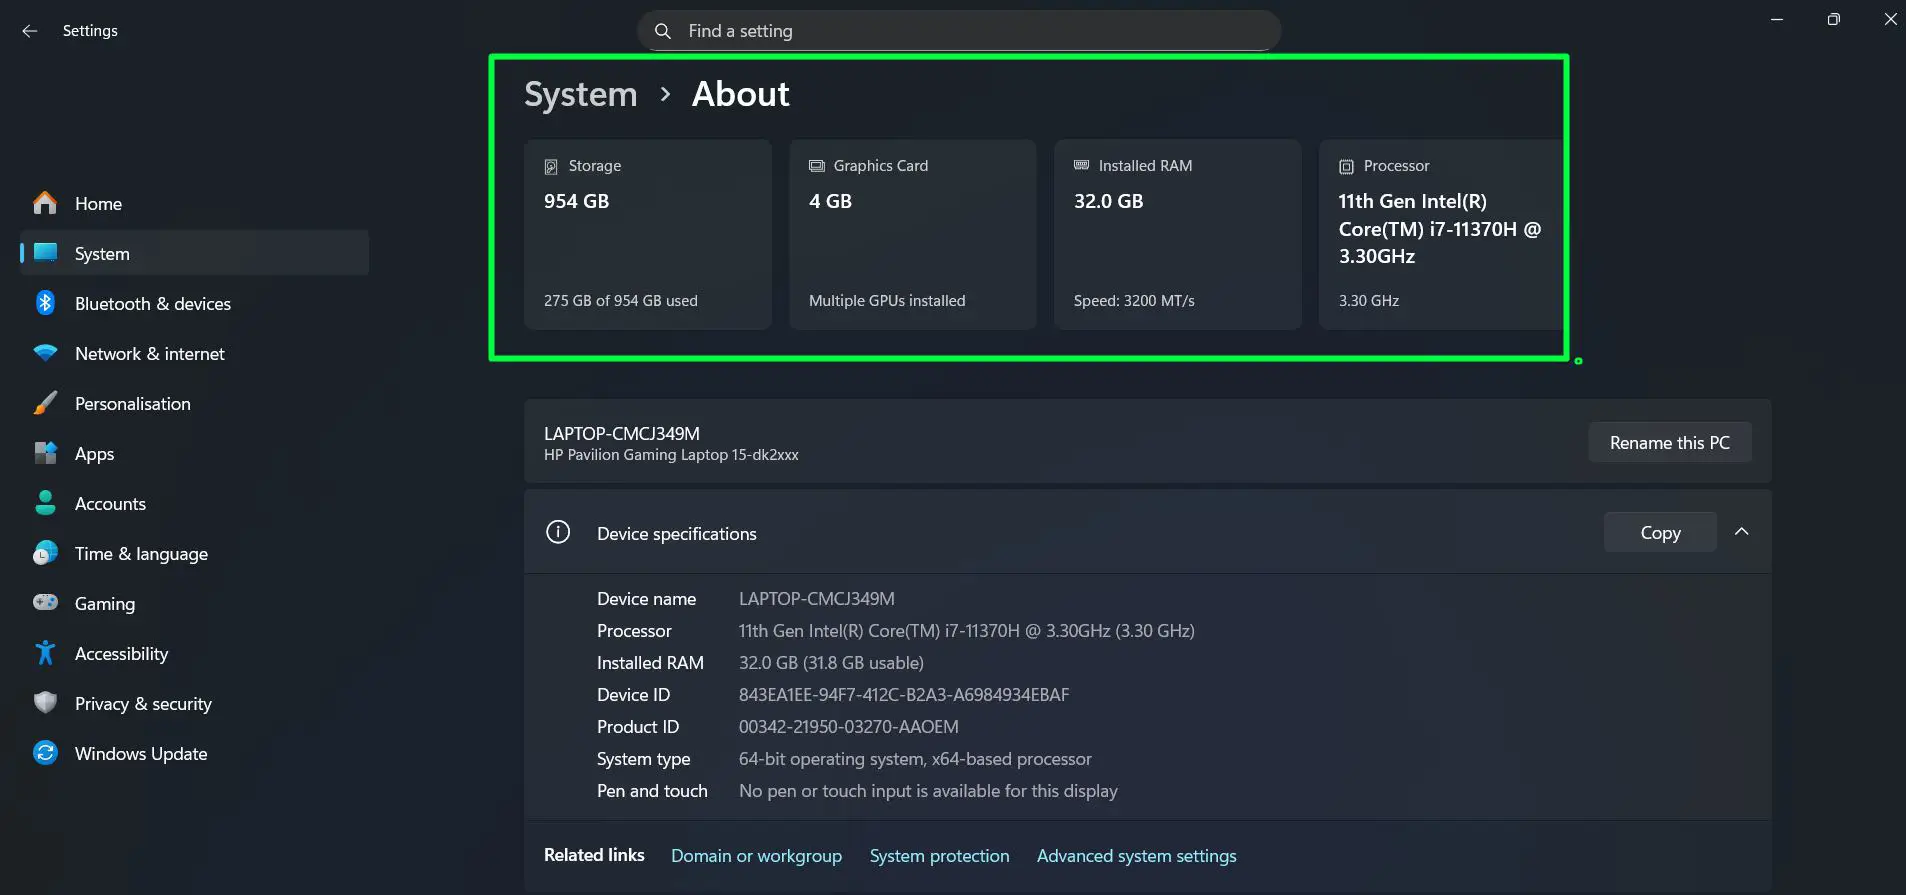
- Step 4: At the top of the About page, four cards will appear showing Storage, Graphics Card, Installed RAM, and Processor at a glance.
- Step 5: Scroll down slightly to the Device specifications section for the full processor name and exact RAM amount.
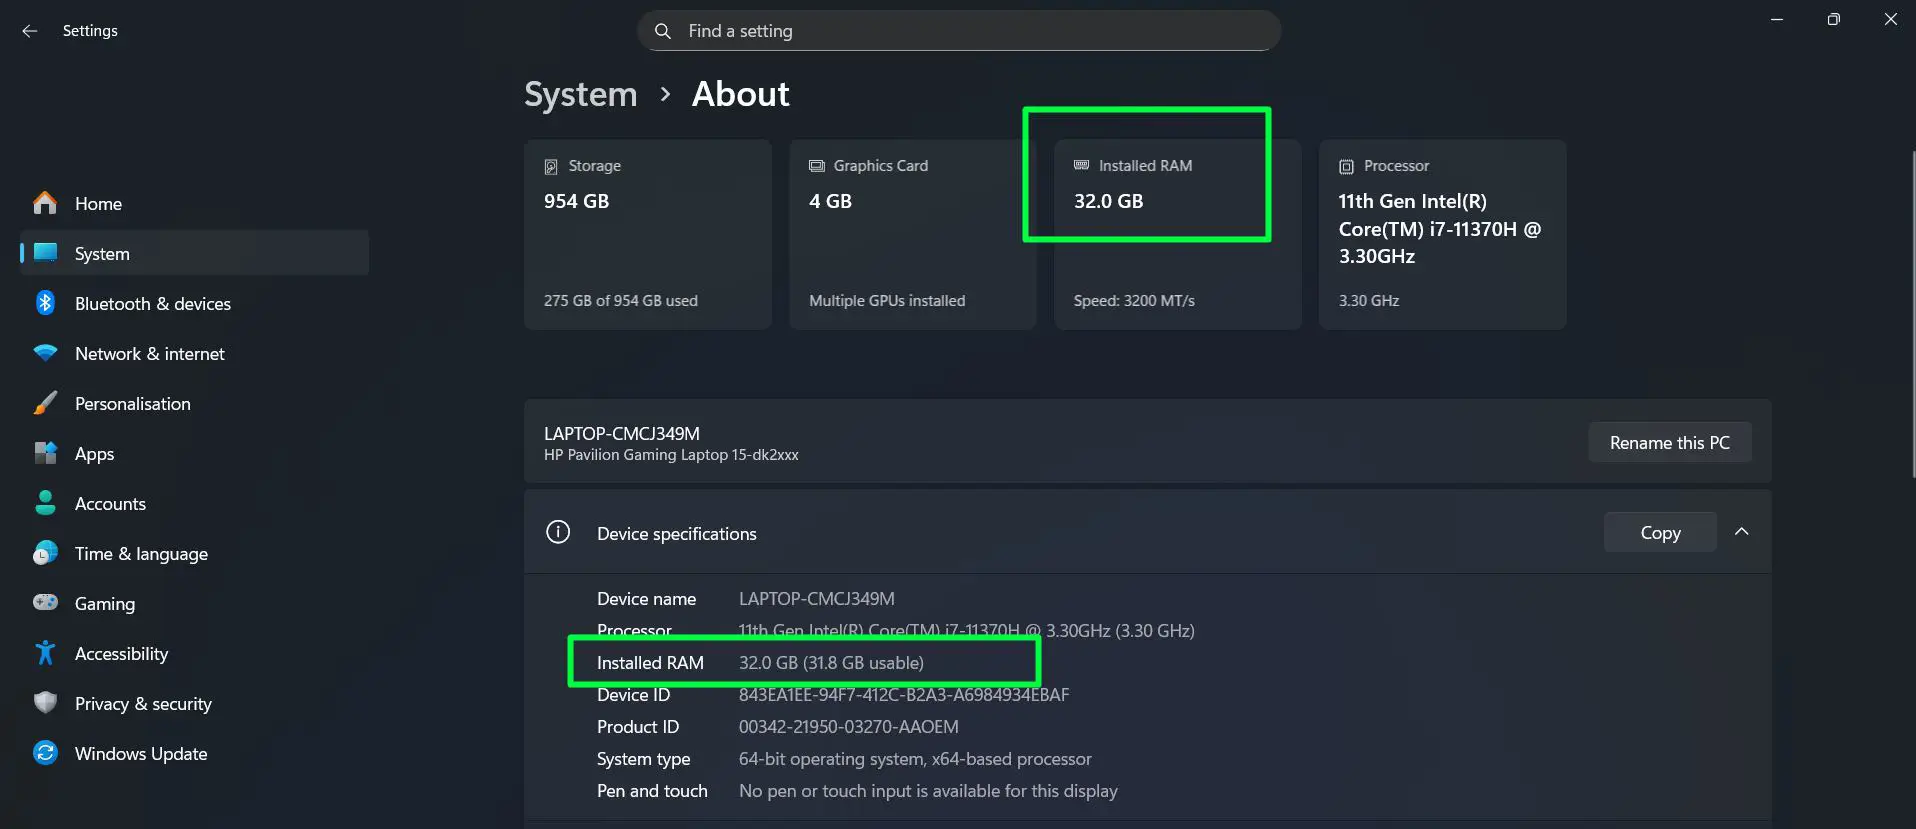
From this one screen, the processor model, RAM size, storage capacity, and graphics card are all visible without opening any additional tools. For example, the ‘Device specifications’ panel shows the full processor name like ’11th Gen Intel Core i7-11370H @ 3.30GHz’, the installed RAM such as ‘32.0 GB’, and the system type. The storage and GPU cards at the top give a quick overview of capacity and whether multiple GPUs are installed.
This screen covers most of what is needed to run a quick compatibility check. For a more detailed breakdown of each component and what the values mean for Windows 11 support, the sections below walk through each one individually.
How to Check Your Processor (CPU)
The processor is the most critical check. Microsoft only supports specific CPU generations – anything older than Intel 8th Gen or AMD Ryzen 3000 series is officially excluded, even if it runs Windows 10 perfectly fine.
- Step 1: Press the Windows key + R on the keyboard to open the Run dialog.
- Step 2: Type msinfo32 and press Enter.
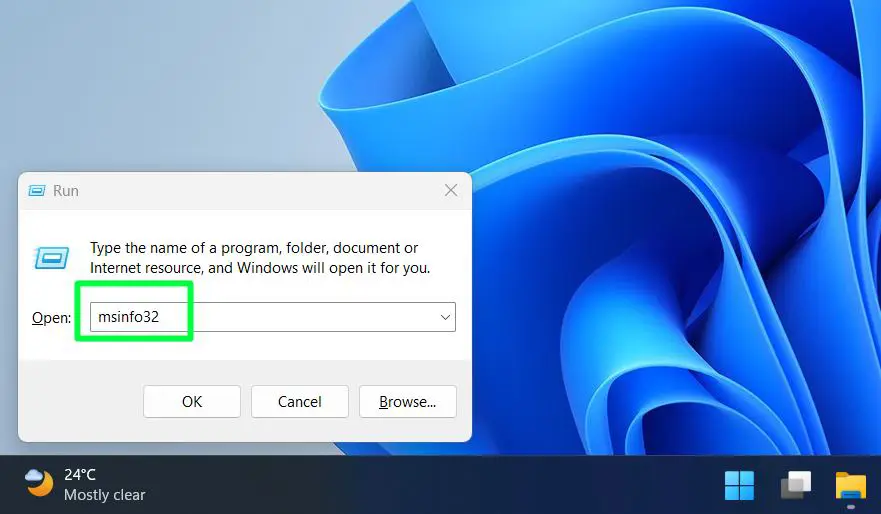
- Step 3: In the System Information window, look for the line labeled Processor.
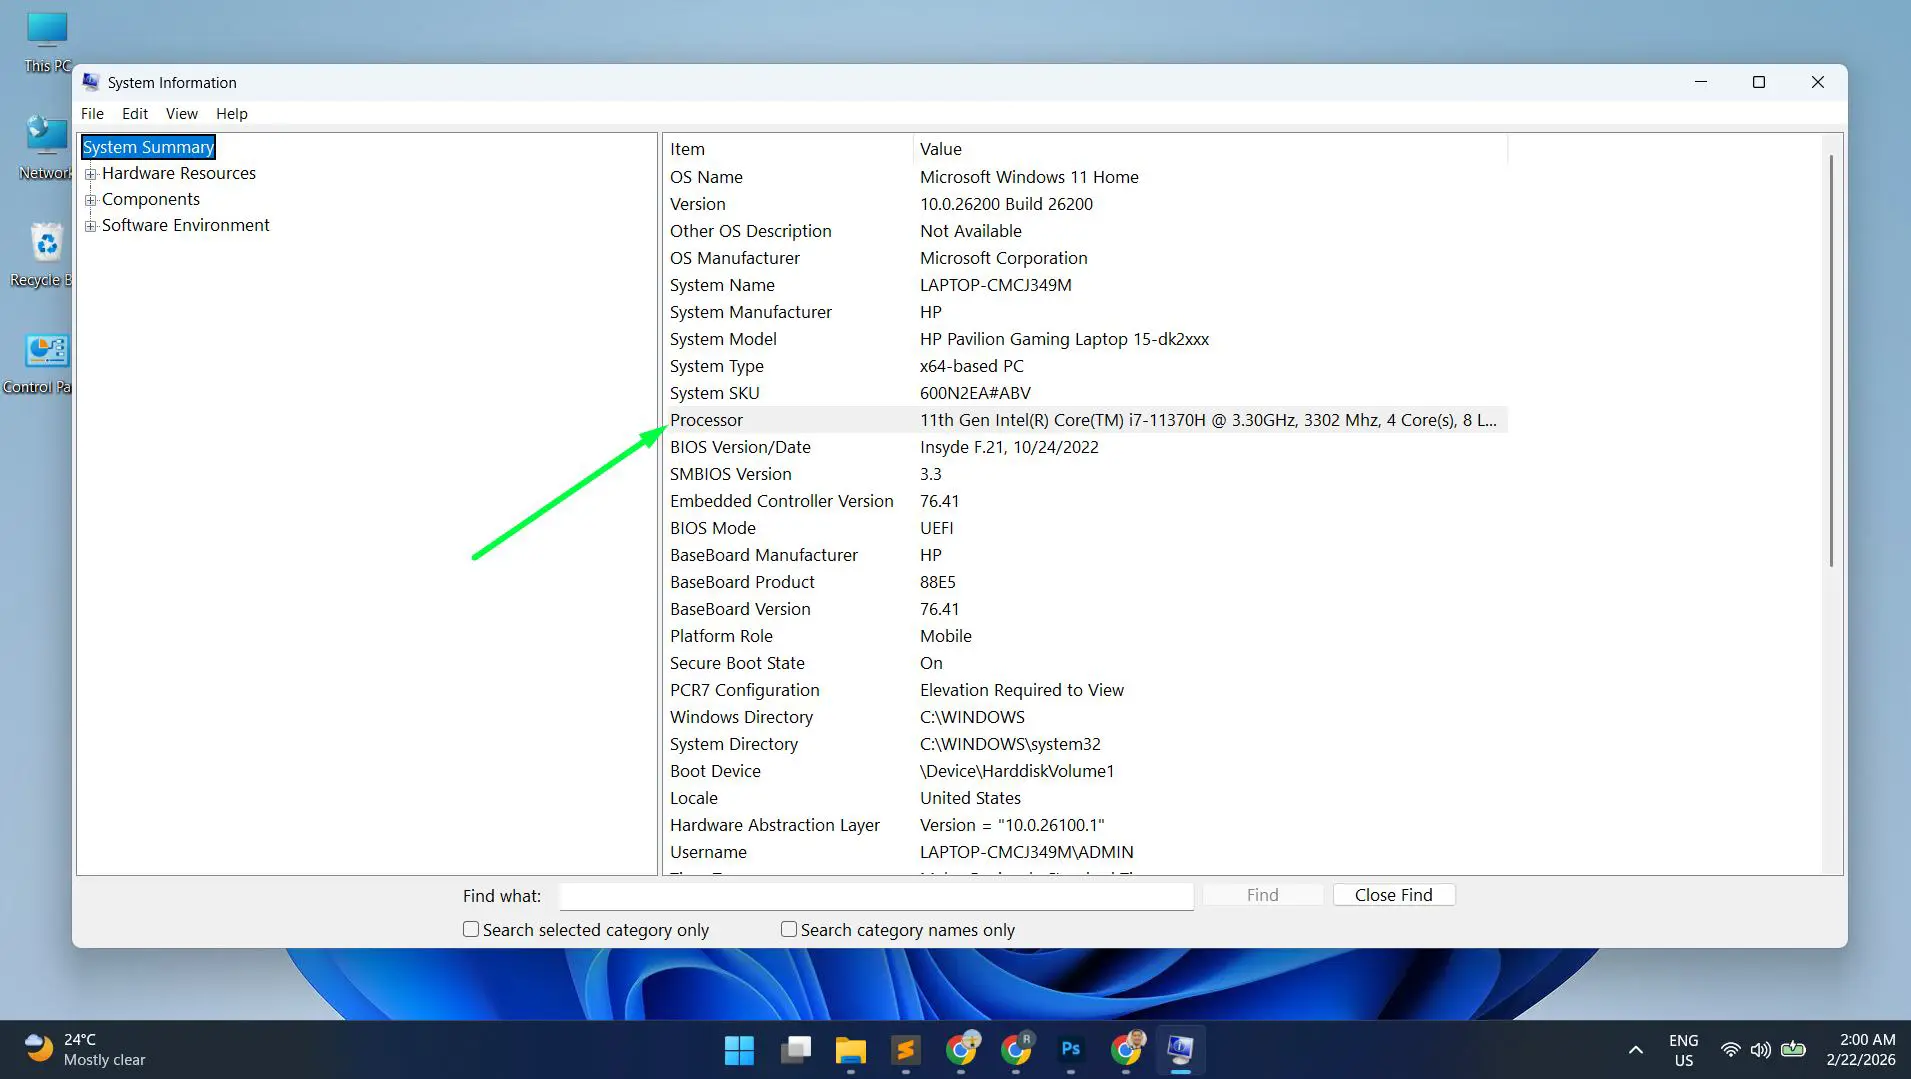
- Step 4: Note the full name – for example, ‘Intel Core i7-10750H’ or ‘AMD Ryzen 5 5600U’.
- Step 5: Enter that name into the compatibility checker tool above or cross-check it against Microsoft’s official supported processor list.
If the processor shows as 7th Gen Intel (like i5-7200U or i7-7700HQ) or AMD Ryzen 2000 series, it is not on the official list. Some users still manage to install Windows 11 on these machines using workarounds, but Microsoft does not provide updates or official support for those setups. For anyone relying on that machine for work, that is a risk worth thinking about carefully.
Pro-Tip: The easiest way to identify a processor generation from the model number is to look at the first digit or two after the core type. For Intel, ‘i7-10750H’ means 10th Gen. For AMD, ‘Ryzen 5 5600U’ means 5000 series. Anything Intel 8th Gen (8xxx) and above, or AMD Ryzen 3500U and above, is generally on the supported list.
How to Check Your RAM
Windows 11 requires a minimum of 4 GB of RAM. In practice, the system runs much better with 8 GB or more – but for compatibility purposes, 4 GB is the hard floor. Here is how to check it quickly.
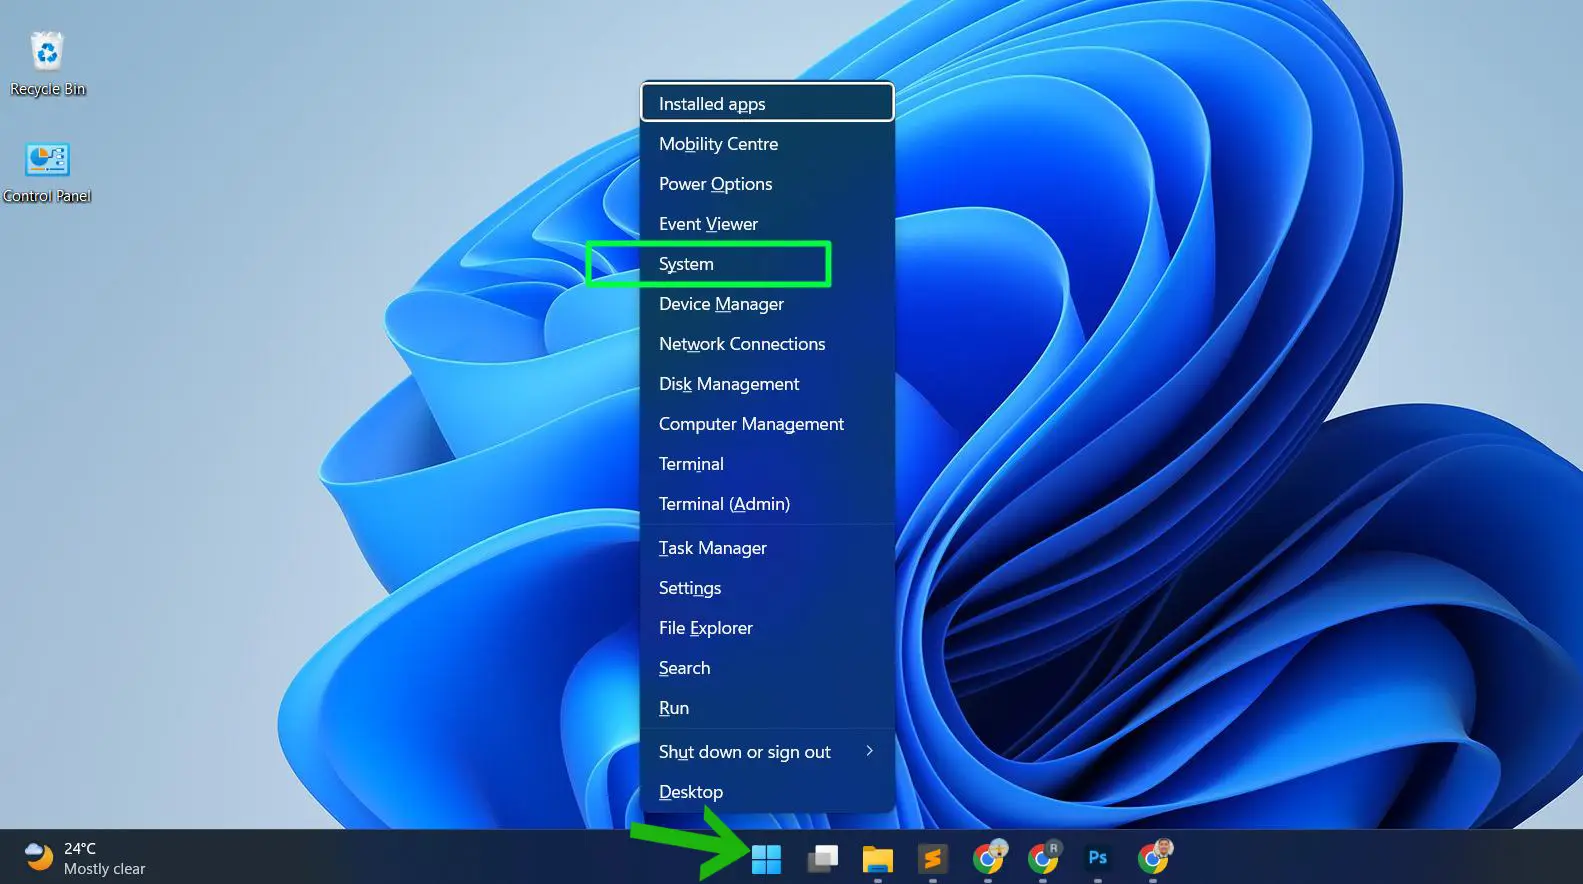
- Step 1: Right-click on the Start button or press Windows key + X.
- Step 2: Select System from the menu.
- Step 3: Scroll down to the Device specifications section.
- Step 4: Look for Installed RAM – it will show the total amount, such as ‘8.00 GB’.
Alternatively, open Task Manager (Ctrl + Shift + Esc), click the Performance tab, then select Memory. The total RAM is shown in the top right corner of that panel.
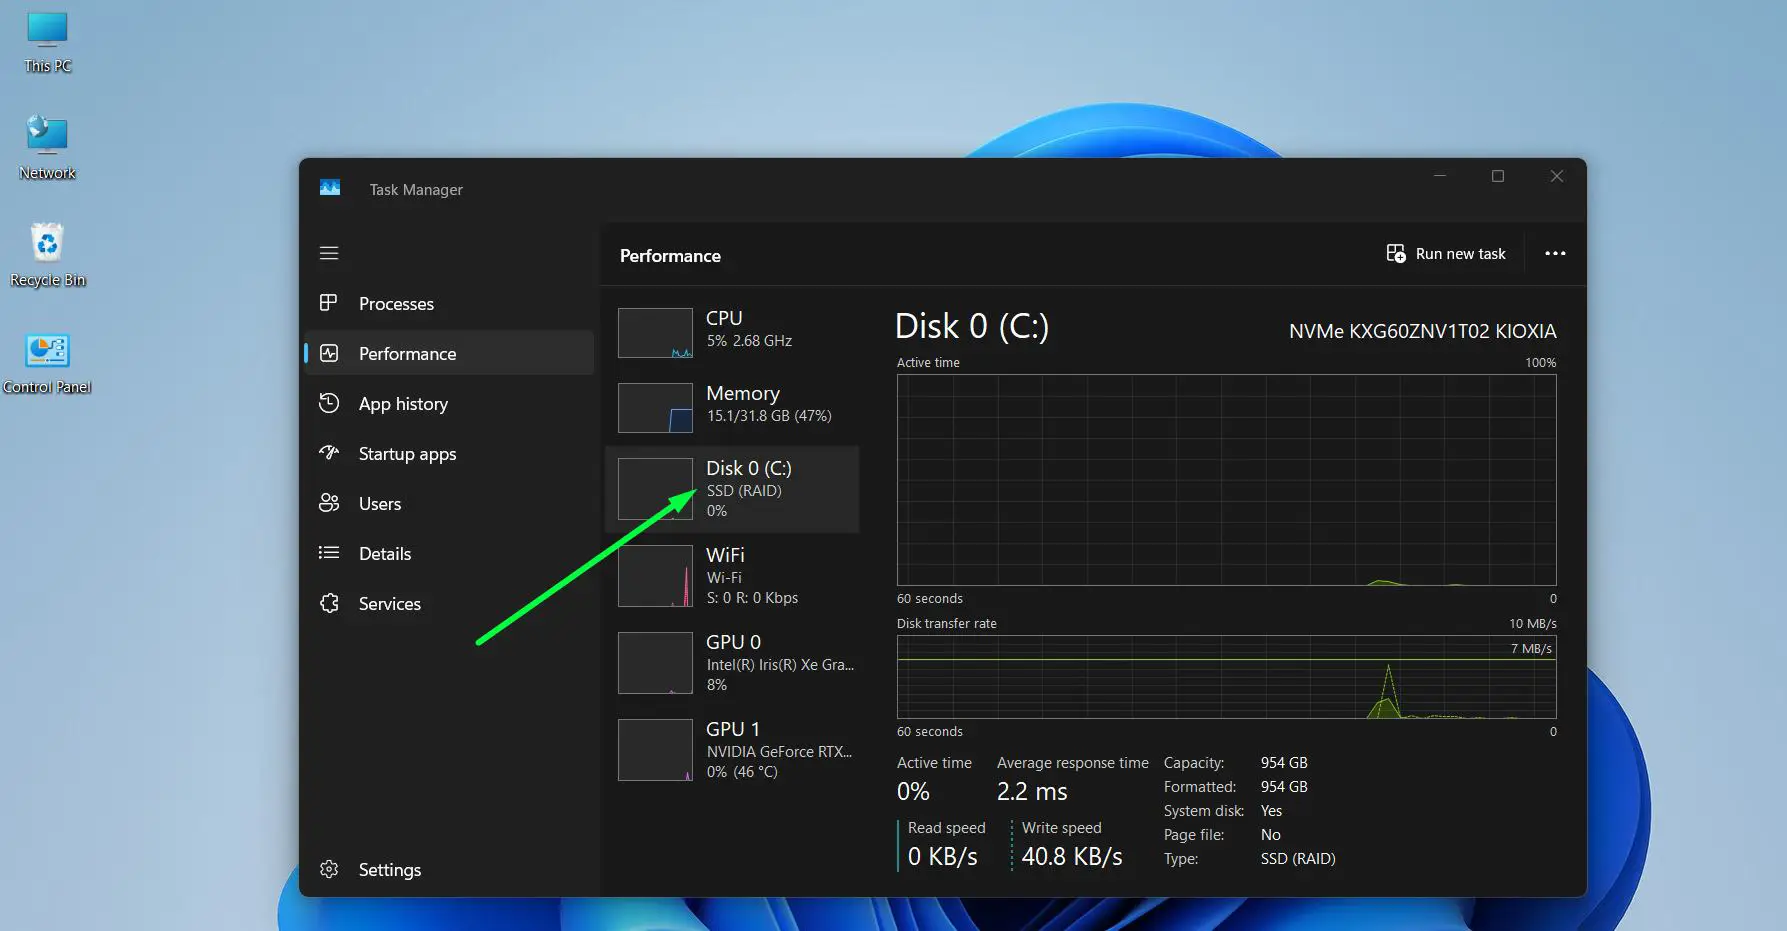
How to Check Your Storage Type and Size
Windows 11 needs at least 64 GB of free storage space to install. But beyond size, the type of storage matters too. An SSD (Solid State Drive) makes Windows 11 significantly faster compared to an HDD (Hard Disk Drive). The drive type does not affect compatibility, but it does affect the day-to-day experience.
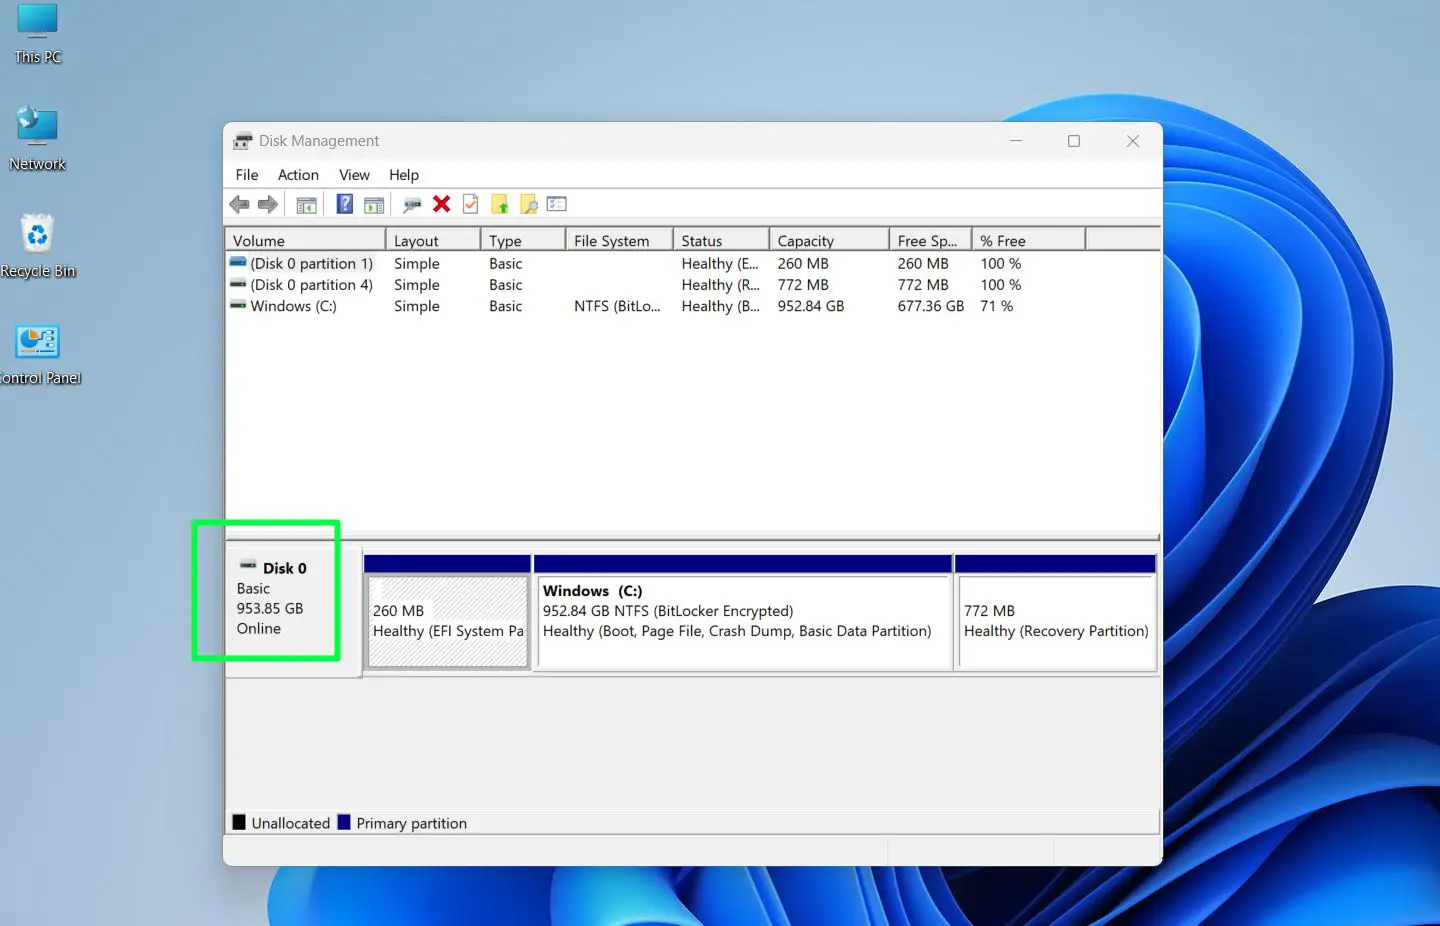
- Step 1: Press Windows key + R, type diskmgmt.msc, and press Enter to open Disk Management.

- Step 2: The drives listed at the bottom show the total size of each disk.
- Step 3: To identify whether it is SSD or HDD, open Task Manager instead (Ctrl + Shift + Esc).
- Step 4: Click the Performance tab and select the disk drive.
- Step 5: At the bottom right, it will say either ‘SSD’ or ‘HDD’ next to the disk type label.
If the system has an HDD and is planning to run Windows 11 long-term, upgrading to an SSD is one of the best investments possible. The speed difference is dramatic – boot times, app loading, and general responsiveness all improve significantly. Check out the hardware upgrade guides for more on that.
Pro-Tip: If Disk Management does not show the drive type clearly, download and run the free tool CrystalDiskInfo. It identifies whether the drive is SSD or HDD instantly, along with drive health status.
How to Check Your Graphics Card (GPU)
Windows 11 requires a graphics card that supports DirectX 12 and uses a WDDM 2.0 driver or later. Most GPUs from 2015 and newer already meet this requirement, but it is still worth confirming before upgrading.
- Step 1: Press Windows key + R, type dxdiag, and press Enter.
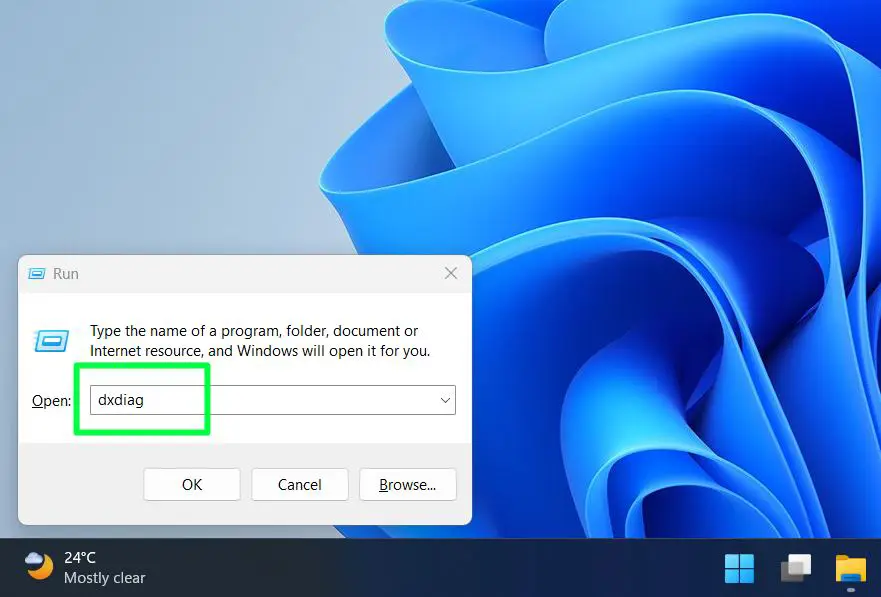
- Step 2: The DirectX Diagnostic Tool will open. Click the Display tab at the top.
- Step 3: Under ‘Device’, note the Name of the graphics card – for example, ‘NVIDIA GeForce GTX 1650’ or ‘Intel UHD Graphics 630’.
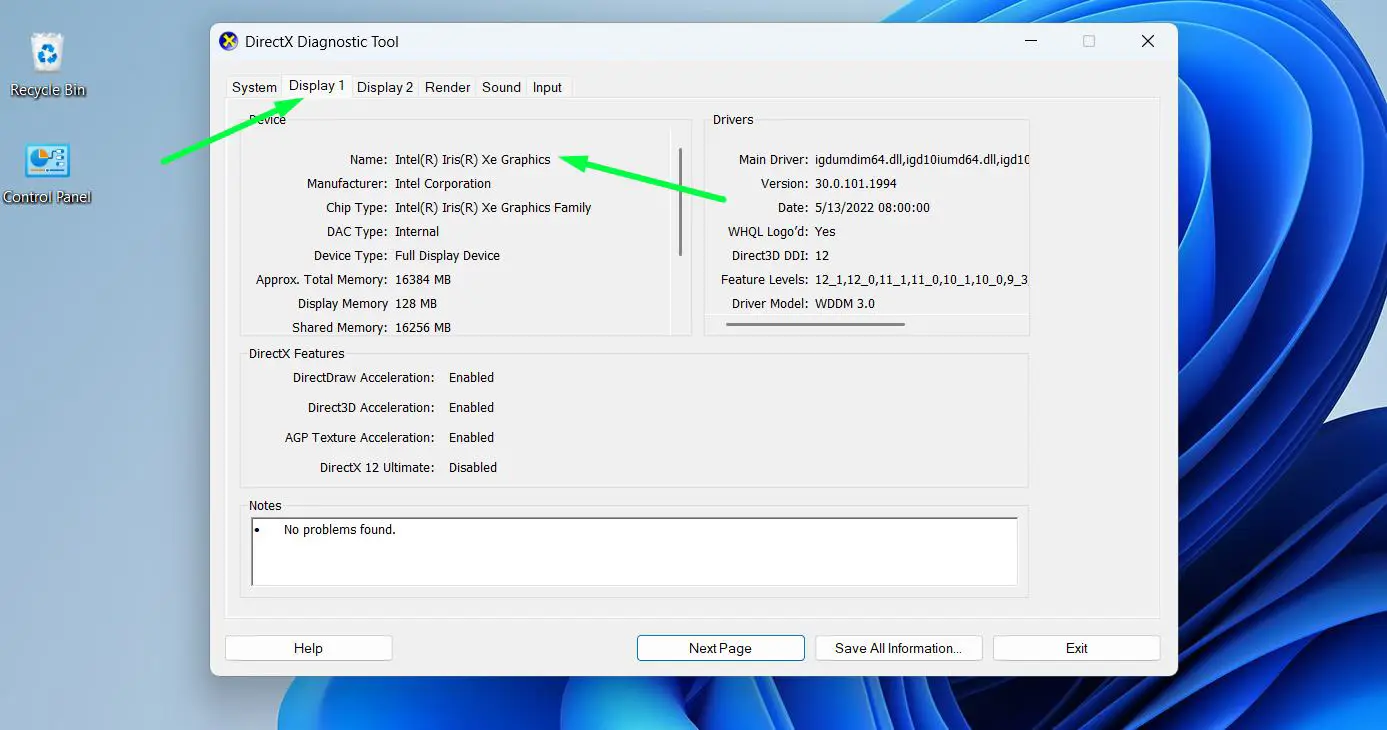
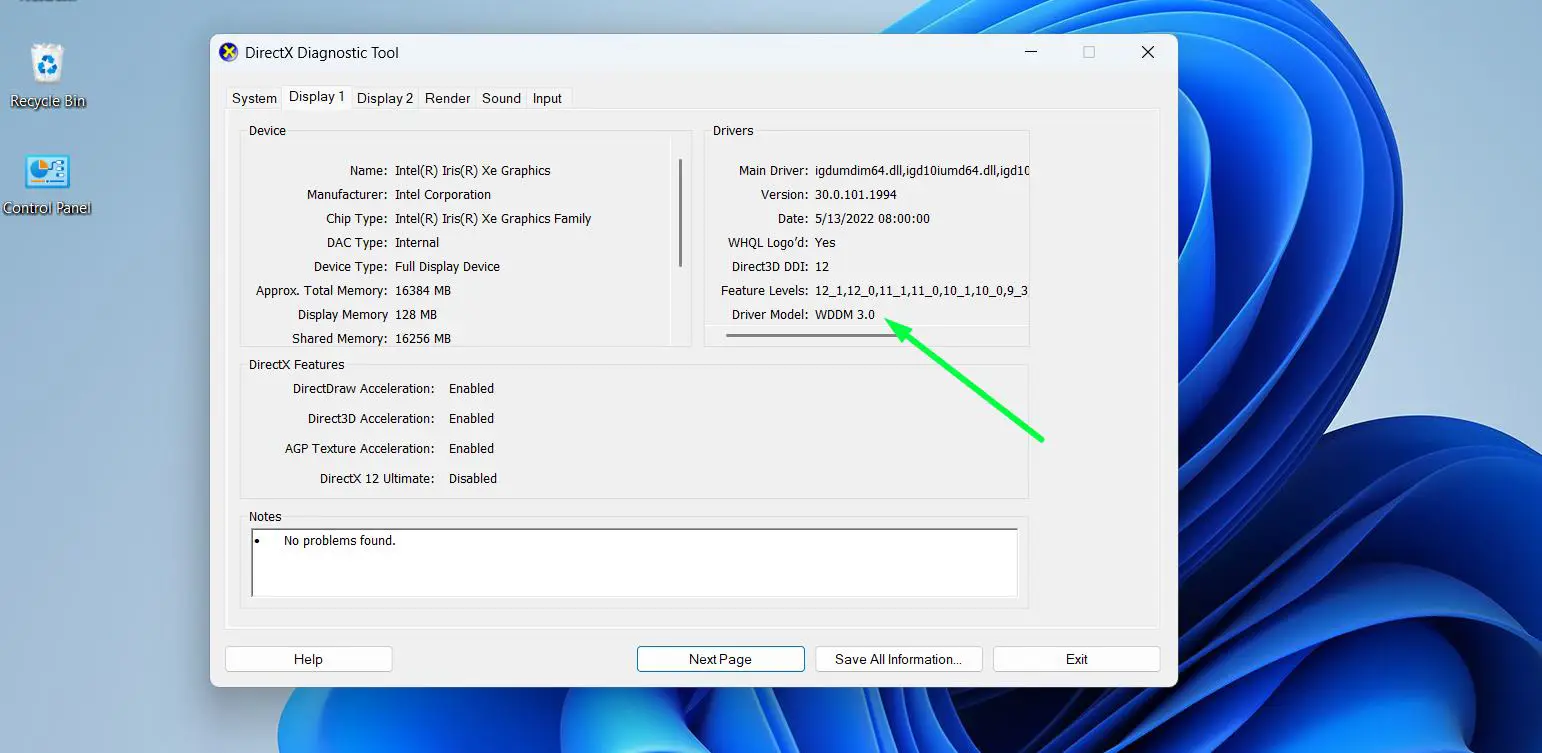
- Step 4: Look for the Driver Model field. It should say WDDM 2.0 or higher.
- Step 5: Enter the GPU name into the compatibility checker tool or verify it against the DirectX 12 support list.
If the display tab shows ‘WDDM 1.0’ or ‘WDDM 1.3’, the system is not compatible. This typically means the GPU is quite old. Most integrated graphics from Intel HD 620 onwards and AMD Radeon RX 470 onwards are fine. For a full reference on Windows system requirements and upgrades, the guides there go into much more depth.
Using Microsoft’s Official PC Health Check Tool
Microsoft provides a free tool called PC Health Check that runs all compatibility checks automatically. It is worth running alongside the manual checks above as a final confirmation.
- Step 1: Search for ‘PC Health Check’ in the Windows Start menu. If already installed, open it directly.
- Step 2: If not installed, download it from Microsoft’s official support website.
- Step 3: Open the app and click ‘Check now’ under the ‘Introducing Windows 11’ section.
- Step 4: The tool will run a full scan and show a pass or fail result with specific reasons for any failures.
- Step 5: If it passes, the device is ready. If it fails, the tool lists which specific requirements were not met.
Tips for Getting the Best Results
- Always update the current drivers before running compatibility checks – outdated drivers can sometimes cause false negatives in tools like dxdiag.
- If the device has dual storage (SSD + HDD), make sure Windows 11 will be installed on the SSD, not the HDD.
- Free up space on the system drive before starting an upgrade. The 64 GB requirement refers to available space, not total drive size.
- If running a laptop, check the manufacturer’s website – some brands publish their own Windows 11 compatibility lists specific to their device models.
- TPM 2.0 is required and can sometimes be enabled in the BIOS/UEFI settings if it appears disabled. Look for ‘PTT’ (Intel) or ‘fTPM’ (AMD) options in firmware settings.
Common Problems and Fixes
PC Health Check says the processor is not supported
This usually means the CPU is older than Intel 8th Gen or AMD Ryzen 3000 series. The device may still be able to run Windows 11 using the registry bypass method, but that setup will not receive certain updates and is not officially supported by Microsoft.
TPM 2.0 not detected
TPM is often present on the hardware but disabled in BIOS. Restart the computer, enter BIOS/UEFI settings (usually by pressing F2, F10, or Delete during startup), and look for a ‘Security’ section. Enable ‘TPM’, ‘PTT’ (Intel), or ‘fTPM’ (AMD), save, and reboot. Then run the check again.
Secure Boot is not enabled
Similar to TPM, Secure Boot is a BIOS/UEFI setting. Go into firmware settings during startup and look for the Secure Boot option under ‘Boot’ or ‘Security’. Enable it, save, and restart. Note: enabling Secure Boot may require the drive to be using GPT partition style, not MBR.
The device has enough RAM but still shows as incompatible
Double-check the RAM amount by running msinfo32 again. Some laptops have a portion of RAM reserved for integrated graphics, which reduces the total available. In that case, the system RAM slot might show 8 GB installed, but only 6 GB is reported as usable. As long as total installed RAM is 4 GB or more, this should not block the upgrade.
Storage shows enough space but compatibility fails
The 64 GB refers to the total drive size, not free space. If the drive is 64 GB total but only 10 GB is free, the installation will still fail. Clear out old files, move data to an external drive, or run Disk Cleanup before attempting the upgrade.
Frequently Asked Questions
What is the Windows 11 Compatibility Checker?
The Windows 11 Compatibility Checker is a tool or step-by-step process used to verify whether a device meets the minimum hardware requirements set by Microsoft for Windows 11. It checks key components including the processor, RAM, storage, TPM version, and graphics card.
Which processors are supported for Windows 11?
Windows 11 officially supports Intel Core processors from the 8th Generation and newer, AMD Ryzen processors from the 3000 series and newer (with some 3rd Gen exceptions), and Qualcomm Snapdragon processors from the 8cx Gen 3 and newer. Older processors are not on the approved list.
Can a PC with 4 GB RAM run Windows 11?
Yes, 4 GB is the minimum RAM requirement for Windows 11. The system will install and run, but performance will feel limited, especially with multiple browser tabs or applications open. 8 GB or more is strongly recommended for a comfortable day-to-day experience.
Does Windows 11 require an SSD?
No, an SSD is not a hard requirement for compatibility. Windows 11 can install and run on an HDD as long as the drive has at least 64 GB of available storage. However, performance on an HDD will be noticeably slower compared to an SSD.
What happens if the PC does not meet Windows 11 requirements?
If the hardware does not meet the official requirements, Microsoft will block the standard upgrade path. The device will continue receiving Windows 10 updates until October 2025, after which it will no longer receive security updates through official channels. Some users choose unofficial installation methods, but those come without guaranteed update support.
Is TPM 2.0 required for Windows 11?
Yes, TPM 2.0 is a mandatory requirement for Windows 11. Many computers built after 2016 have TPM 2.0 hardware present but may have it disabled in the BIOS. It can usually be enabled in the BIOS/UEFI settings under the Security section.
How do you check if a laptop supports Windows 11 without downloading anything?
Use the built-in Windows tools: press Windows key + R and type msinfo32 to check the CPU and RAM, type dxdiag to check the GPU and DirectX version, and type diskmgmt.msc to check storage. These three tools together cover all the main compatibility checks without any downloads.