Learning to adjust display brightness settings easily Windows 11 can significantly improve viewing comfort and extend battery life on laptops. Windows 11 offers multiple methods to control screen brightness, from quick keyboard shortcuts to detailed settings menus. This guide covers all the practical ways to manage display brightness, whether using a desktop monitor or laptop screen.
Quick Methods to Change Brightness in Windows 11
Windows 11 provides several fast ways to adjust screen brightness without diving into complex settings. The quickest method uses the brightness slider in Quick Settings, accessible from the system tray. Most users find this approach convenient for immediate adjustments throughout the day.
Watch This: 3 Easy Ways to Adjust Brightness in Windows 11
Using the Quick Settings Panel
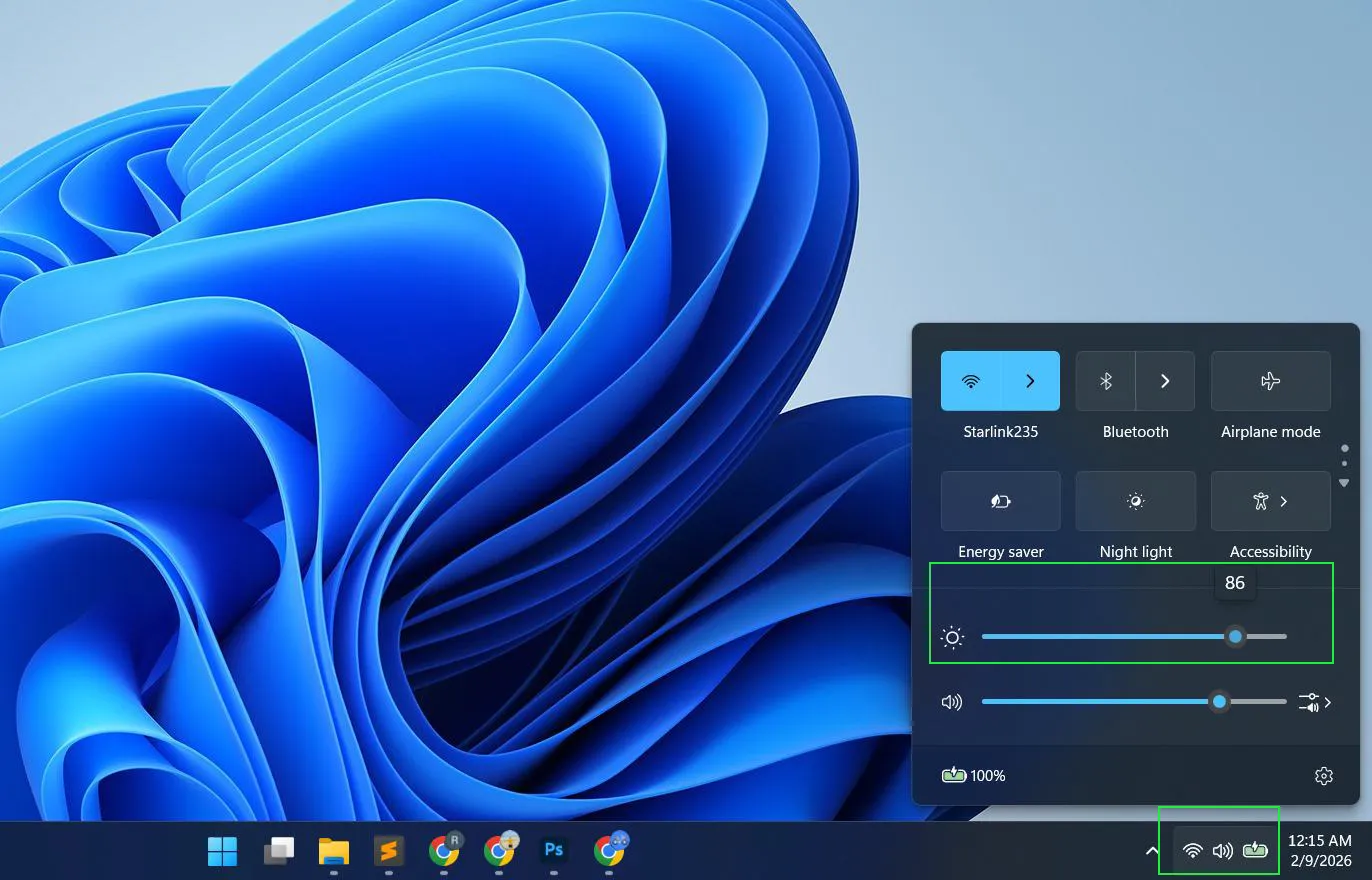
The Quick Settings panel offers the fastest way to adjust brightness with just a couple of clicks. Follow these steps:
- Click the network, sound, and battery icons in the bottom-right corner of the taskbar
- The Quick Settings panel will appear with a brightness slider at the top
- Drag the slider left to decrease brightness or right to increase it
- The changes apply instantly to the screen
This method works best when lighting conditions change throughout the day and quick adjustments are needed.
Keyboard Shortcuts for Brightness Control
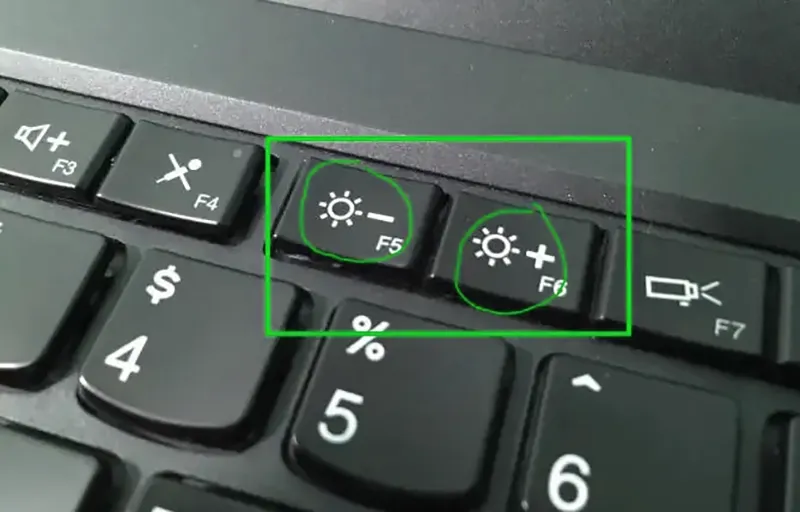
Most laptops include dedicated brightness keys that provide instant control. Here’s how to use them:
- Locate the brightness keys on the keyboard, usually marked with sun icons
- Find the key with a smaller sun icon for dimming the screen
- Find the key with a larger sun icon for brightening the screen
- Press the brightness down key to reduce screen intensity
- Press the brightness up key to increase screen intensity
- If the keys don’t work immediately, hold the Fn key while pressing the brightness keys
These keys typically sit on the function row (F1-F12) and respond immediately without opening any menus.
Using the Windows Mobility Center
The Mobility Center provides centralized access to brightness and other mobile settings. Access it this way:
- Press Windows key + X on the keyboard

- Select “Mobility Center” from the menu that appears
- Locate the brightness slider in the Mobility Center window
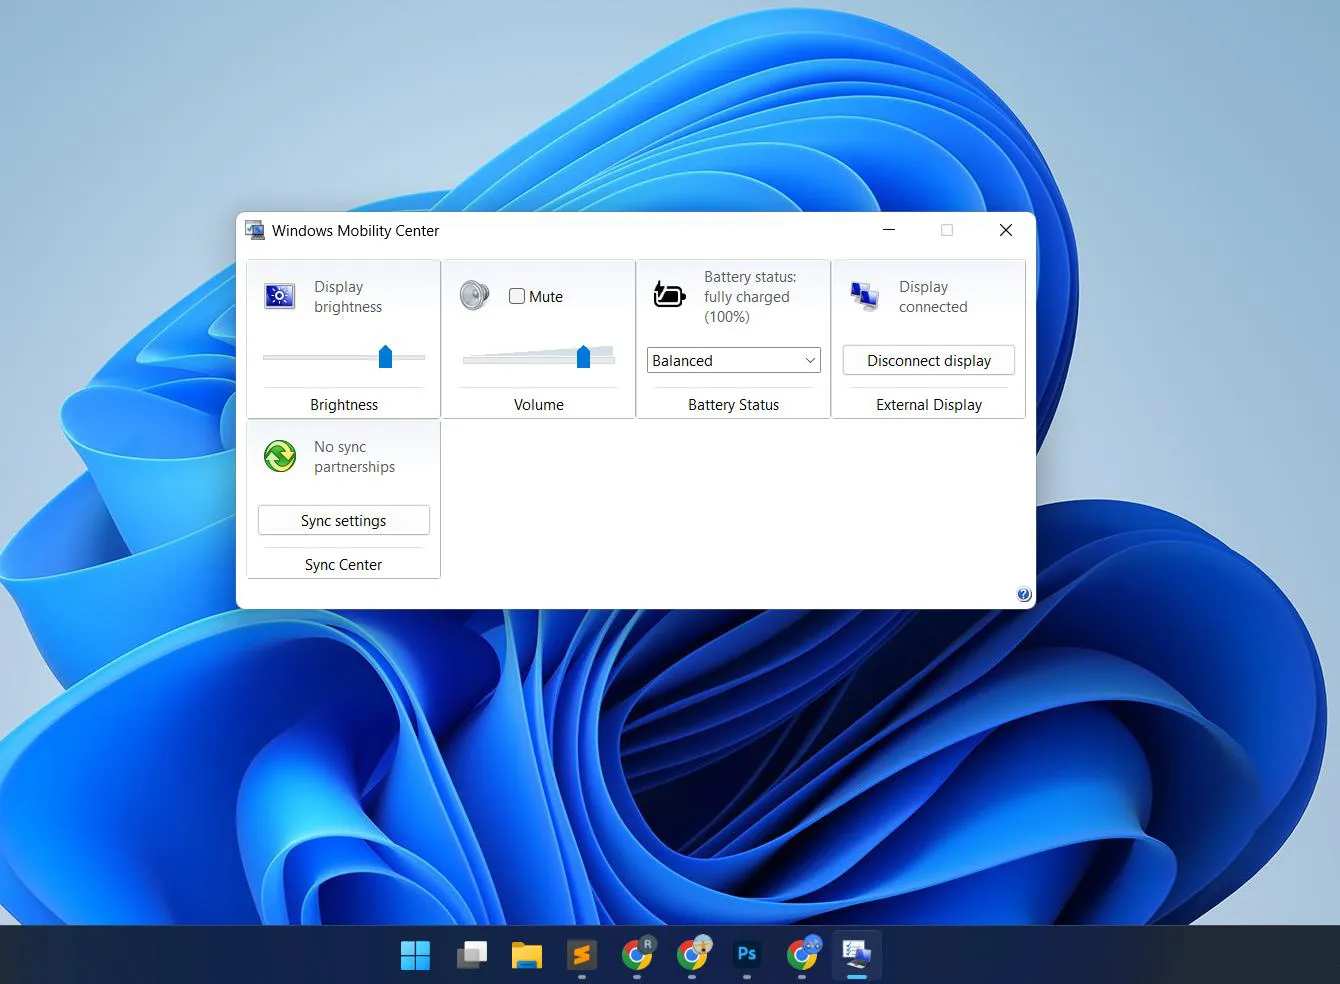
- Drag the slider to adjust brightness to the desired level
This method works best on laptops and portable devices where quick access to multiple mobile settings is helpful.
Adjusting Brightness Through Windows Settings
The Settings app offers more detailed brightness controls with additional options for automatic adjustments and power management. This approach suits users who want precise control over display behavior across different scenarios.
Accessing Display Settings
The Display settings provide comprehensive brightness control options. Follow these steps to access them:
- Press Windows key + I to open the Settings app
- Click on “System” in the left sidebar

- Select “Display” from the System menu
- Locate the brightness slider near the top of the Display settings page
- Move the slider left or right to adjust brightness levels
- Review additional options below the slider for power-specific brightness settings
This method allows for precise brightness adjustments and access to advanced features like automatic brightness.
Setting Different Brightness for Battery and Plugged In
Laptops benefit from separate brightness settings for different power states. Windows 11 also includes a content-adaptive brightness feature that optimizes screen contrast and brightness based on what’s displayed. Configure these using these steps:
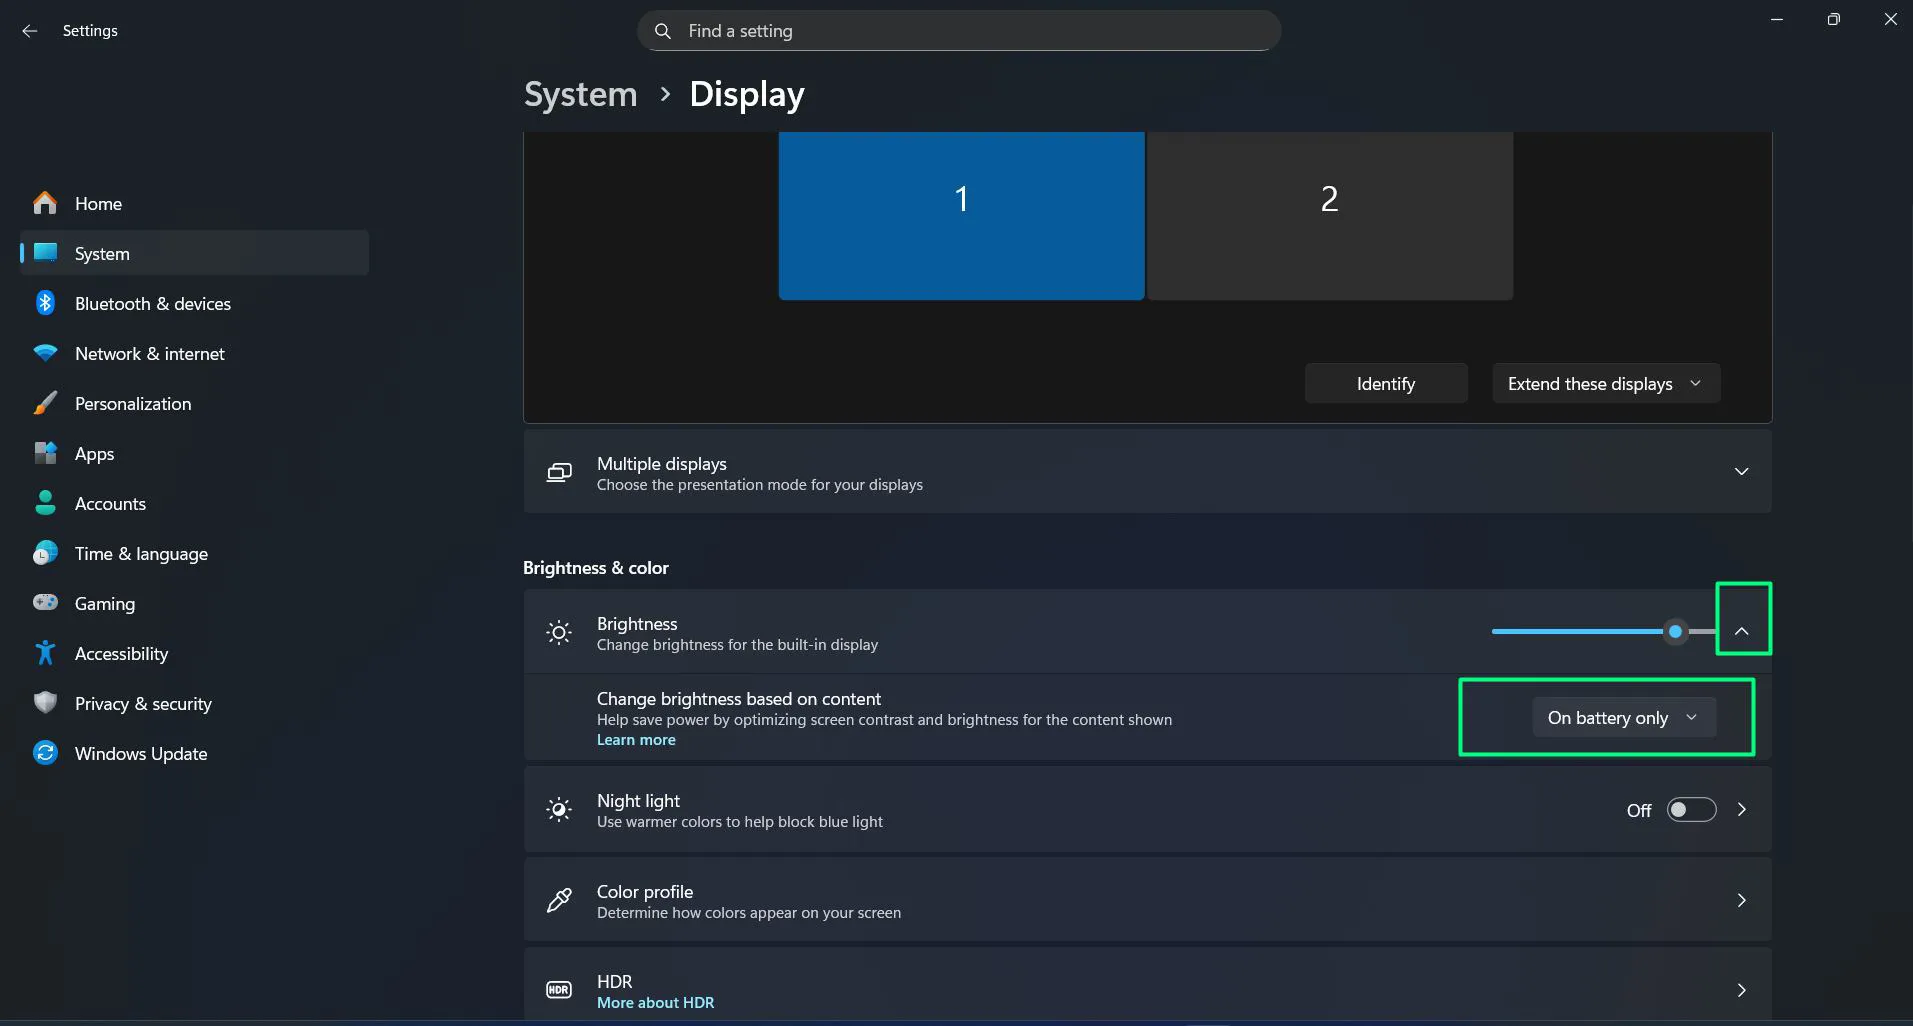
- Open Settings and navigate to System > Display
- Scroll down to the “Brightness & color” section
- Locate the brightness slider labeled “Change brightness for the built-in display”
- Click the dropdown menu next to this option
- Look for “Change brightness based on content” option below the brightness slider
- Choose between “Off”, “On battery only”, or “Always” based on preference
- When enabled, this feature optimizes screen contrast and brightness for the content shown
- Click “Learn more” link to understand how content-adaptive brightness works
The “Change brightness based on content” feature helps save power by optimizing screen contrast and brightness for the content shown. Setting it to “On battery only” provides the best balance between visual quality and battery conservation. Setting lower brightness on battery power helps extend usage time between charges significantly.
Advanced Brightness Control Options
Power users often need more granular control over display brightness for specific applications or workflows. Windows 11 includes several advanced features for customizing brightness behavior beyond basic adjustments.
Using Night Light to Reduce Blue Light
Night Light reduces blue light emissions during evening hours, helping minimize eye strain. Configure it with these steps:
- Navigate to Settings > System > Display
- Locate the “Night Light” section
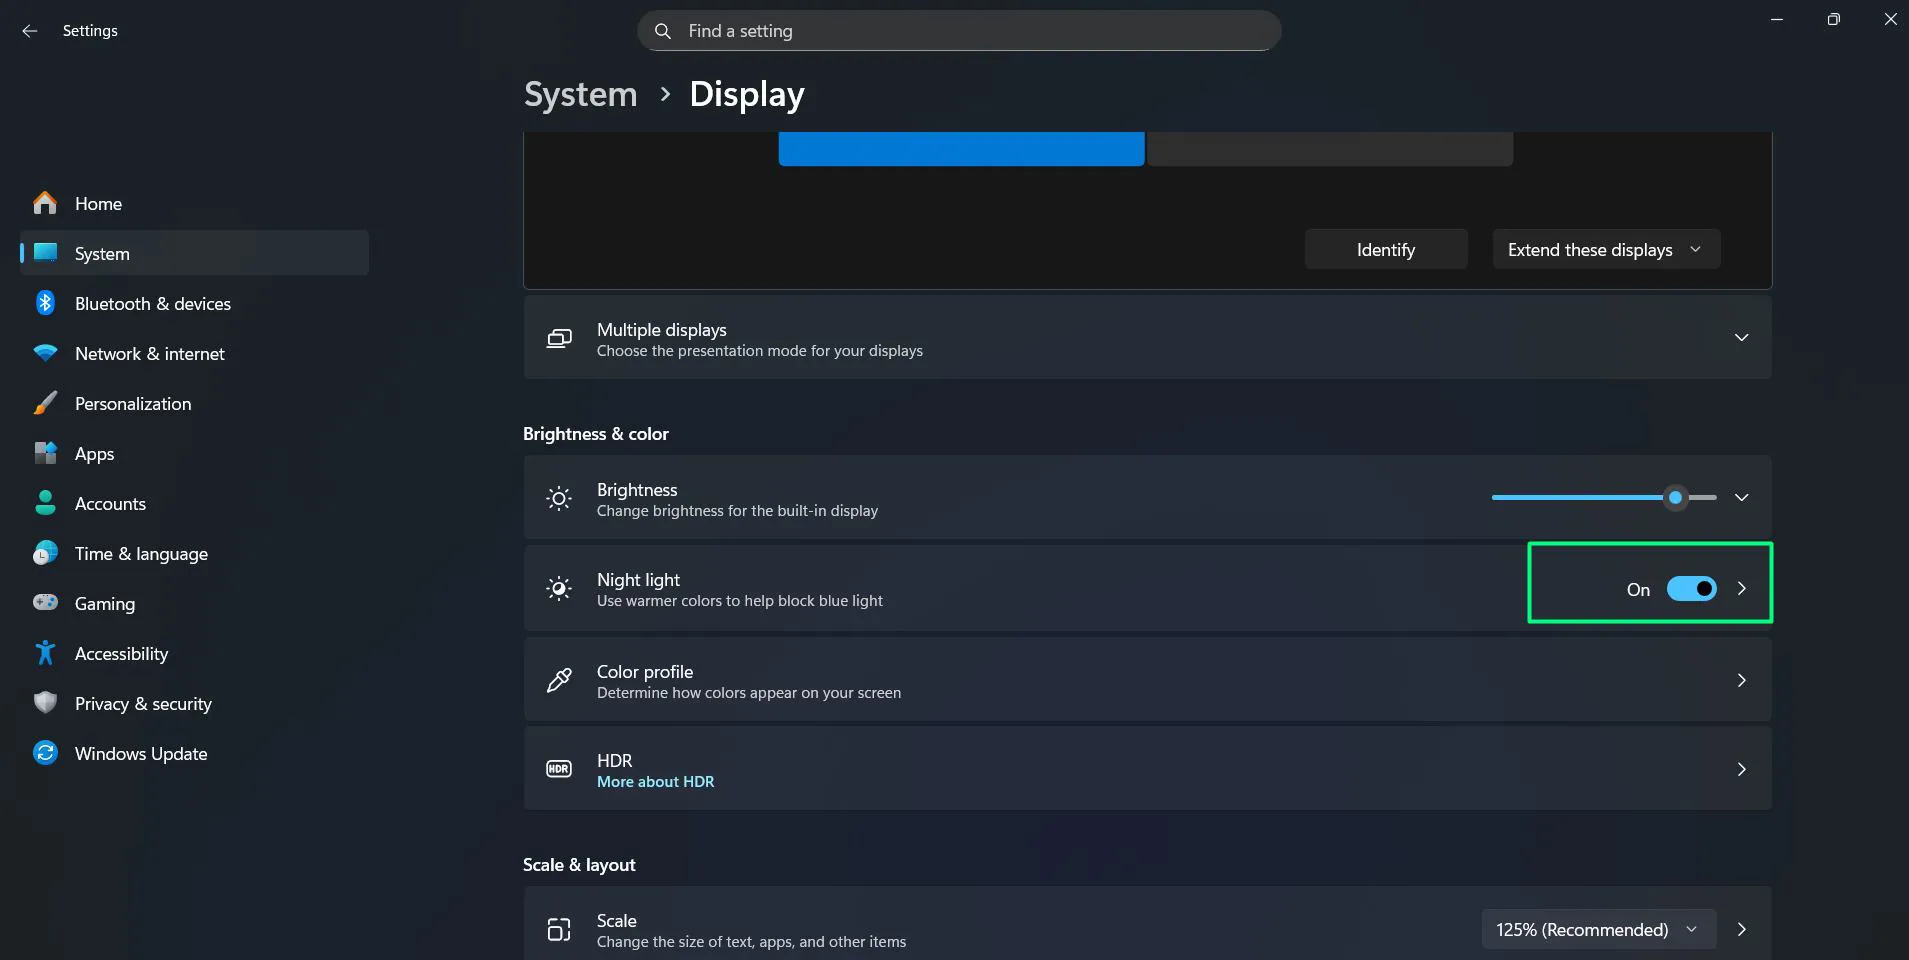
- Toggle Night Light to the “On” position
- Click on “Night light settings” to access detailed options
- Use the strength slider to control how much blue light gets filtered
- Click “Schedule night light” to set automatic activation times
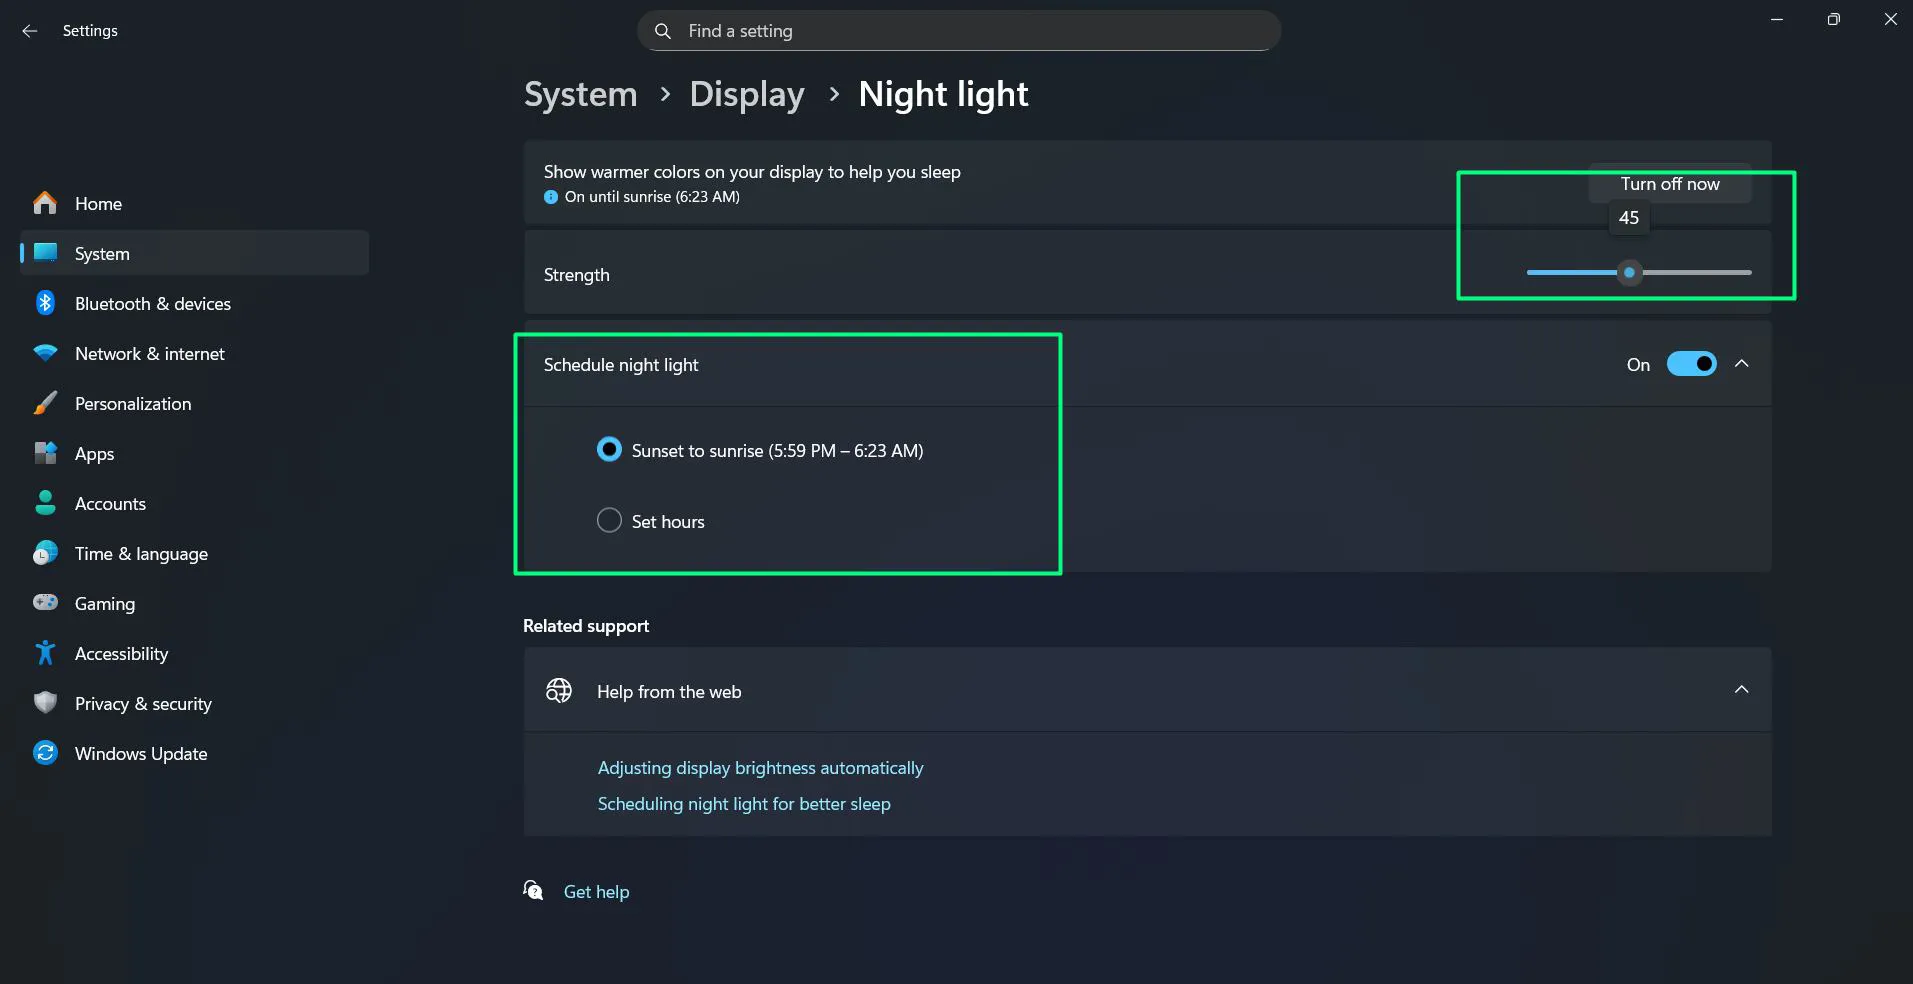
- Choose “Sunset to sunrise” or set custom hours
- Save the settings to activate Night Light during specified times
Most people find that scheduling Night Light from sunset to sunrise provides the best balance between visibility and eye comfort.
Adjusting Brightness Through Graphics Control Panel
Graphics card software provides additional display controls beyond Windows settings. Access these options by following these steps:
- Right-click on an empty area of the desktop
- Select the graphics control panel option (Intel Graphics Command Center, AMD Software, or NVIDIA Control Panel)
- Navigate to the display or color settings section
- Look for brightness, gamma, or color correction options
- Adjust these settings independently of Windows brightness controls
- Apply the changes and test the new brightness levels
This works particularly well for desktop monitors connected to dedicated graphics cards.
Creating Custom Power Plans
Custom power plans allow precise control over brightness behavior in different scenarios. Create one using these steps:
- Open Control Panel by searching for it in the Start menu
- Search for “Power Options” and click on it
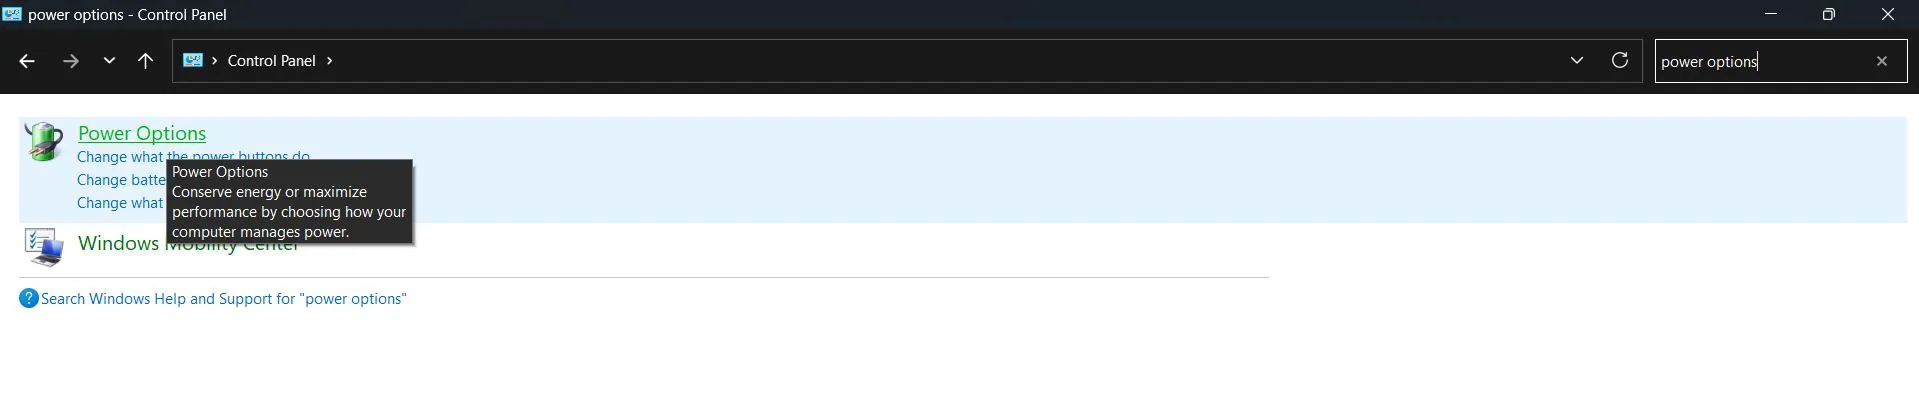
- Select “Create a power plan” from the left sidebar
- Choose a base plan to start from (Balanced, Power Saver, or High Performance)
- Name the custom power plan
- Click “Next” to proceed to detailed settings
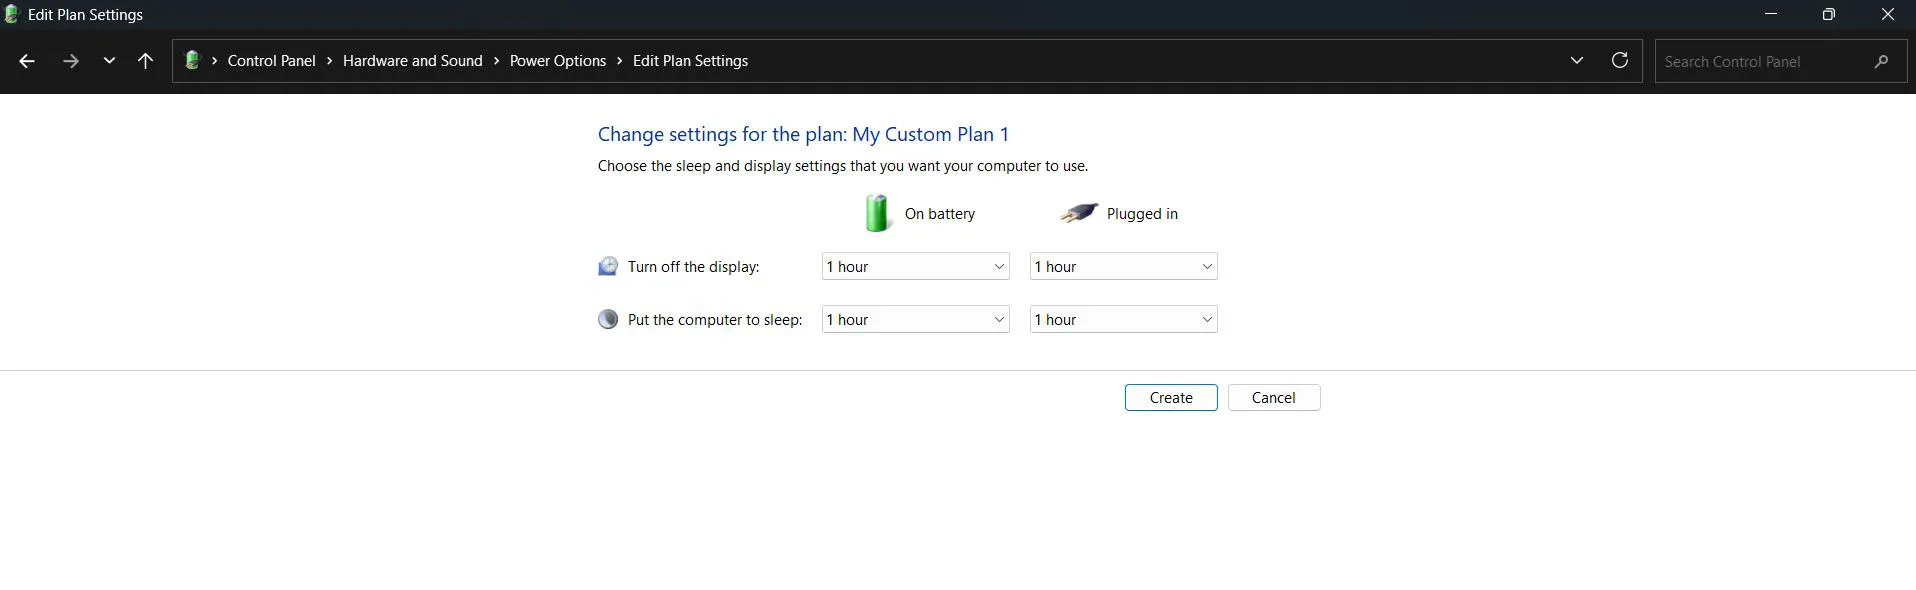
- Set specific brightness percentages for different scenarios
- Configure brightness for idle periods and active use
- Set different levels for battery versus plugged-in operation
- Save the custom power plan
The key is to balance visibility with battery conservation based on typical usage patterns.
Troubleshooting Brightness Control Issues
Sometimes brightness controls stop working or behave unexpectedly. Several common issues affect brightness adjustment in Windows 11, each with specific solutions.
Brightness Slider Grayed Out or Missing
A grayed-out or missing brightness slider usually indicates driver issues. Fix this by following these steps:
- Right-click the Start button and select “Device Manager”
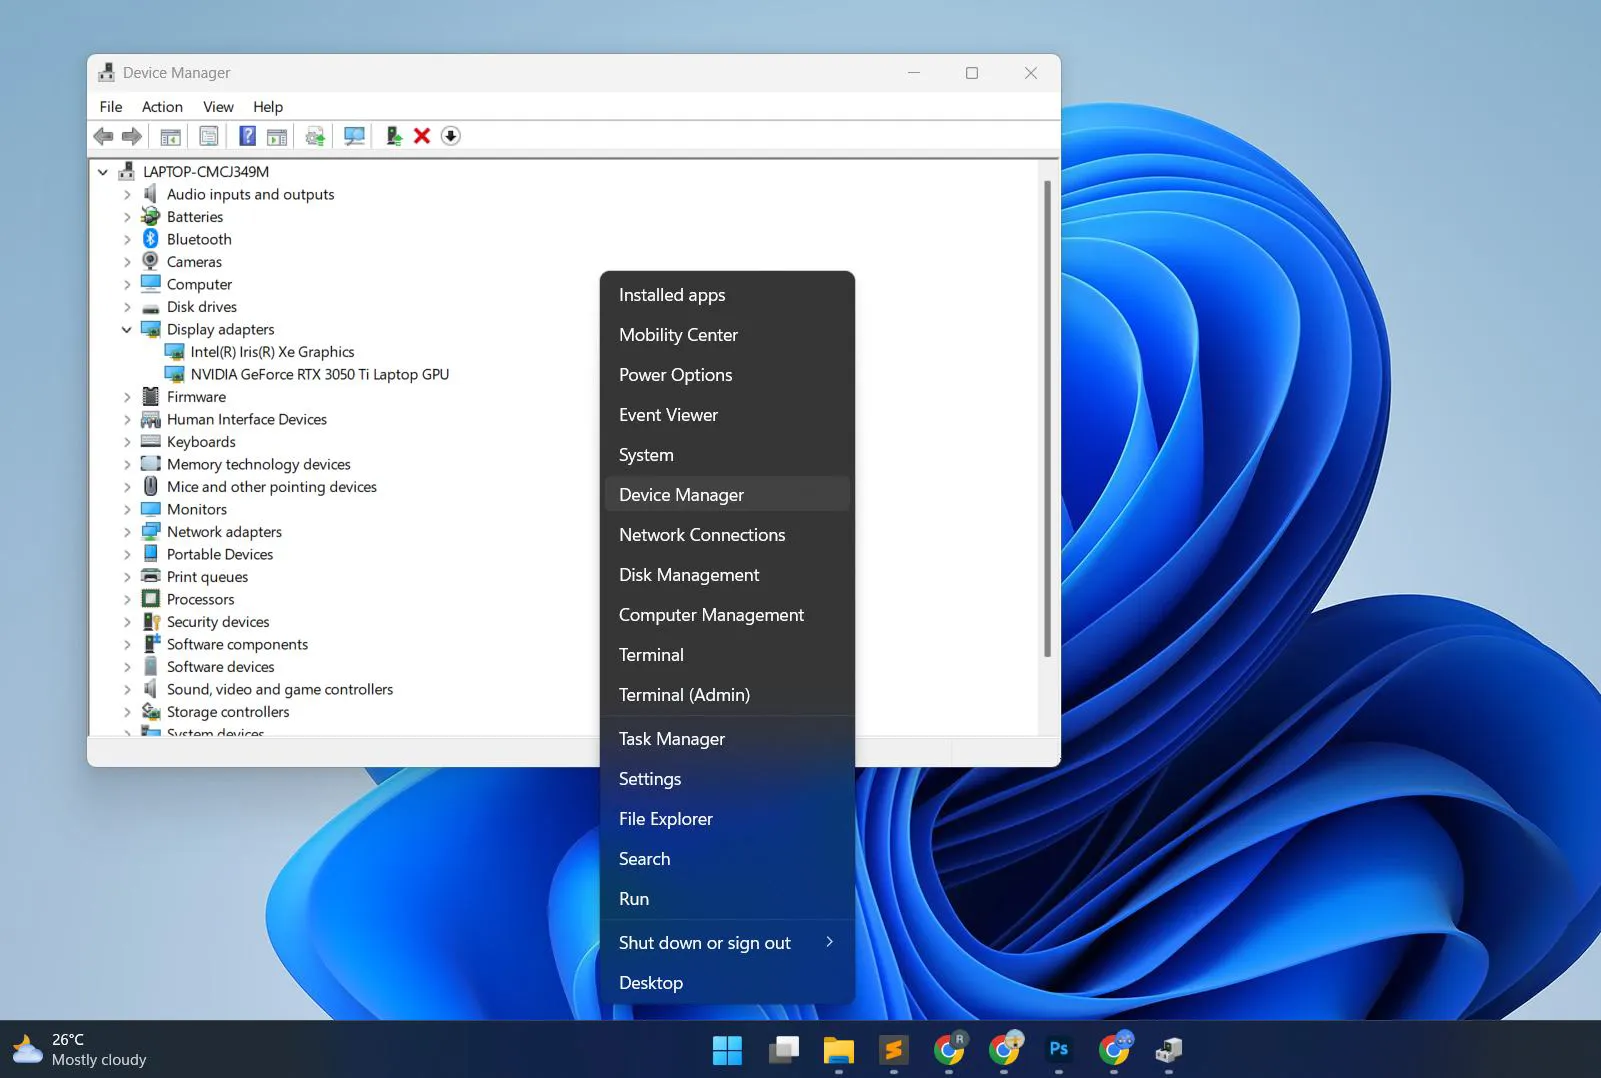
- Expand the “Display adapters” category
- Right-click on the graphics device listed
- Select “Update driver” from the context menu
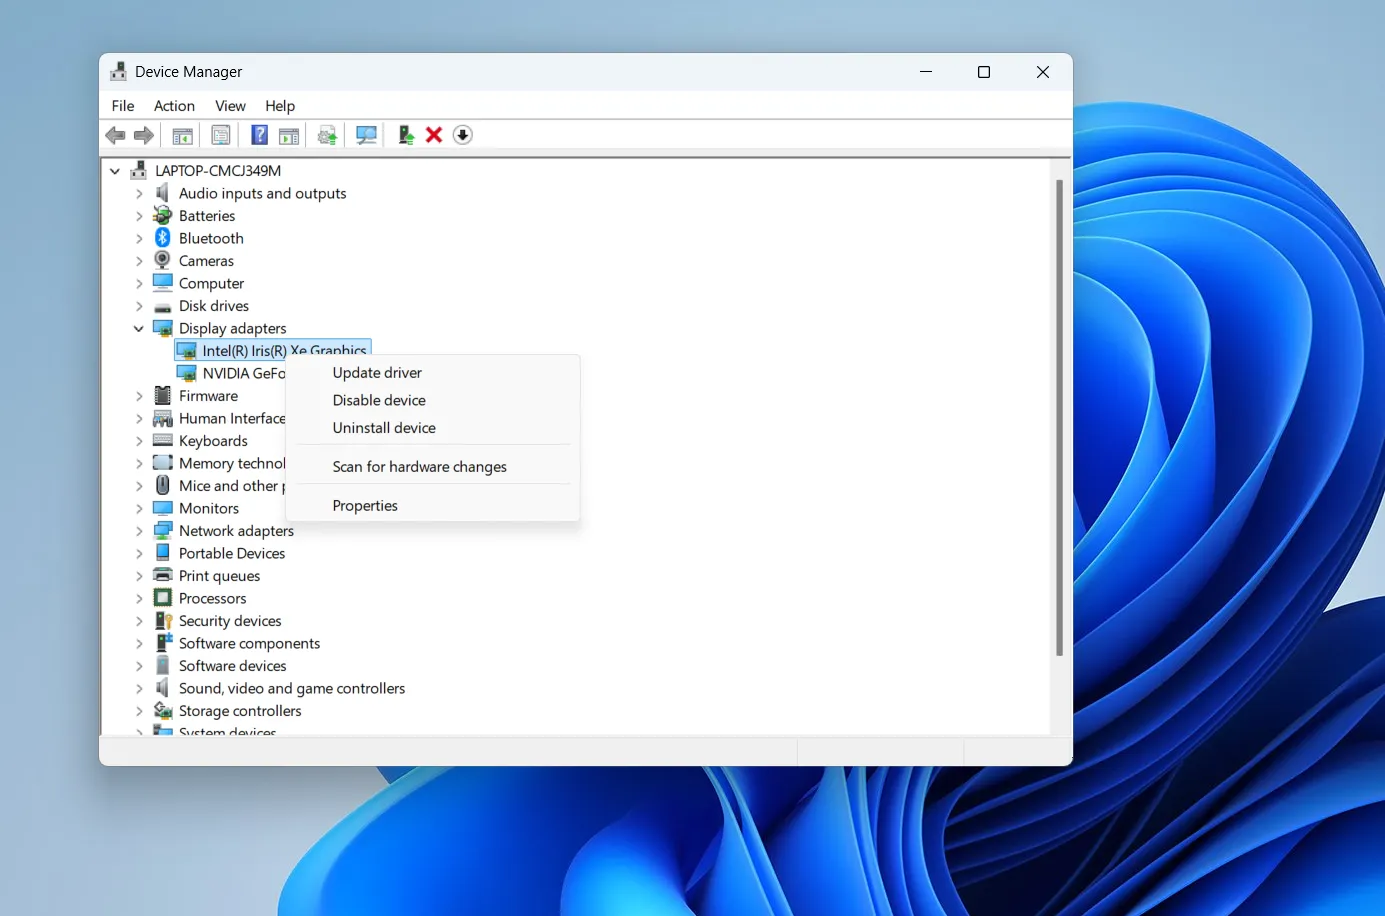
- Choose “Search automatically for drivers”
- Wait for Windows to search and install any available updates
- Restart the computer after installation completes
- If Windows finds no updates, visit the manufacturer’s website
- Download the latest graphics drivers for the specific device model
- Install the downloaded drivers manually
- Restart again and check if brightness controls have returned
This process resolves most brightness slider issues related to outdated or corrupted drivers.
Automatic Brightness Not Working
When automatic brightness fails to respond to lighting changes, the light sensor may need attention. Troubleshoot using these steps:
- Open Device Manager by right-clicking the Start button
- Look for a “Sensors” category and expand it
- Find the ambient light sensor entry
- Right-click the sensor and select “Update driver”
- Allow Windows to search for and install updates
- If the sensor shows a warning icon, right-click and select “Uninstall device”
- Restart the computer to force Windows to reinstall the sensor driver
- Check that nothing physically covers the sensor (usually near the webcam)
- Clean the sensor area gently with a soft cloth
- Test automatic brightness again after these steps
Most automatic brightness issues resolve after updating or reinstalling the sensor drivers.
Brightness Changes on Its Own
Unwanted brightness changes often stem from various automatic features. Disable these by following these steps:
- Navigate to Settings > System > Display
- Turn off “Change brightness automatically when lighting changes”
- Open the graphics control panel (Intel, AMD, or NVIDIA)
- Look for content-adaptive brightness or dynamic contrast features
- Disable any automatic brightness adjustment options found
- Check the monitor’s physical menu using its buttons
- Navigate to picture or display settings on the monitor
- Disable any built-in automatic brightness or eco-mode features
- Test to see if brightness remains stable after these changes
After disabling these features, brightness should only change when manually adjusted.
Monitor-Specific Brightness Controls
External monitors require different approaches to brightness adjustment compared to laptop displays. Understanding these methods helps maintain consistent brightness across multiple displays.
Using Physical Monitor Buttons
External monitors include physical controls for direct brightness adjustment. Use them following these steps:
- Locate the control buttons on the monitor (usually on the bottom bezel, side, or back)
- Press the menu button to access the on-screen display (OSD)
- Use arrow buttons to navigate to brightness or picture settings
- Select the brightness option
- Use up/down arrows or +/- buttons to increase or decrease brightness
- Press the menu button again or select “Exit” to save changes
This method works independently of software settings and affects only the specific monitor being adjusted.
Using Monitor Control Software
Many monitor manufacturers provide software for easier brightness adjustment. Set this up using these steps:
- Visit the monitor manufacturer’s support website
- Search for the specific monitor model
- Download the official monitor control software (Dell Display Manager, LG OnScreen Control, Samsung MagicTune, etc.)
- Install the software following the on-screen instructions
- Launch the monitor control application
- Look for brightness controls in the main interface or system tray icon
- Adjust brightness using sliders or preset profiles
- Save custom brightness presets if the software supports it
Once installed, brightness changes can be made without touching the monitor itself.
Configuring Multi-Monitor Brightness
When using multiple monitors, each display needs individual brightness adjustment. Configure them using these steps:
- Open Settings and go to System > Display
- View all connected monitors shown in the display diagram
- Click on the first display to select it
- Adjust its brightness slider to the desired level
- Click on the second display in the diagram
- Adjust its brightness slider independently
- Repeat for any additional monitors connected to the system
- Use physical monitor controls or manufacturer software for more precise control
The Quick Settings panel only controls the primary display, so secondary monitors require adjustment through Settings or monitor-specific controls.
Understanding Brightness and Display Technology
Different display technologies respond to brightness adjustments in varying ways. Knowing these differences helps set appropriate expectations and optimize settings for specific screen types.
LCD and LED Display Brightness
LCD and LED displays use backlight technology that affects how brightness works. Understanding this helps optimize settings:
- LCD and LED displays control brightness by adjusting backlight intensity
- Lower brightness settings reduce power consumption and extend backlight lifespan
- These displays maintain consistent color accuracy across most brightness ranges
- Very low brightness settings (below 20%) may reduce contrast ratio slightly
- Brightness adjustments respond quickly without noticeable lag
- The backlight remains on even at minimum brightness settings
Most modern laptops use LED-backlit LCD panels that balance power efficiency with visual quality.
OLED Display Brightness Considerations
OLED displays work differently from LCD technology and require special considerations. Manage OLED brightness properly using these guidelines:
- Understand that each OLED pixel emits its own light independently
- Reduce brightness significantly to lower power consumption on OLED screens
- Keep brightness moderate to reduce the risk of burn-in on static elements
- Note that OLED displays may shift color temperature at different brightness levels
- Accept that maximum brightness on OLED laptops is often lower than LCD equivalents
- Use dark themes and backgrounds to further reduce power consumption
- Avoid keeping static content at high brightness for extended periods
OLED brightness controls have a more direct impact on power usage and panel longevity compared to LCD displays.
HDR Brightness Behavior
HDR content manages brightness differently than standard content. Configure HDR properly using these steps:
- Navigate to Settings > System > Display
- Enable HDR if the display supports it
- Locate the “SDR content brightness” slider
- Adjust SDR brightness to control non-HDR content when HDR is enabled
- Understand that HDR content will use its own brightness metadata
- Allow HDR videos and games to adjust brightness dynamically
- Keep SDR content brightness moderate to prevent eye strain when switching between HDR and SDR
This dual-brightness system ensures HDR content displays with intended brightness peaks while keeping standard applications comfortable for viewing. More details about display technologies can be found in hardware resources.
Third-Party Tools for Enhanced Brightness Control
Several third-party applications provide advanced brightness control features beyond what Windows offers natively. These tools suit users who need scheduling, hotkeys, or per-application brightness adjustments.
Using Desktop Dimmer Applications
Desktop dimmer applications offer enhanced brightness control with automation features. Set up these tools using these steps:
- Research popular dimmer applications like f.lux, Dimmer, or Twinkle Tray
- Download the chosen application from its official website
- Install the software following the installation wizard
- Launch the application after installation completes
- Configure brightness schedules based on time of day
- Set up automatic dimming for specific hours (such as evening or night)
- Create profiles for different usage scenarios
- Enable overlay dimming if Windows brightness controls fail
- Test the automated brightness changes throughout the day
These programs can adjust brightness based on schedules that match daily routines and lighting conditions.
Keyboard Macro Tools for Custom Shortcuts
Keyboard macro software allows creating custom brightness controls for any device. Set this up using these steps:
- Download AutoHotkey or similar macro software from its official website
- Install the application on the system
- Create a new script file with a .ahk extension
- Write or copy brightness control scripts from online resources
- Assign custom key combinations for brightness up and brightness down
- Set increment values for how much brightness changes with each keypress
- Save the script file
- Run the script to activate custom brightness hotkeys
- Configure the script to run automatically at startup if desired
This works particularly well for desktop systems with external keyboards that lack brightness function keys.
Monitor Control Software for Multiple Displays
Specialized monitor control applications provide unified brightness management for multiple displays. Set these up using these steps:
- Download applications like ClickMonitorDDC or Monitorian
- Install the monitor control software
- Launch the application to detect all connected displays
- Verify that all monitors appear in the software interface
- Use sliders to adjust each monitor’s brightness individually
- Create hotkeys for quick brightness adjustments across all monitors
- Set up synchronized brightness control to adjust all displays simultaneously
- Save custom brightness profiles for different times of day or tasks
This works best when managing three or more monitors where reaching physical buttons becomes impractical.
Best Practices for Long-Term Display Health
Proper brightness management contributes to display longevity and eye health. Follow these best practices for optimal results:
Maintaining Optimal Brightness Levels
Keep displays in good condition by following these brightness management practices:
- Avoid running displays at maximum brightness for extended periods
- Match brightness to ambient lighting conditions throughout the day
- Use automatic brightness adjustment when available and properly calibrated
- Reduce brightness during nighttime use to minimize eye strain
- Allow displays to adjust gradually rather than making extreme sudden changes
- Keep brightness moderate (40-60%) for general everyday use
These practices help extend display component lifespan while maintaining comfortable viewing conditions.
Preventing Eye Strain and Fatigue
Protect eye health during computer use by implementing these brightness strategies:
- Follow the 20-20-20 rule: every 20 minutes, look at something 20 feet away for 20 seconds
- Adjust brightness to match surrounding ambient light levels
- Enable Night Light or blue light filters during evening hours
- Position the monitor to avoid glare from windows or overhead lights
- Increase brightness slightly if squinting or straining to read text
- Decrease brightness if experiencing eye discomfort or headaches
- Take regular breaks from screen time throughout the day
- Ensure proper room lighting to reduce contrast between screen and surroundings
Proper brightness management combined with good ergonomic practices significantly reduces eye strain during extended computer sessions.
Energy Efficiency Considerations
Optimize brightness for energy savings while maintaining usability by following these steps:
- Reduce brightness to the lowest comfortable level for the current task
- Use power plans that automatically reduce brightness on battery power
- Enable Battery Saver mode on laptops to automatically dim the display
- Set shorter screen timeout durations to turn off the display when inactive
- Use dark themes and wallpapers on OLED displays to reduce power consumption
- Turn off displays completely during breaks rather than relying on screensavers
- Schedule brightness to decrease during times of low activity
These energy-efficient practices reduce electricity consumption and extend battery life without significantly impacting usability. Additional tips for optimizing Windows performance can be found in related resources.
Frequently Asked Questions
Why can’t I adjust brightness on my Windows 11 desktop?
Desktop computers with external monitors don’t have Windows-controlled brightness sliders because external displays manage brightness independently through physical buttons or monitor software. Laptops have integrated brightness controls because the display connects directly to the motherboard. To adjust brightness on external monitors, use the physical buttons on the monitor itself or install manufacturer-specific monitor control software that communicates with the display through DDC/CI protocols.
How do I fix brightness control when it’s not working?
Start by updating display drivers through Device Manager. Right-click the Start button, select Device Manager, expand Display adapters, right-click the graphics device, and choose Update driver. If this doesn’t resolve the issue, uninstall the display driver completely and restart the computer to force Windows to reinstall it. Check for Windows updates in Settings > Windows Update, as system updates often include driver fixes. Disable automatic brightness and adaptive brightness features, then test manual brightness adjustment.
What’s the best brightness level for eye health?
The optimal brightness level matches ambient lighting in the surrounding environment. In bright rooms, set brightness higher to maintain adequate contrast without straining eyes. In darker rooms, reduce brightness to prevent glare and eye fatigue. Most experts recommend brightness levels between 40-60% for typical office environments. Enable Night Light or blue light filters during evening hours to reduce eye strain before sleep. Take regular breaks following the 20-20-20 rule: every 20 minutes, look at something 20 feet away for 20 seconds.
Does lowering brightness actually save battery life?
Yes, reducing screen brightness significantly extends battery life on laptops and tablets. The display typically consumes 20-40% of total system power, making it one of the largest power draws. Lowering brightness from 100% to 50% can extend battery runtime by 30-60 minutes depending on the device and display technology. OLED displays show even greater battery savings at lower brightness levels because individual pixels consume less power. Combining reduced brightness with Battery Saver mode maximizes battery conservation.
Can I set different brightness for different apps?
Windows 11 doesn’t natively support per-application brightness settings, but third-party tools like f.lux or specialized gaming software can adjust brightness or color temperature based on active applications. Some graphics control panels offer game-specific profiles that include brightness adjustments. For most users, manual brightness adjustment when switching between tasks provides sufficient control. Content-adaptive brightness features in some displays automatically adjust brightness based on what appears on screen, though this differs from per-application control.
Why does my screen brightness change by itself?
Automatic brightness changes typically occur due to adaptive brightness features responding to ambient light sensors. Disable this in Settings > System > Display by turning off “Change brightness automatically when lighting changes.” Content-adaptive brightness control in graphics settings can also cause unexpected changes based on displayed content. Some monitors have built-in automatic brightness sensors that operate independently of Windows settings. Power plans may also switch brightness when transitioning between battery and AC power. Check all these settings to identify which feature causes unwanted brightness adjustments.