Key Takeaways
- User Account Control (UAC) in Windows 11 helps protect the system from unauthorized changes.
- UAC settings can be adjusted through the Control Panel or Windows Security settings.
- There are four UAC notification levels – choosing the right one depends on how often apps need admin access.
- Disabling UAC completely is not recommended for everyday users.
- Changes to UAC settings take effect immediately after applying them.
What Is User Account Control in Windows 11
User Account Control, commonly known as UAC, is a built-in security feature in Windows 11 that prevents unauthorized changes to the operating system. Whenever an app tries to make changes that require administrator-level permission, UAC steps in and asks for confirmation. That familiar pop-up asking ‘Do you want to allow this app to make changes to your device?’ – that is UAC doing its job.
Most people find UAC prompts a little annoying at times, but they play a key role in keeping the system secure. The good news is that Windows 11 allows full control over how and when UAC notifications appear – without needing to be a tech expert to do it.
For anyone looking to explore more Windows settings and guides, there are plenty of step-by-step resources available to help navigate common tasks.
How to Access User Account Control Settings in Windows 11
Getting to the UAC settings is straightforward. Follow these steps to open it:
- Step 1: Click the Start menu and type ‘UAC’ or ‘User Account Control’ in the search bar.
- Step 2: Click on ‘Change User Account Control settings’ from the search results.
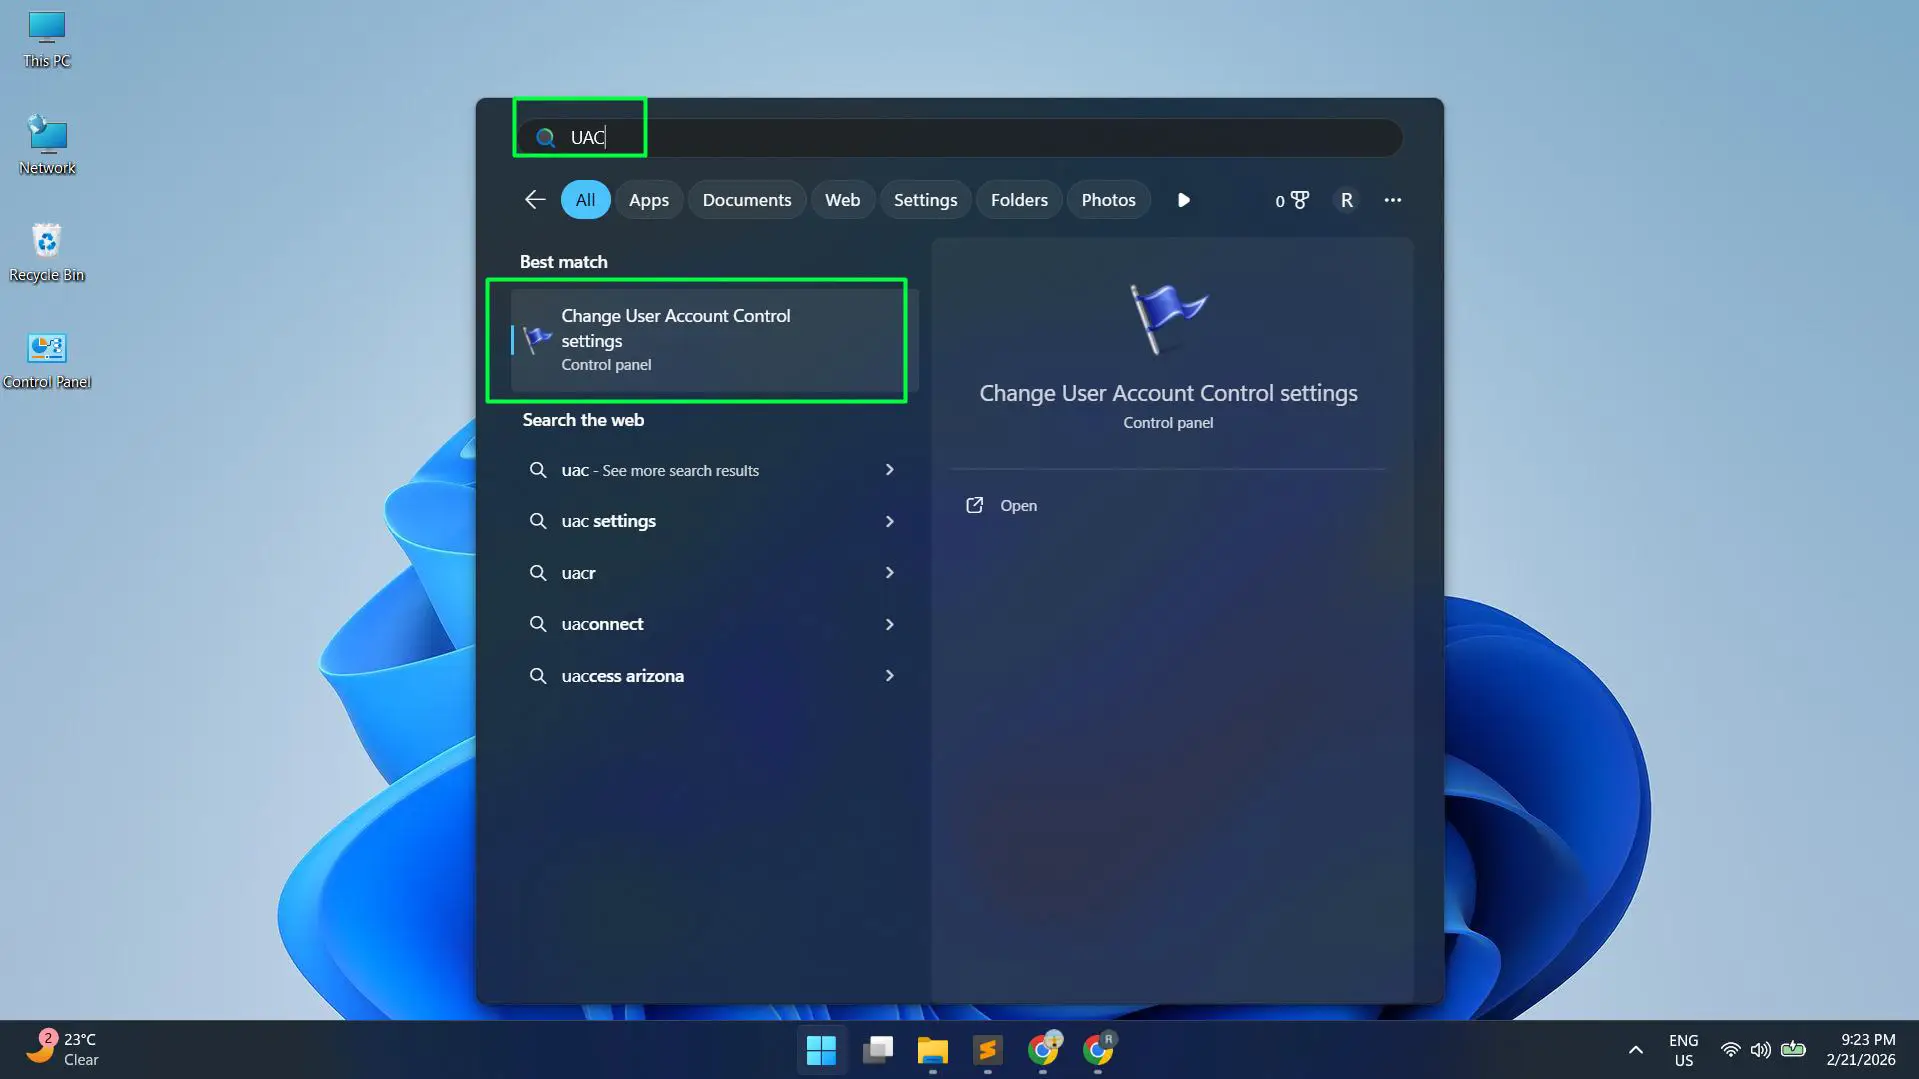
- Step 3: The UAC settings window will open with a slider showing four notification levels.
That is the fastest way to get there. Alternatively, it can also be accessed through the classic Control Panel path.
How to Open UAC via Control Panel
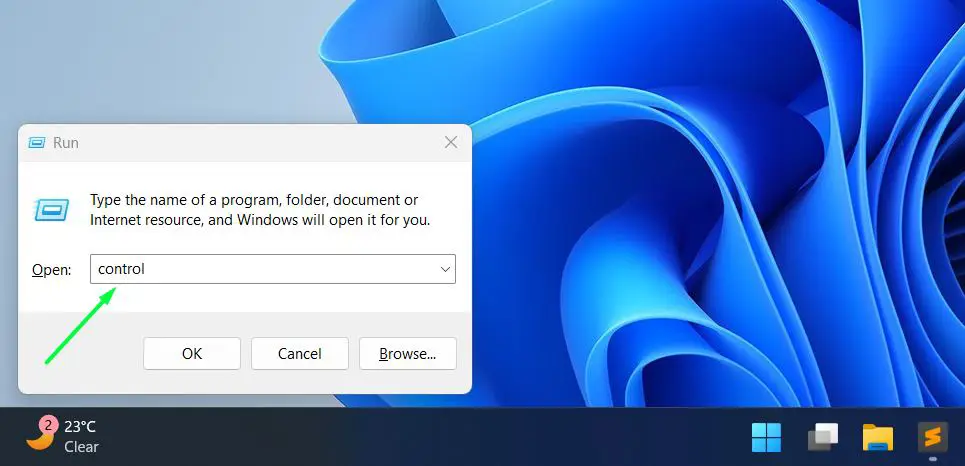
- Step 1: Press Windows + R to open the Run dialog box.
- Step 2: Type ‘control’ and press Enter to open the Control Panel.
- Step 3: Select ‘System and Security’
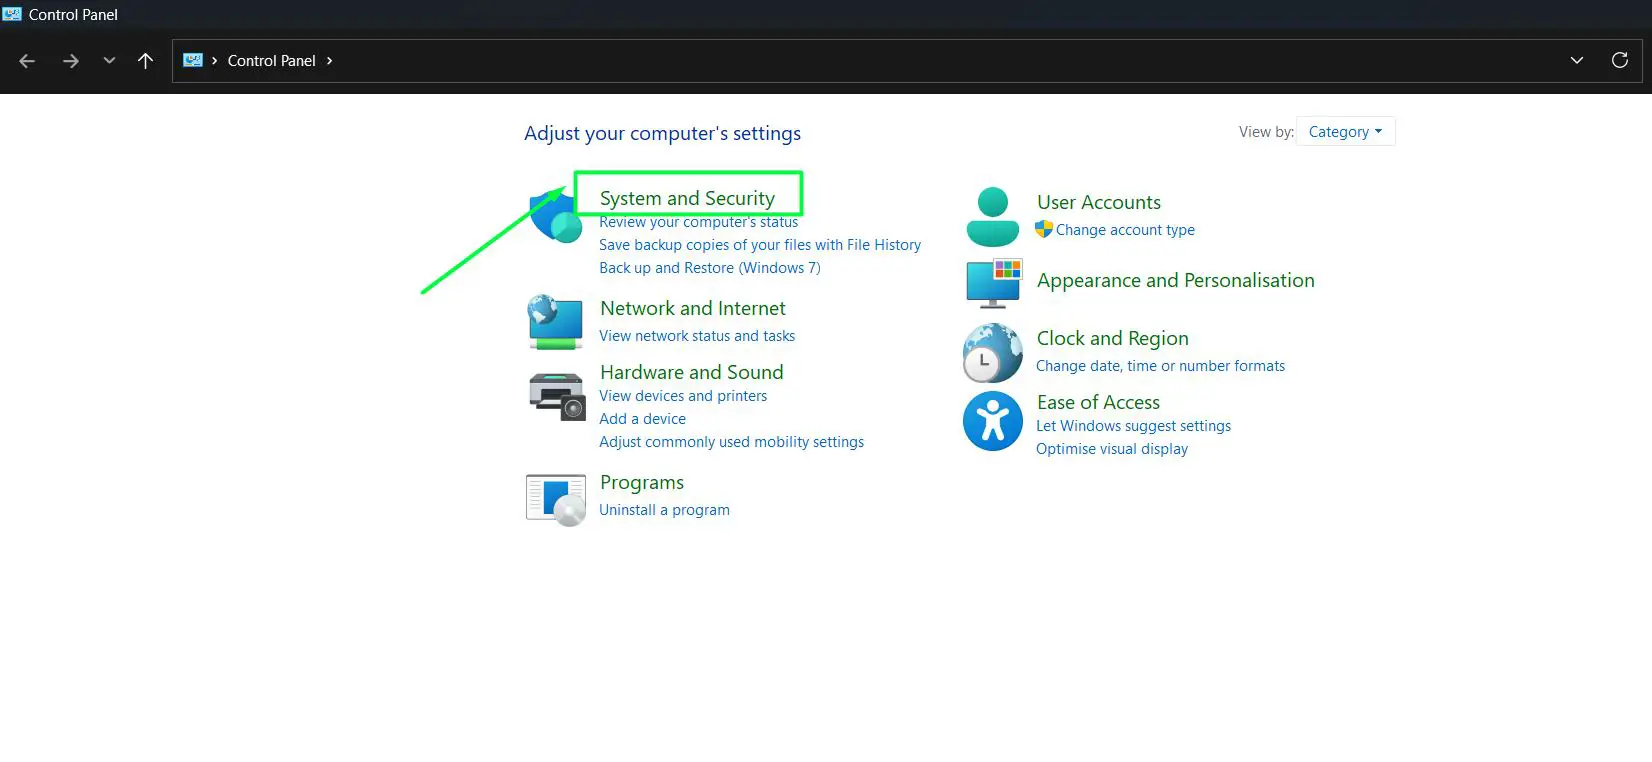
- Step 4: Click ‘Security and Maintenance’.
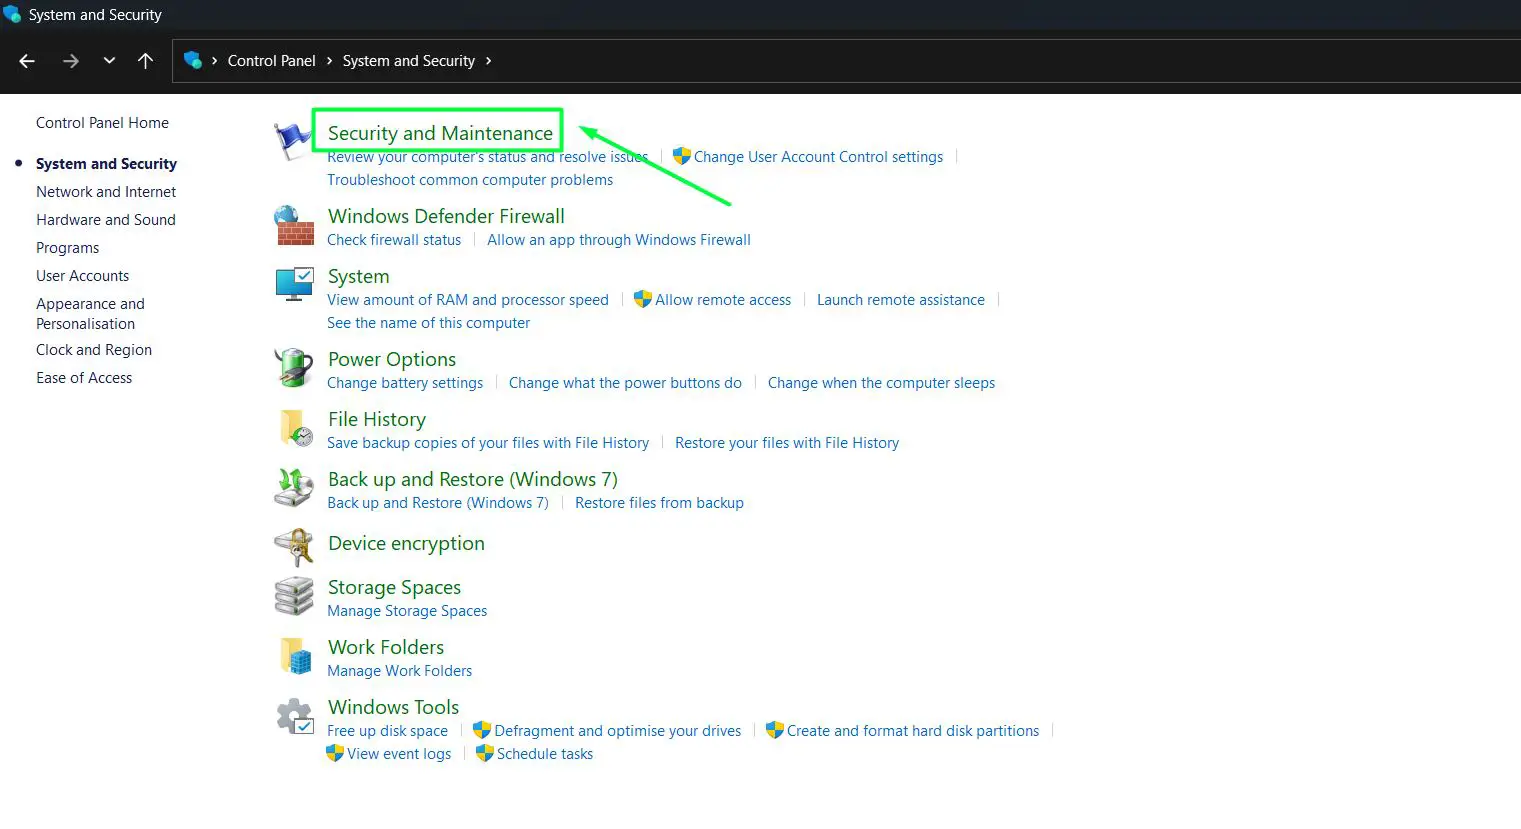
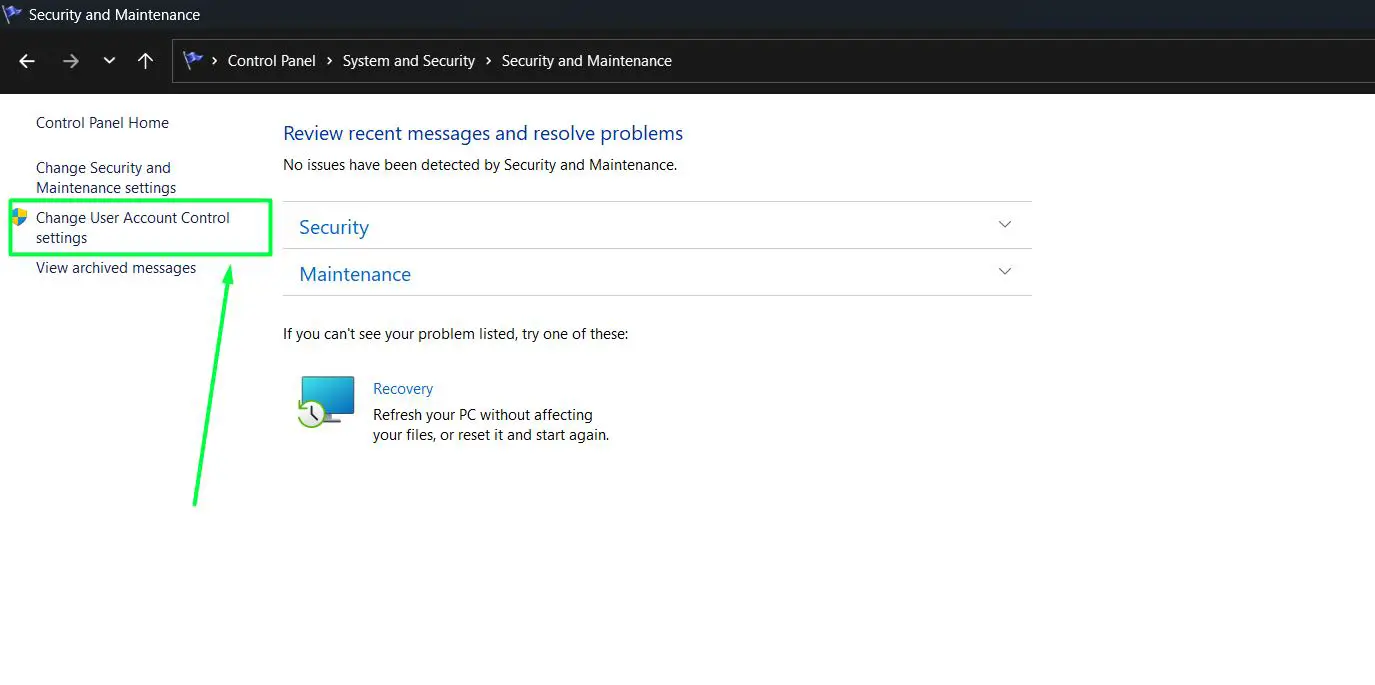
- Step 5: On the left panel, click ‘Change User Account Control settings’.
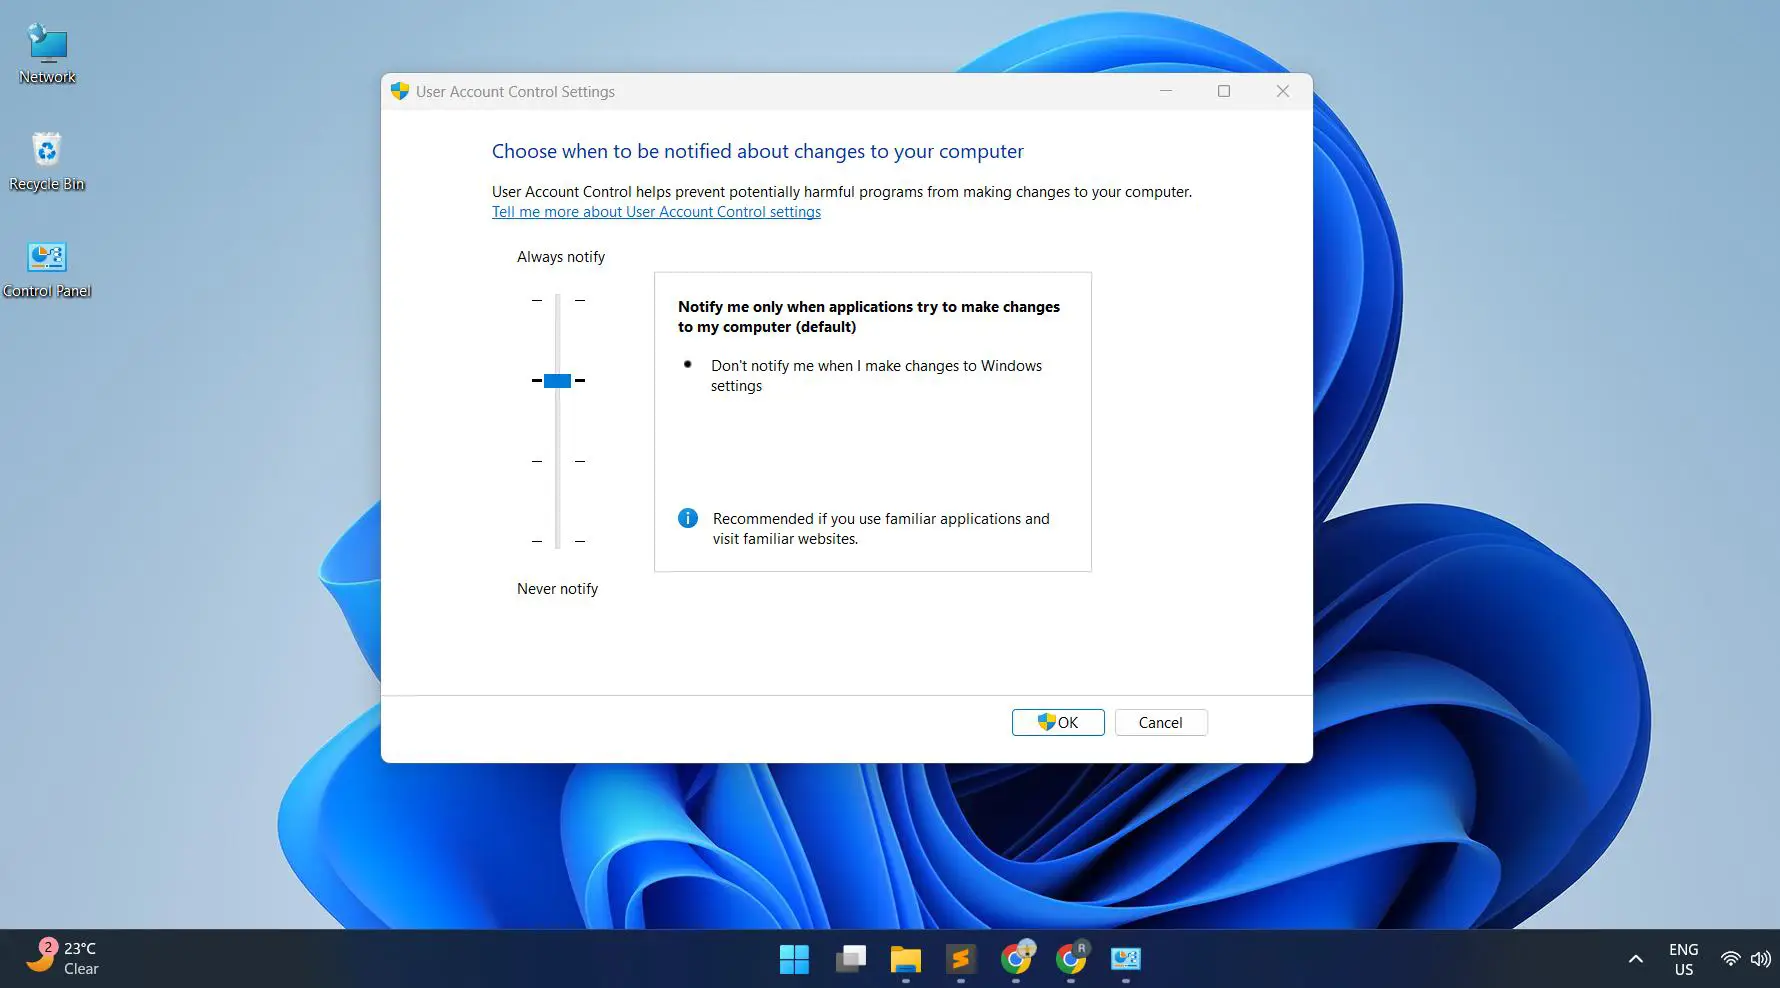
Understanding the Four UAC Notification Levels
The UAC settings window has a vertical slider with four positions. Each one controls how often and when Windows will notify about changes. Here is what each level means:
Always Notify (Highest Level)
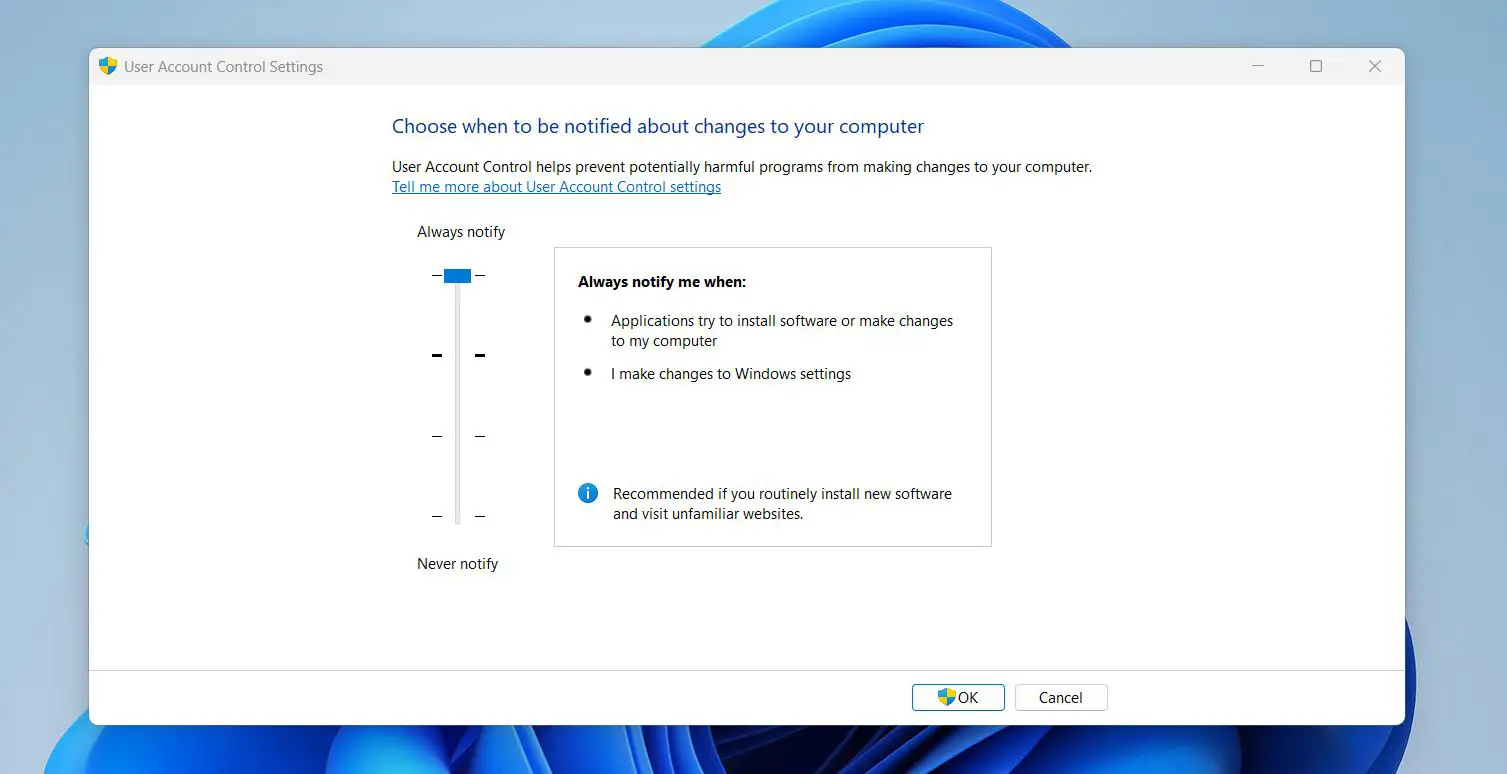
This setting notifies every time any change is attempted – whether it is from an app or from the user directly adjusting Windows settings. It is the most secure option and works best in shared or high-risk environments.
Notify Only When Apps Try to Make Changes (Default)
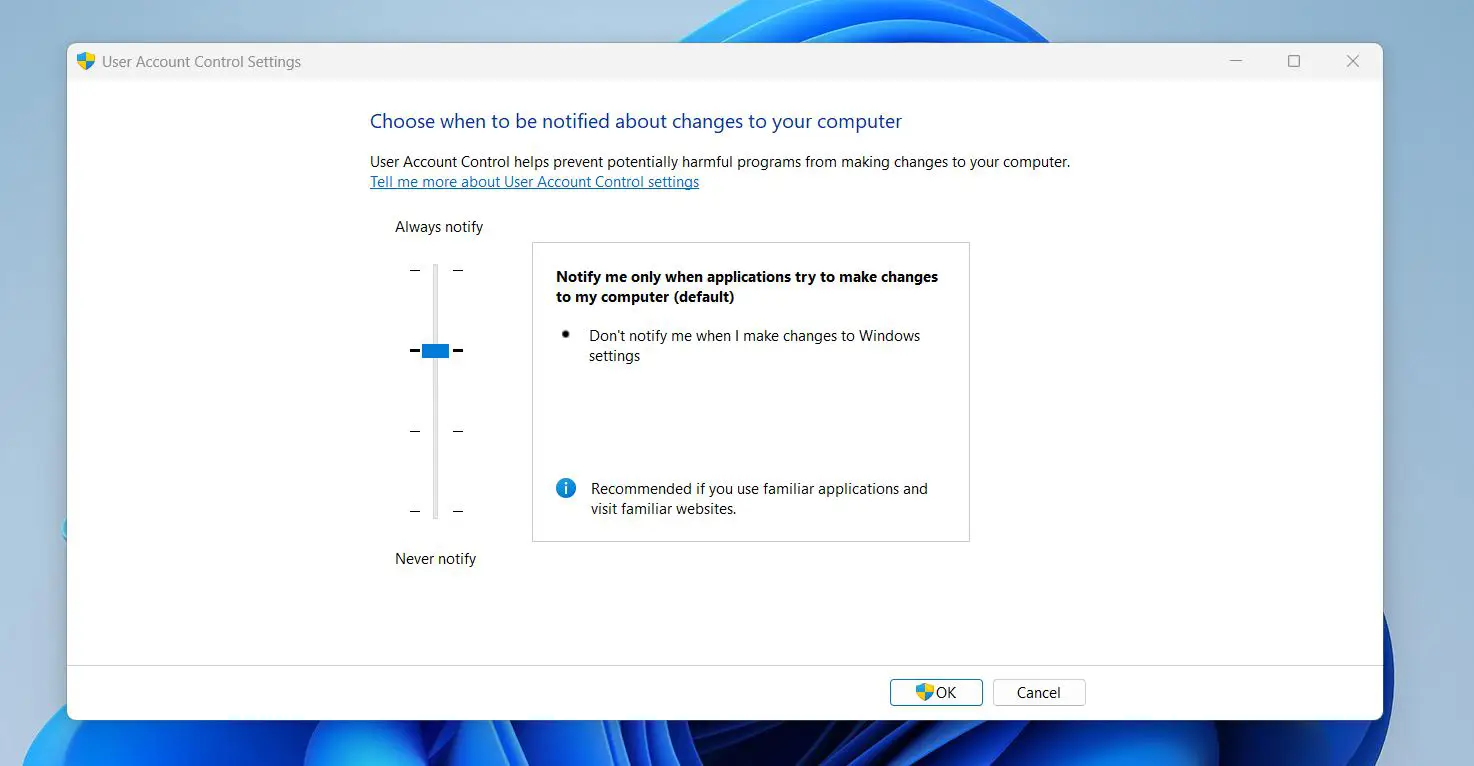
This is the default setting for most Windows 11 installations. The system only prompts when an application tries to make changes, not when the user manually adjusts settings. This strikes a solid balance between security and convenience.
Notify Without Dimming the Desktop
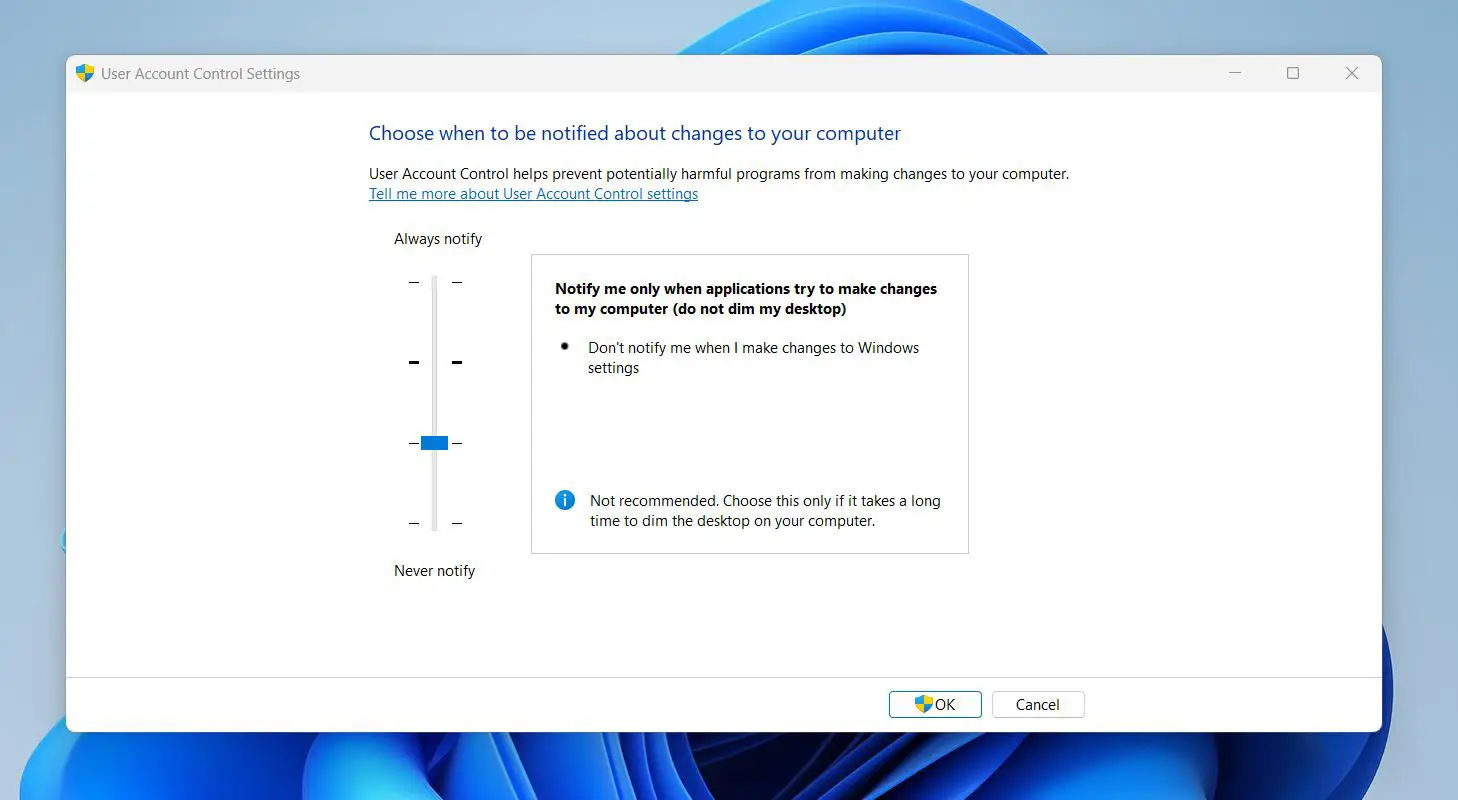
Functionally similar to the default, but the desktop does not dim when the prompt appears. This is useful on older or slower hardware where the dimming effect causes a lag.
Never Notify (Lowest Level)
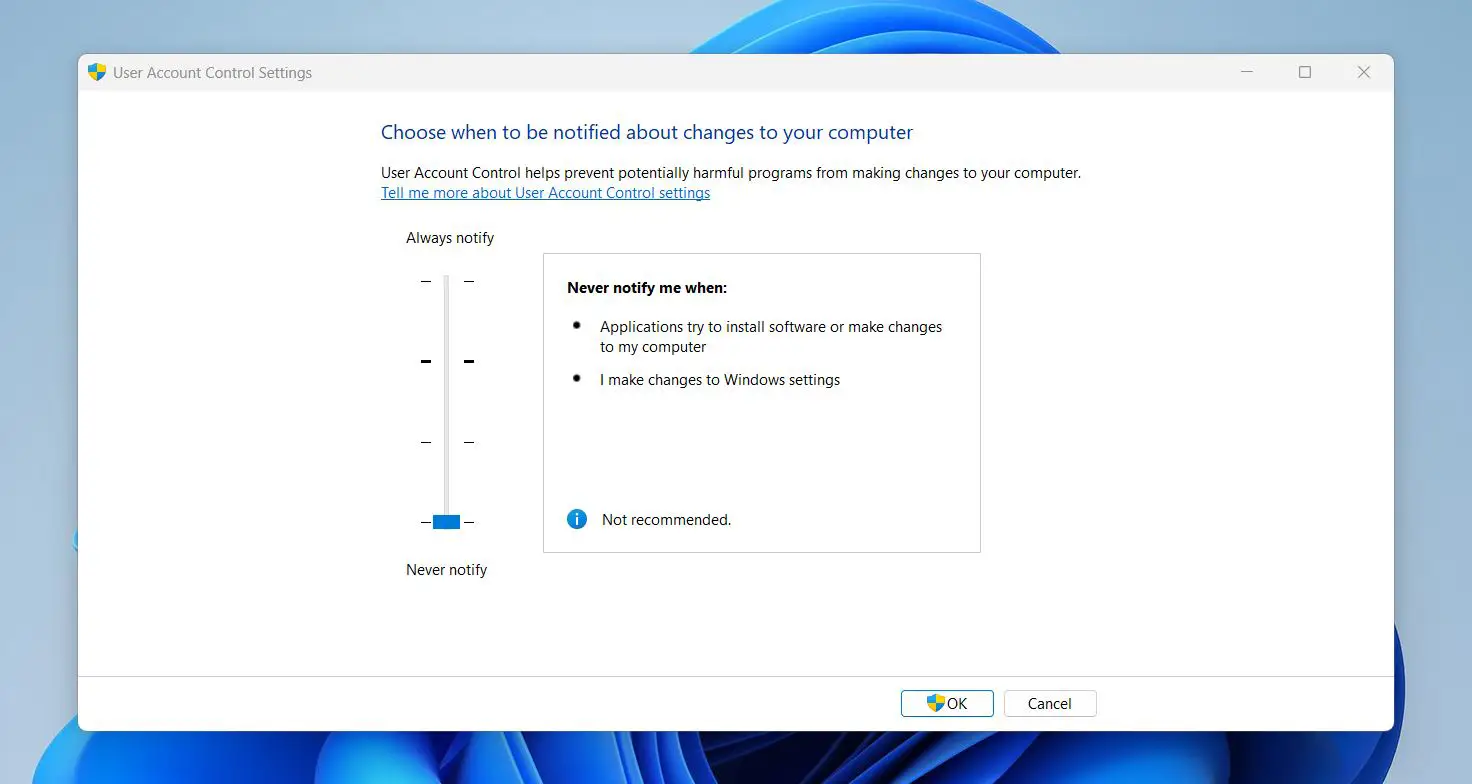
This disables UAC entirely. Apps can make changes without any prompts. This is not recommended for general use because it removes a core layer of system protection.
Pro-Tip: The default ‘Notify only when apps try to make changes’ level works well for most users. Only go lower if there is a specific reason – like running legacy software that constantly triggers UAC – and consider reverting afterwards.
Want to change your user account picture easily in Windows? Check this guide here for easy steps!
How to Change the UAC Level in Windows 11
- Step 1: Open the UAC settings window using any of the methods above.
- Step 2: Move the slider up or down to select the desired notification level.
- Step 3: Click ‘OK’ to save the changes.
- Step 4: A UAC prompt may appear asking to confirm the change – click ‘Yes’ to apply it.
The change takes effect right away. No restart needed.
How to Manage UAC for Specific Apps
Sometimes the issue is not UAC as a whole – it is one specific application triggering it constantly. Rather than lowering the UAC level globally, it is possible to configure individual apps to always run with administrator privileges, which bypasses the UAC prompt for that specific app only.
- Step 1: Right-click the application shortcut or executable file.
- Step 2: Select ‘Properties’ from the context menu.

- Step 3: Go to the ‘Compatibility’ tab.
- Step 4: Under ‘Settings’, check the box that says ‘Run this program as an administrator’.
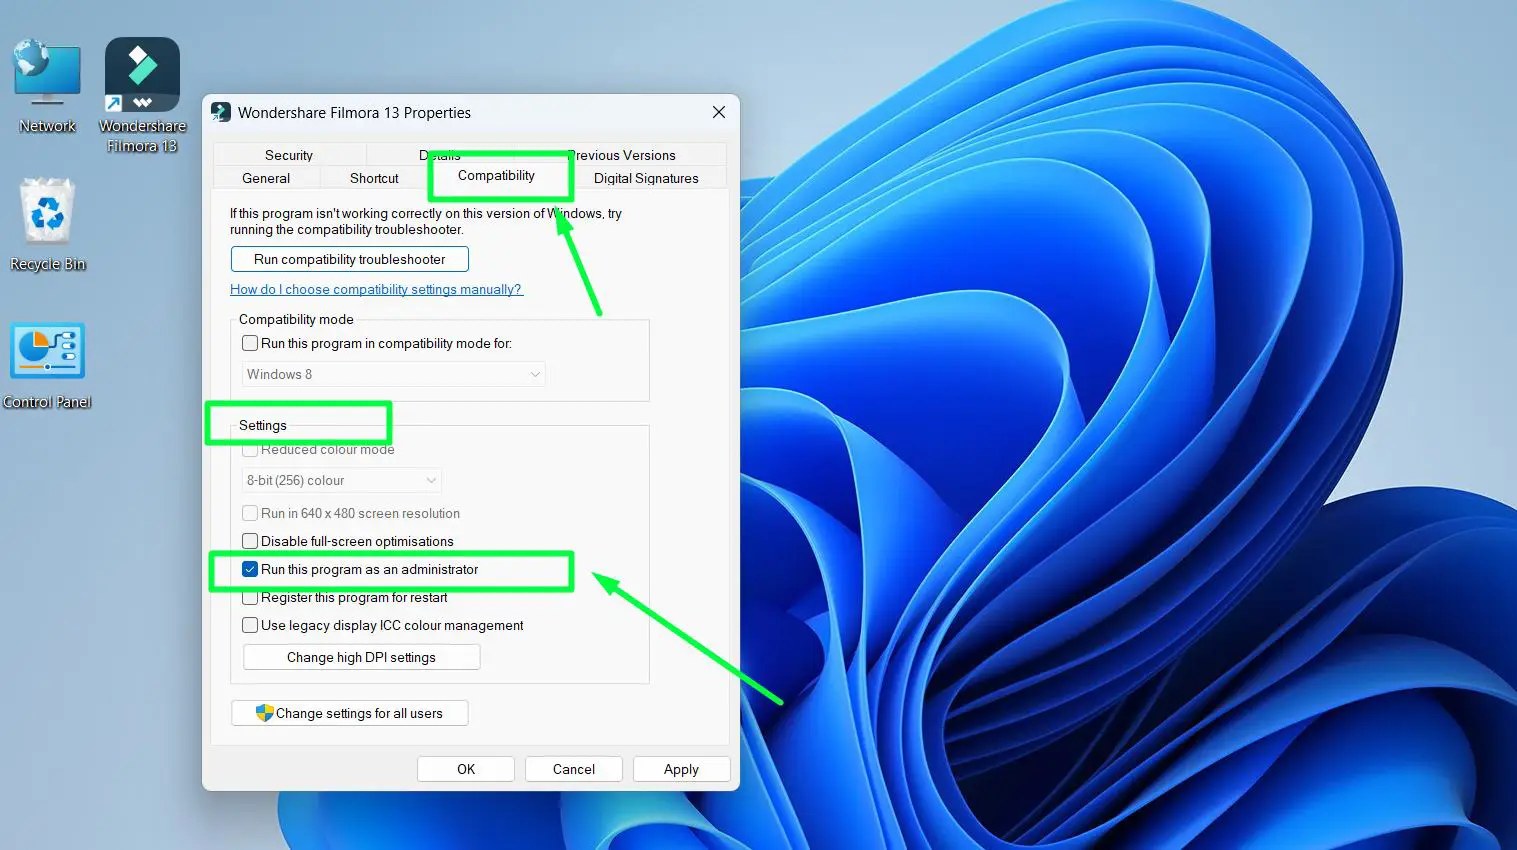
- Step 5: Click ‘Apply’, then ‘OK’.
This works best when dealing with older software or tools that were not designed with Windows 11 security standards in mind.
How to Enable or Disable UAC Using the Registry Editor
For advanced users who prefer registry-level control, UAC can be toggled through the Windows Registry. This method is useful for system administrators managing multiple machines or applying group-level policies.
Pro-Tip: Always back up the registry before making any changes. A wrong edit can cause system instability.

- Step 1: Press Windows + R, type ‘regedit’, and press Enter.
- Step 2: Navigate to: HKEY_LOCAL_MACHINE\SOFTWARE\Microsoft\Windows\CurrentVersion\Policies\System
- Step 3: Find the value named ‘EnableLUA’.
- Step 4: Double-click it and set the value to ‘1’ to enable UAC or ‘0’ to disable it.
- Step 5: Click ‘OK’ and restart the computer for the change to take effect.
Tips for Managing UAC Effectively
- Keep UAC at the default or higher level for daily use – it is a first line of defense against malware.
- Use the ‘Run as administrator’ option for specific apps instead of lowering UAC globally.
- If UAC prompts appear for trusted software regularly, check if the software has a ‘run as administrator’ option that can be set permanently.
- On a shared or family computer, keeping UAC at ‘Always Notify’ adds an extra layer of oversight.
- For more help managing software settings and configurations, explore additional guides that cover common application management tasks.
Common Problems With User Account Control in Windows 11
UAC Prompt Not Appearing
If the UAC prompt does not appear when expected, the notification level may have been set to ‘Never Notify’. Open the UAC settings and move the slider back up to at least the default level.
UAC Prompt Appears Too Frequently
This usually happens when running apps that constantly need elevated permissions. Try setting those specific apps to always run as administrator using the Compatibility tab method described above.
UAC Is Greyed Out or Cannot Be Changed
This typically means the system is managed by a group policy – common in workplace or school environments. A system administrator would need to adjust the policy settings. On a personal machine, this can also happen if the current user account does not have administrator privileges.
Desktop Dims but Prompt Does Not Show
This can happen when the UAC prompt is opened in the background. Check the taskbar for a flashing window or try pressing Alt + Tab to bring it to the front.
Frequently Asked Questions
What does User Account Control do in Windows 11?
User Account Control monitors and controls changes made to the operating system. It prompts for confirmation whenever an app or process tries to make changes that require administrator-level access, helping prevent unauthorized modifications.
Is it safe to disable UAC in Windows 11?
Disabling UAC is generally not recommended. It removes an important layer of protection, making the system more vulnerable to malware and unauthorized changes. Only consider disabling it temporarily for specific troubleshooting tasks, then re-enable it afterwards.
How do you turn off UAC for just one app in Windows 11?
Right-click the app shortcut, select ‘Properties’, go to the ‘Compatibility’ tab, and check ‘Run this program as an administrator’. This allows the app to always run with elevated rights without affecting the global UAC setting.
Why does UAC keep popping up in Windows 11?
Frequent UAC prompts usually mean an application is repeatedly requesting admin permissions. This is common with older or poorly optimized software. Setting the specific app to always run as administrator can reduce these prompts.
Can UAC settings be changed without an administrator account?
No. Changing UAC settings requires administrator privileges. On a standard user account, Windows will prompt for an administrator password before allowing any changes to UAC settings.