Key Takeaways
- Press Windows + Shift + R to start screen recording instantly – no extra downloads needed
- The Snipping Tool records a specific rectangle area or a full window
- Bandicam offers higher-quality recordings with more control
- All three methods let you select which part of the screen to record
- The Snipping Tool auto-saves recordings as MP4 to the Screen Recordings folder – no manual save needed
Learning how to screen record on Windows 11 doesn’t have to be complicated. Windows 11 includes everything you need built right in. You can start recording in just a few seconds once you know the right method.
You might need to capture a quick tutorial, save a presentation, or record part of your screen for reference. This guide covers exactly how to do it – step by step, no fluff.
Three Methods Covered
This guide covers three solid methods. First, you’ll learn the keyboard shortcut that opens the Snipping Tool recorder instantly. Second, you’ll see how to open the Snipping Tool manually for more selection control. Third, you’ll discover Bandicam for those who want more recording power.
All three are straightforward. The right choice depends on how much control you need over the recording.
Method 1: Screen Record on Windows 11 Using Windows + Shift + R
This is the fastest way to start a screen recording on Windows 11. Press Windows + Shift + R to open the Snipping Tool directly into recording mode. This skips the need to open any app manually.
From there, you can select the exact area of the screen to capture before recording begins.
Why This Method Works Best
Most people use this method daily once they discover it. The key advantage is that you define exactly what gets recorded. You don’t have to capture the whole screen when you only need a portion.
Step-by-Step Instructions
Step 1: Press Windows + Shift + R on the keyboard at the same time
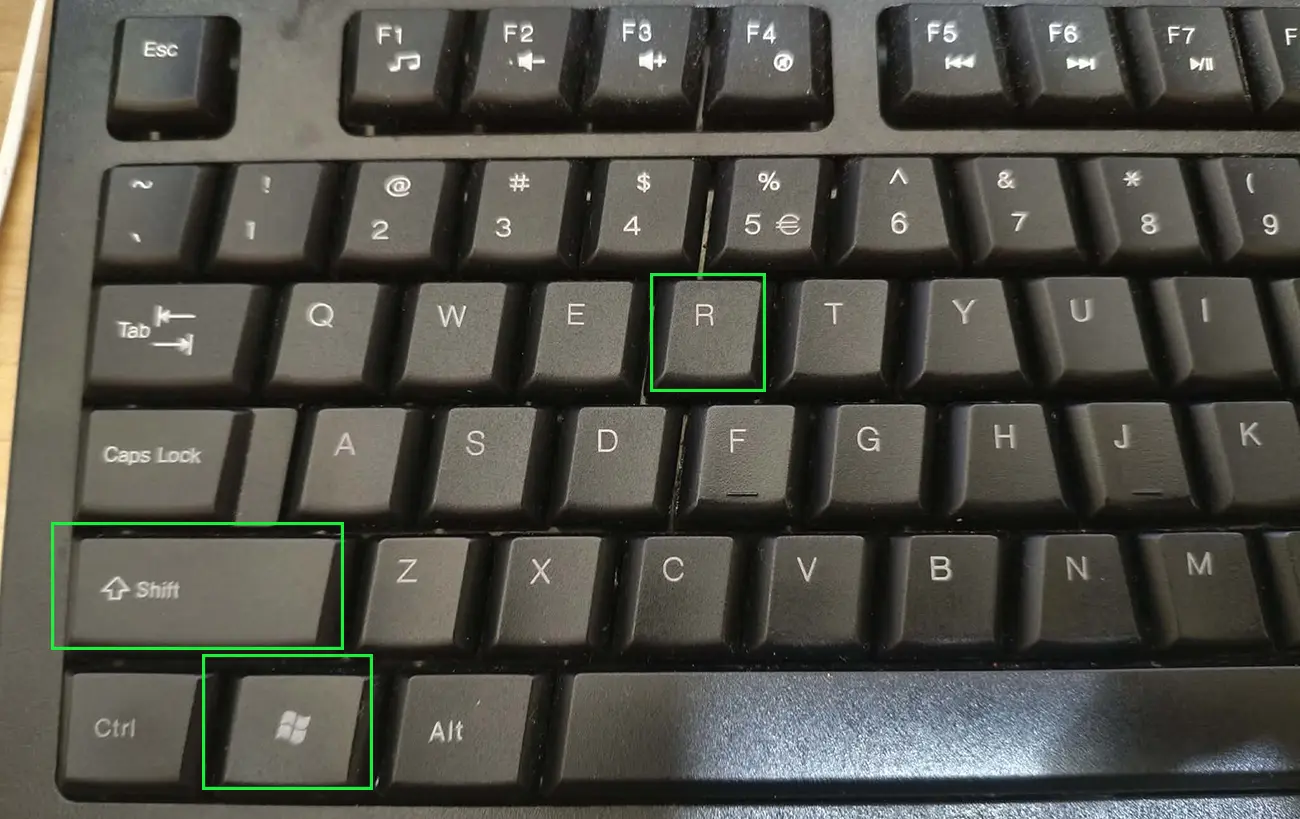
Step 2: The screen will dim slightly. A small toolbar will appear at the top

Step 3: Choose between Rectangle mode or Window mode
Rectangle mode: Click and drag to select a custom area
Window mode: Click on a specific app window to select it

Step 4: Click and drag across the area of the screen to record, or click on the window to capture
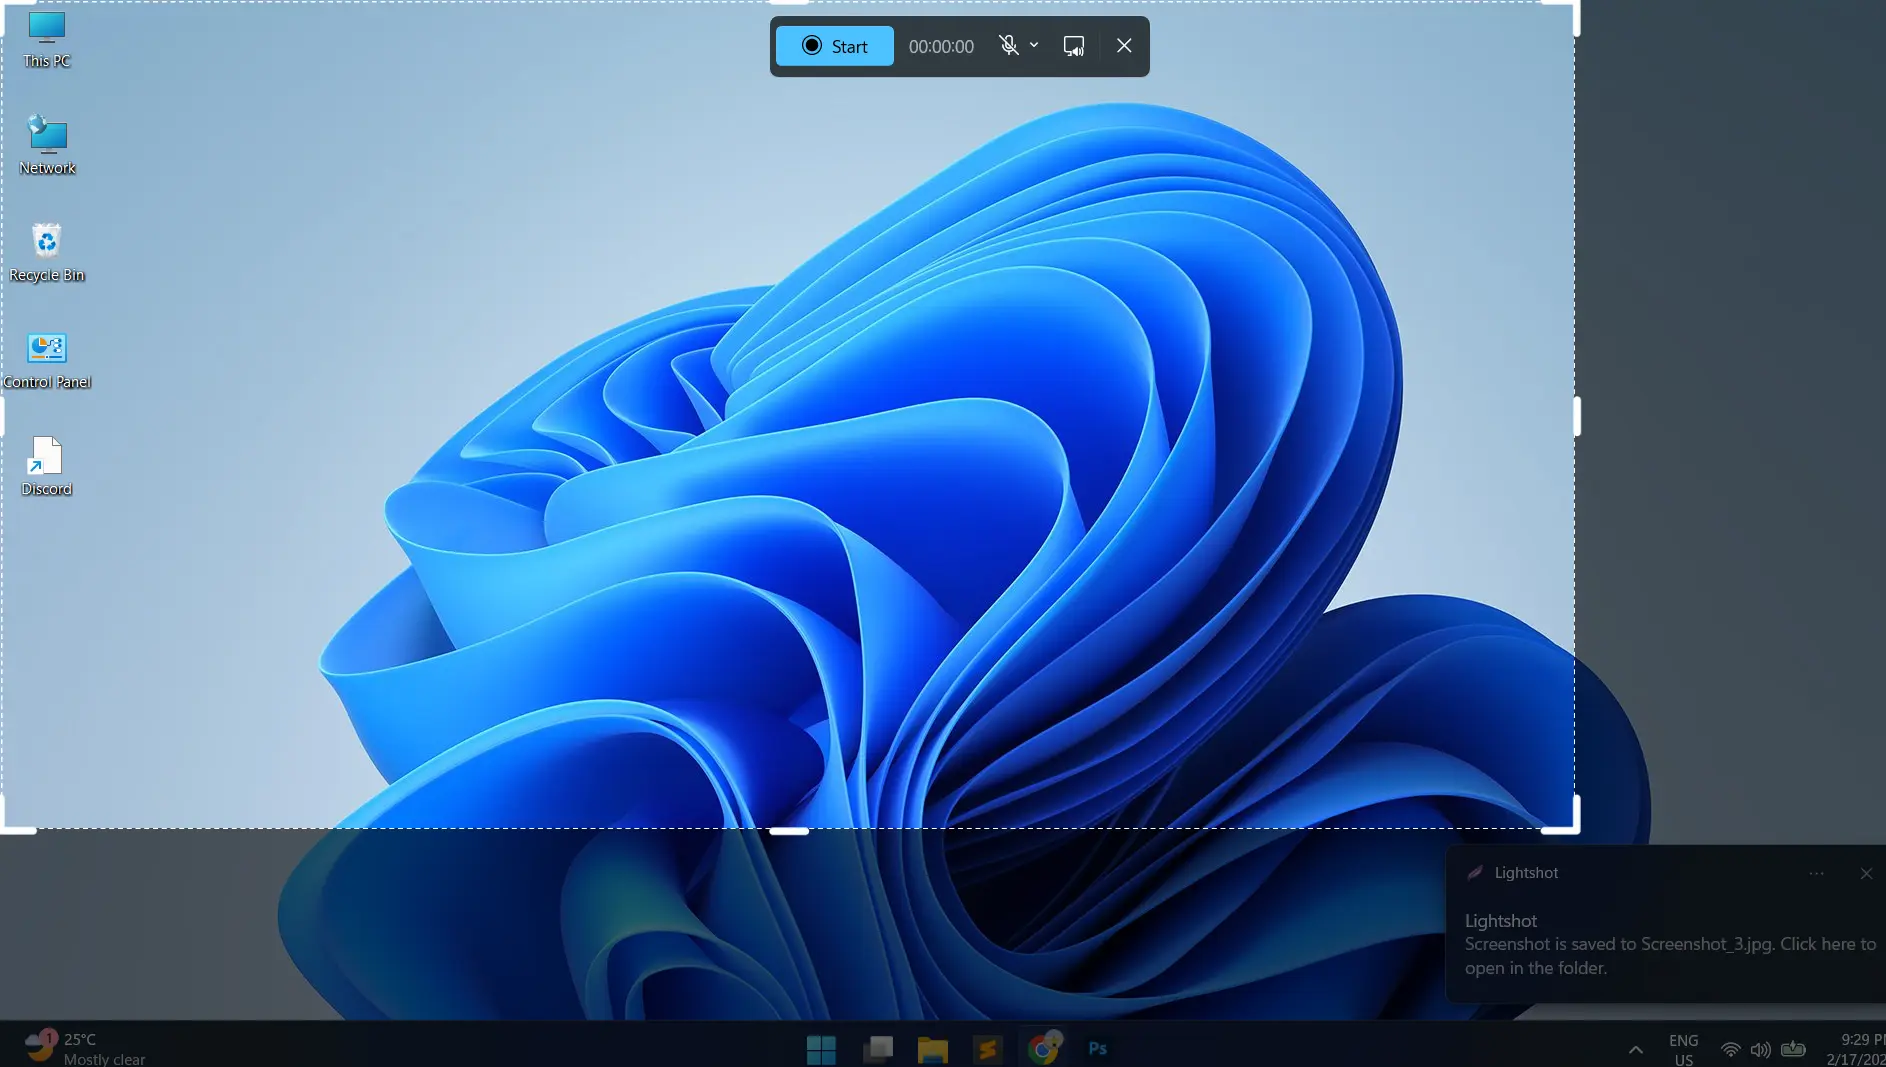
Step 5: A recording bar appears at the top once you make your selection. It shows a Start button and a timer at 00:00:00
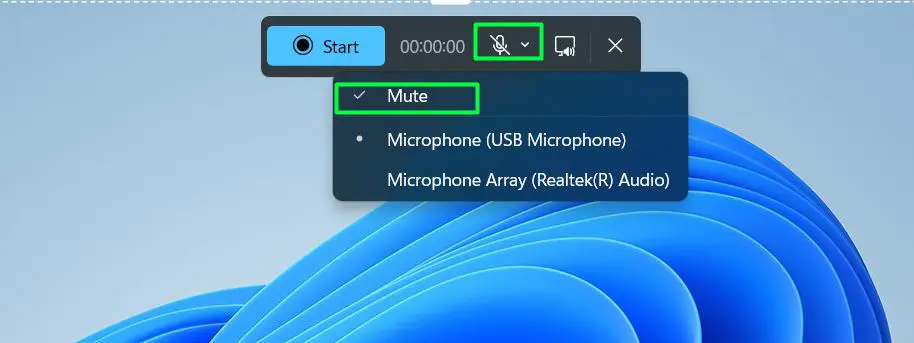
Step 6: To record with audio, click the microphone dropdown arrow in the toolbar
– The tool checks ‘Mute’ by default. Click ‘Mute’ to uncheck it
– Select your preferred microphone from the list
Step 7: Click the Start button

Step 8: When you finish recording, click the red Stop button in the recording bar

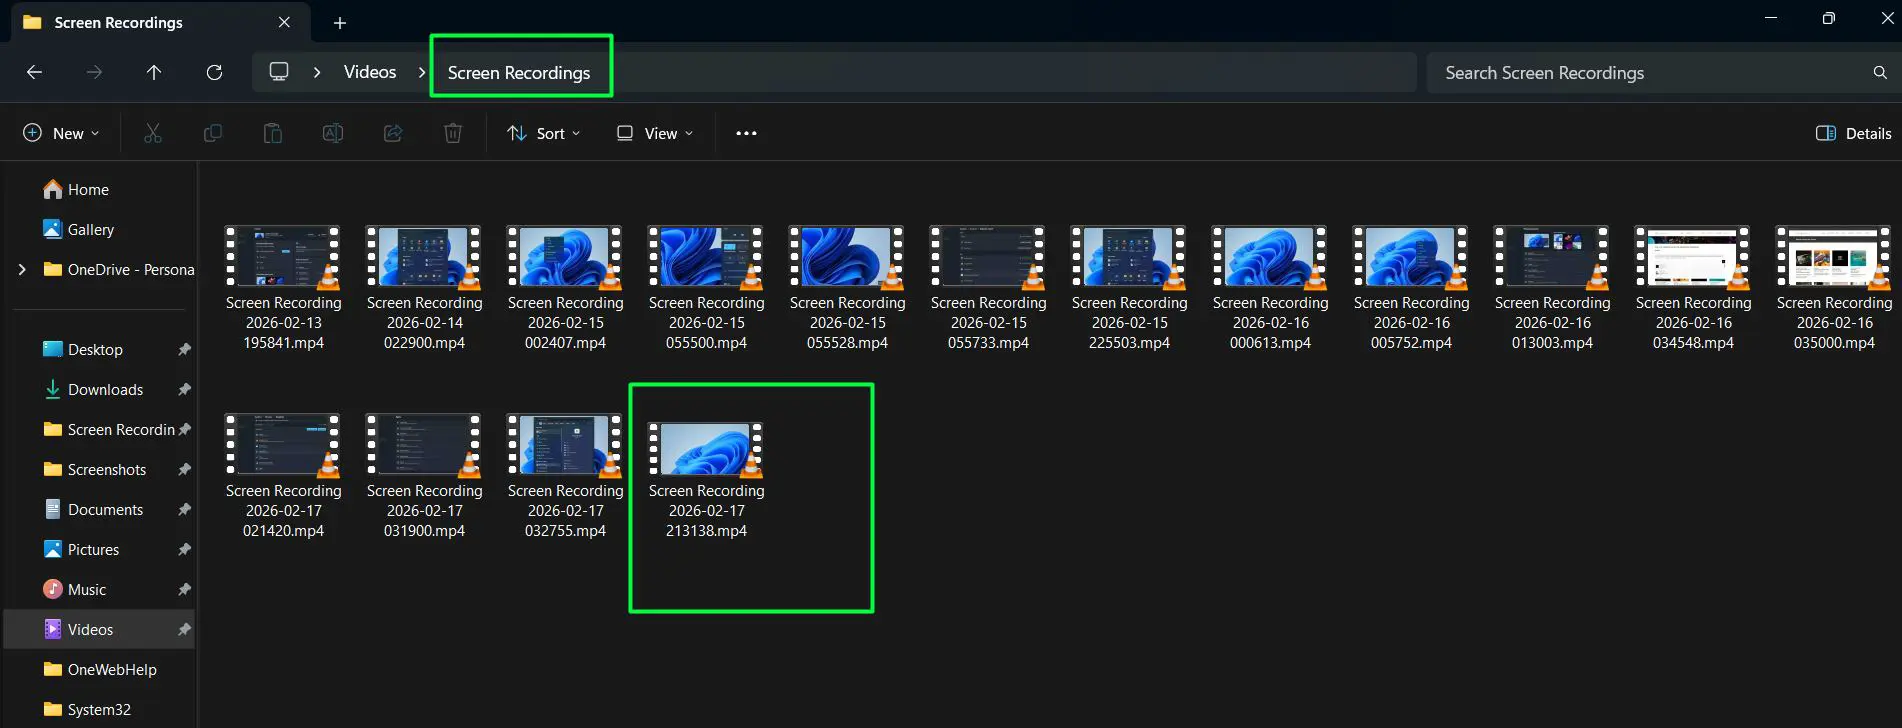
Step 9: The tool automatically saves your recording as an MP4 file to the Screen Recordings folder inside the Videos folder. No manual saving required.
Understanding the Recording Toolbar
The recording toolbar appears after you make a selection. It shows the timer, a mute/unmute microphone button with a dropdown, and a stop button. Everything you need to control the recording is right there in that bar at the top of the screen.
Pro-Tip: Setting Up Audio Before You Start
When you click the microphone dropdown, it shows all connected audio input devices. This includes USB microphones and built-in arrays.
Select the right one before hitting Start to avoid having to redo the recording. If you don’t need audio, leave it on ‘Mute’ to keep the recording clean with on-screen visuals only.
This small step before pressing Start saves a lot of frustration later.
Why This Shortcut Method Excels
This shortcut method works perfectly for quick captures. Need to record just a browser window? Select only that. Recording a specific app without showing the rest of the desktop? Rectangle mode handles that precisely.
The flexibility here is one of the biggest advantages over older full-screen-only recording methods.
Method 2: Screen Record on Windows 11 Using the Snipping Tool
Opening the Snipping Tool manually gives you the same recording capabilities as the keyboard shortcut above. The difference is you navigate through a visual interface.
This method works well if you prefer navigating through menus rather than memorizing shortcuts. It’s also useful when the app is already open for taking screenshots and you also need a recording.
Watch This Tutorial
How to Screen Record on Windows 11 Easily Using the Snipping Tool – No Third Party App Needed
Accessing the Recording Mode
The Snipping Tool in Windows 11 has a dedicated video recording mode. Access it directly from the toolbar, which shows a dropdown with two capture options – Rectangle and Window.
You can choose the selection type before even clicking New. Here is how to use it:
Step-by-Step Instructions
Step 1: Click the Start Menu and type Snipping Tool in the search bar. Press Enter to open it.
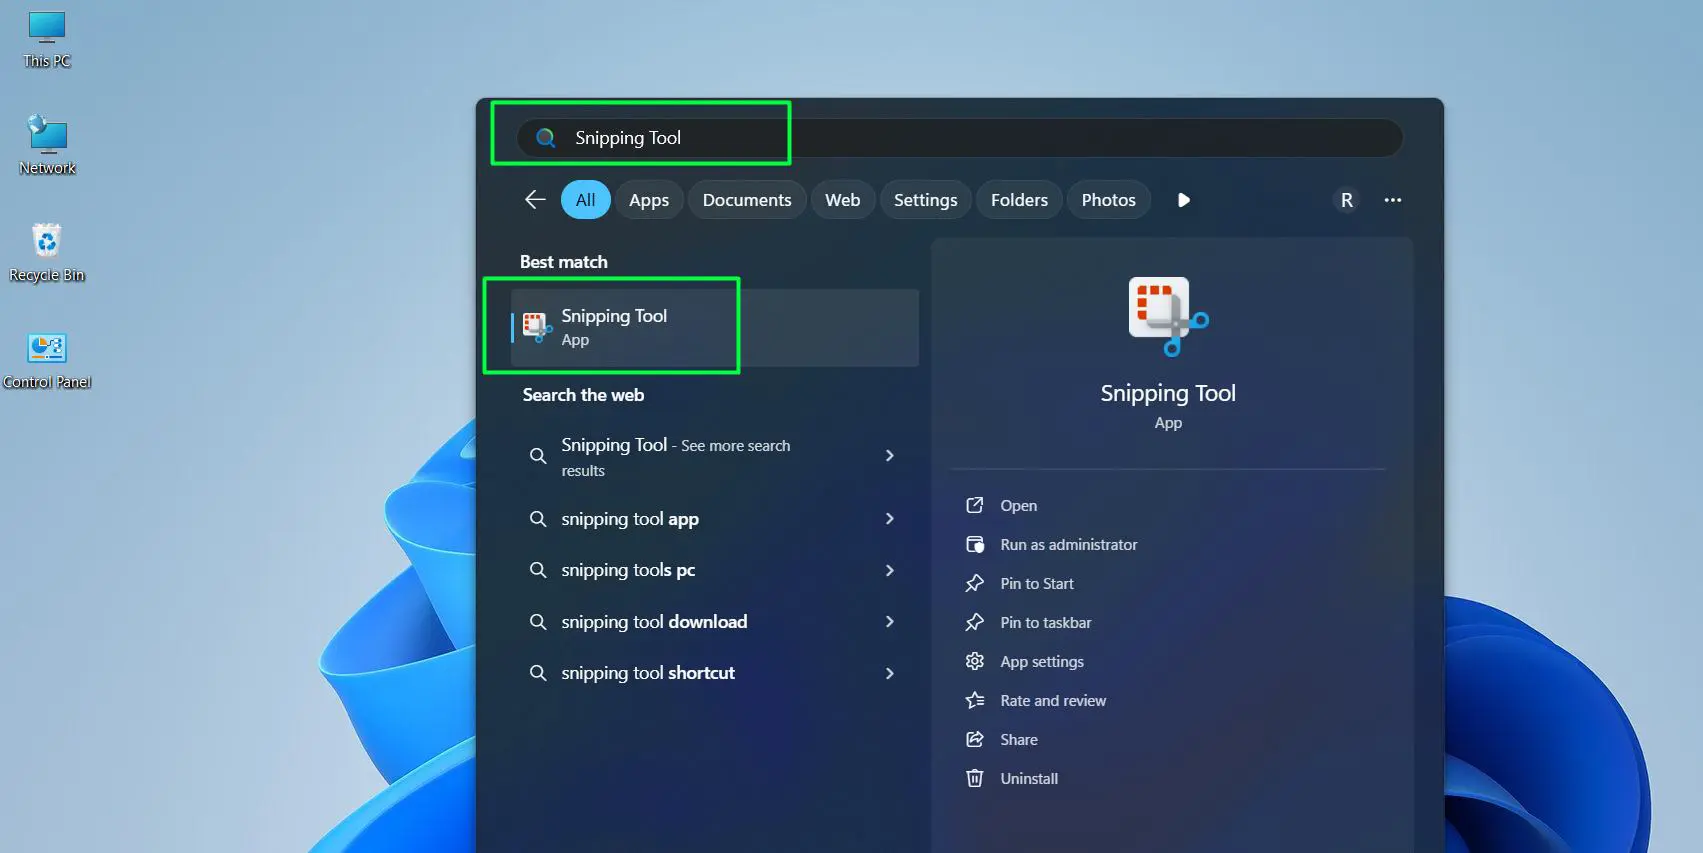
Step 2: In the Snipping Tool window, look at the top toolbar. Click the video camera icon (the third icon, between the screenshot camera and the text capture button). This switches to video recording mode.
![]()
Step 3: Click the dropdown arrow on the Recording Area icon
– Choose Rectangle to draw a custom area
– Or choose Window to capture a specific open application window
![]()
Step 4: Click the New button in the top-left of the Snipping Tool window. This begins the screen selection process.

Step 5: The screen will dim and a selection cursor appears
– If using Rectangle mode: Click and drag to select the area to record
– If using Window mode: Simply click on the desired window
Step 6: After you make the selection, the recording toolbar appears at the top. It shows the Start button, timer, and audio controls.
Step 7: To record with audio, click the microphone dropdown arrow. Uncheck ‘Mute’, then select your preferred microphone from the list.
Step 8: Click Start to begin the recording. A brief countdown may appear before recording starts.
Step 9: Click the red Stop button in the toolbar to stop recording
Step 10: The tool automatically saves your recording as an MP4 file to the Screen Recordings folder inside the Videos folder. No manual saving required.
Confirming the Shortcut Connection
The shortcut shown inside the Snipping Tool itself reads ‘Press Windows + Shift + R to start a recording’. This confirms that both methods lead to exactly the same recording experience.
The manual route simply adds the visual step of choosing Rectangle or Window mode from the dropdown before clicking New.
System Requirements
The Snipping Tool screen recording feature requires Windows 11 version 22H2 or later. If the video camera icon is missing from the toolbar, you can update it.
Open Microsoft Store, search for Snipping Tool, and hit Update to bring the feature in.
Pro-Tip: Trim Your Recording Before Saving
After stopping a recording, the Snipping Tool allows you to trim the clip before the file is finalized. Drag the trim handles on the playback timeline to cut out any unwanted seconds at the beginning or end.
Your recording then auto-saves to Videos > Screen Recordings. No Save button needed.
The built-in trim feature eliminates the need for a separate video editor for simple clean-up while keeping the final file tight and professional.
File Format Compatibility
The output saves as an MP4 file. This format works with virtually every video player, editor, and sharing platform. You don’t need any conversion.
Method 3: Screen Record on Windows 11 Using Bandicam
Bandicam is a well-established screen recording software. It gives you more control over recording quality, frame rate, audio mixing, and output settings compared to the built-in Snipping Tool.
Content creators, educators, and gamers often choose Bandicam. They need clean recordings with consistent quality over longer sessions.
Free vs Paid Version
The free version of Bandicam adds a small watermark to recordings. The paid version removes it entirely and unlocks additional features.
For general testing, tutorials, or personal use where a watermark isn’t a concern, the free version provides the full recording experience. You can evaluate it before upgrading.
Step-by-Step Instructions
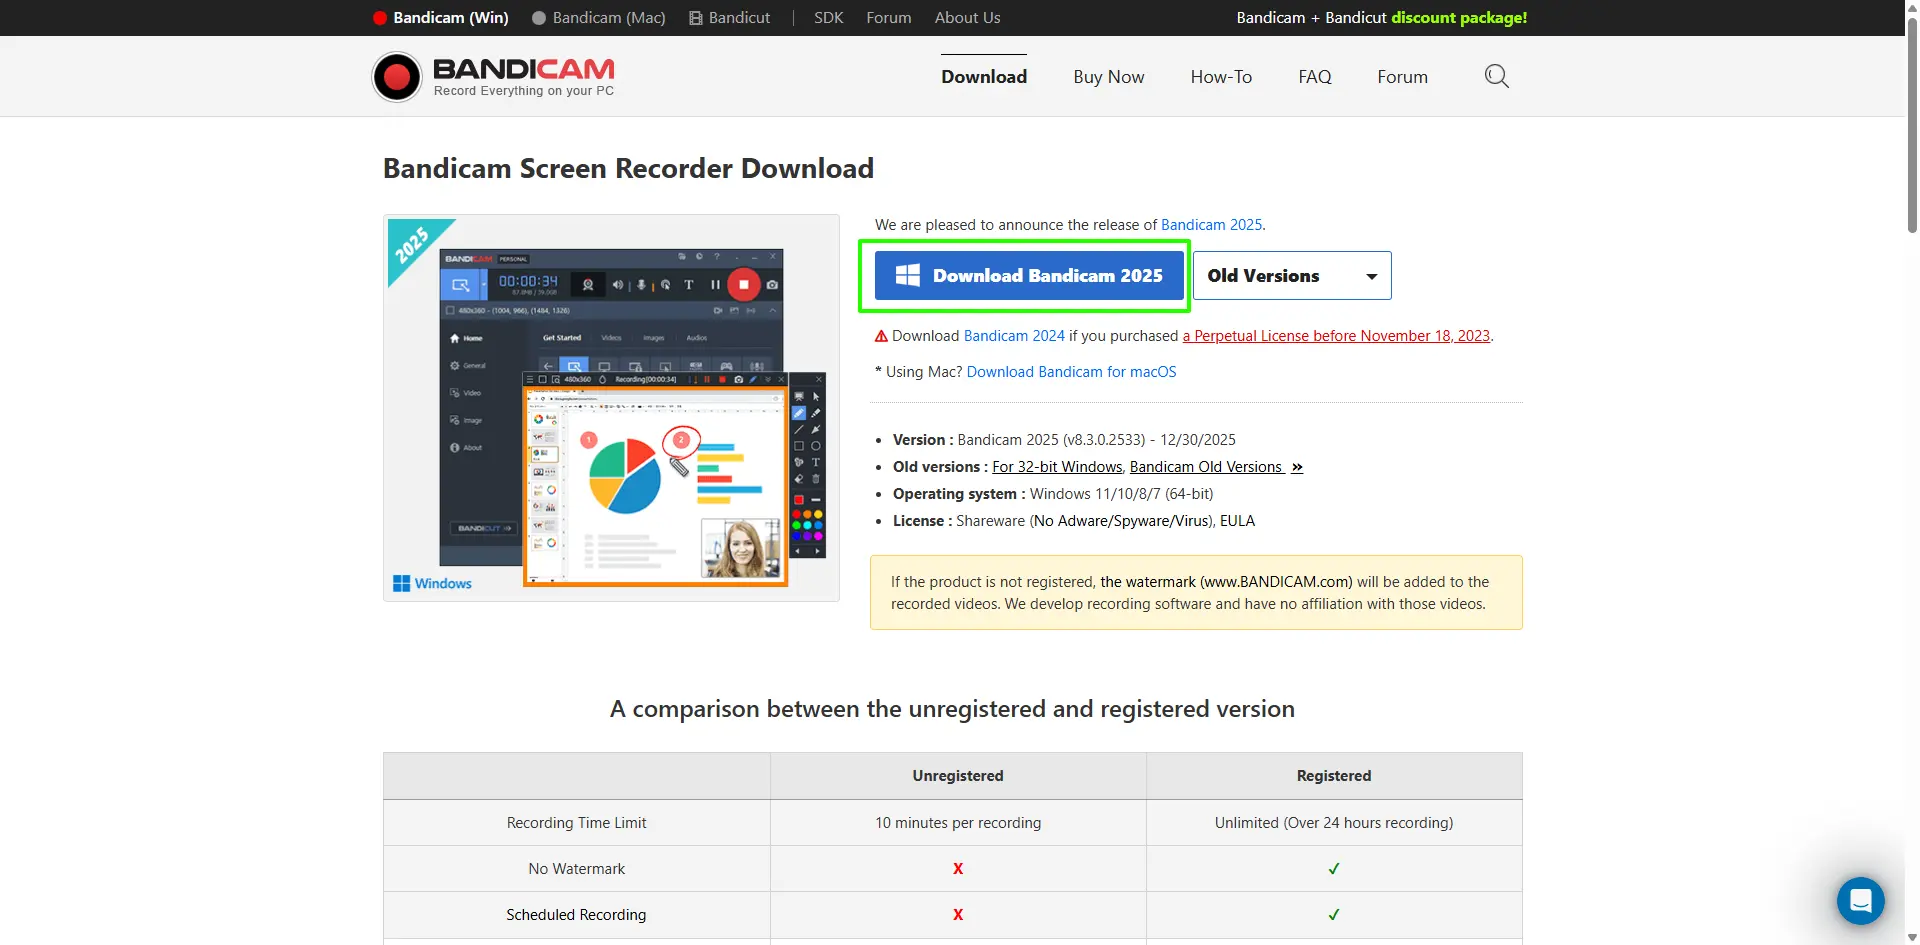
Step 1: Go to bandicam.com and download the latest version of Bandicam. Run the installer and follow the setup prompts.
Step 2: Open Bandicam after installation. The main dashboard appears with the Get Started tab open. You’ll see recording mode options at the top of the window.
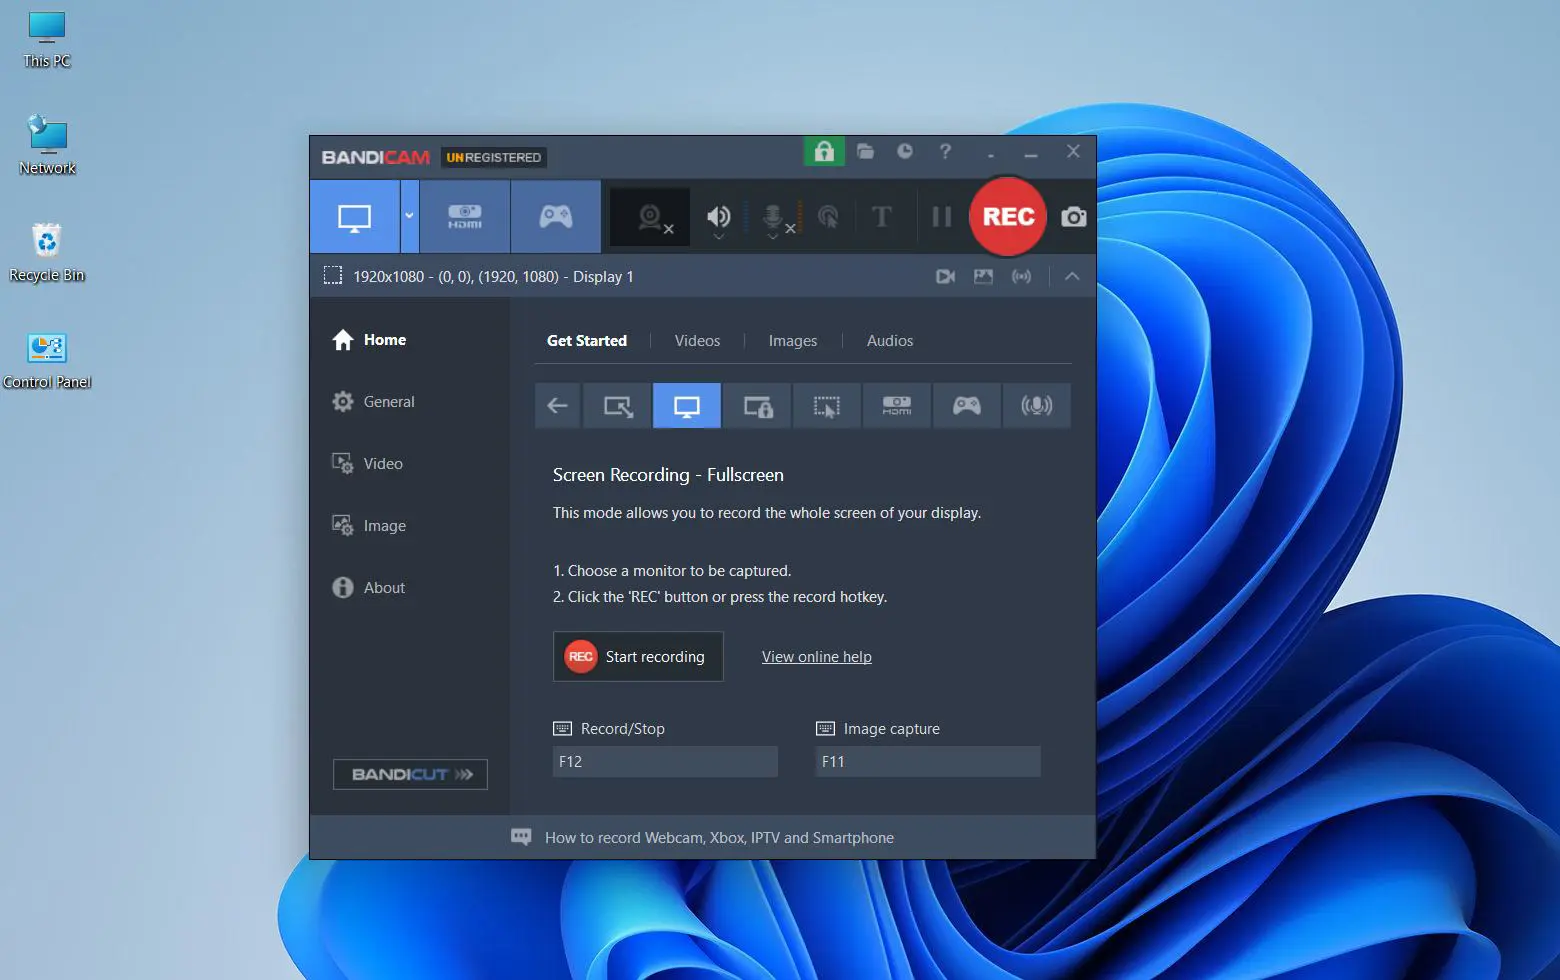
Step 3: Click the Screen Recording Mode icon (the monitor icon) in the top-left of the toolbar. Then click the small dropdown arrow beside it to choose a capture type:
– Select Rectangle on a screen to draw a custom area
– Select Fullscreen to capture the entire display
– Or select Specific window to record a particular open application
![]()
Step 4: If you selected Rectangle on a screen, click and drag on the screen to draw the recording area before proceeding
Step 5: To set up microphone audio, click the dropdown arrow on the microphone icon in the toolbar
– By default, the tool checks ‘Disable microphone’
– Select your preferred microphone from the list such as ‘Microphone (USB Microphone)’ or ‘Microphone Array (Realtek Audio)’ to enable it
![]()
Step 6: Once you set the recording area and microphone, click the red REC button
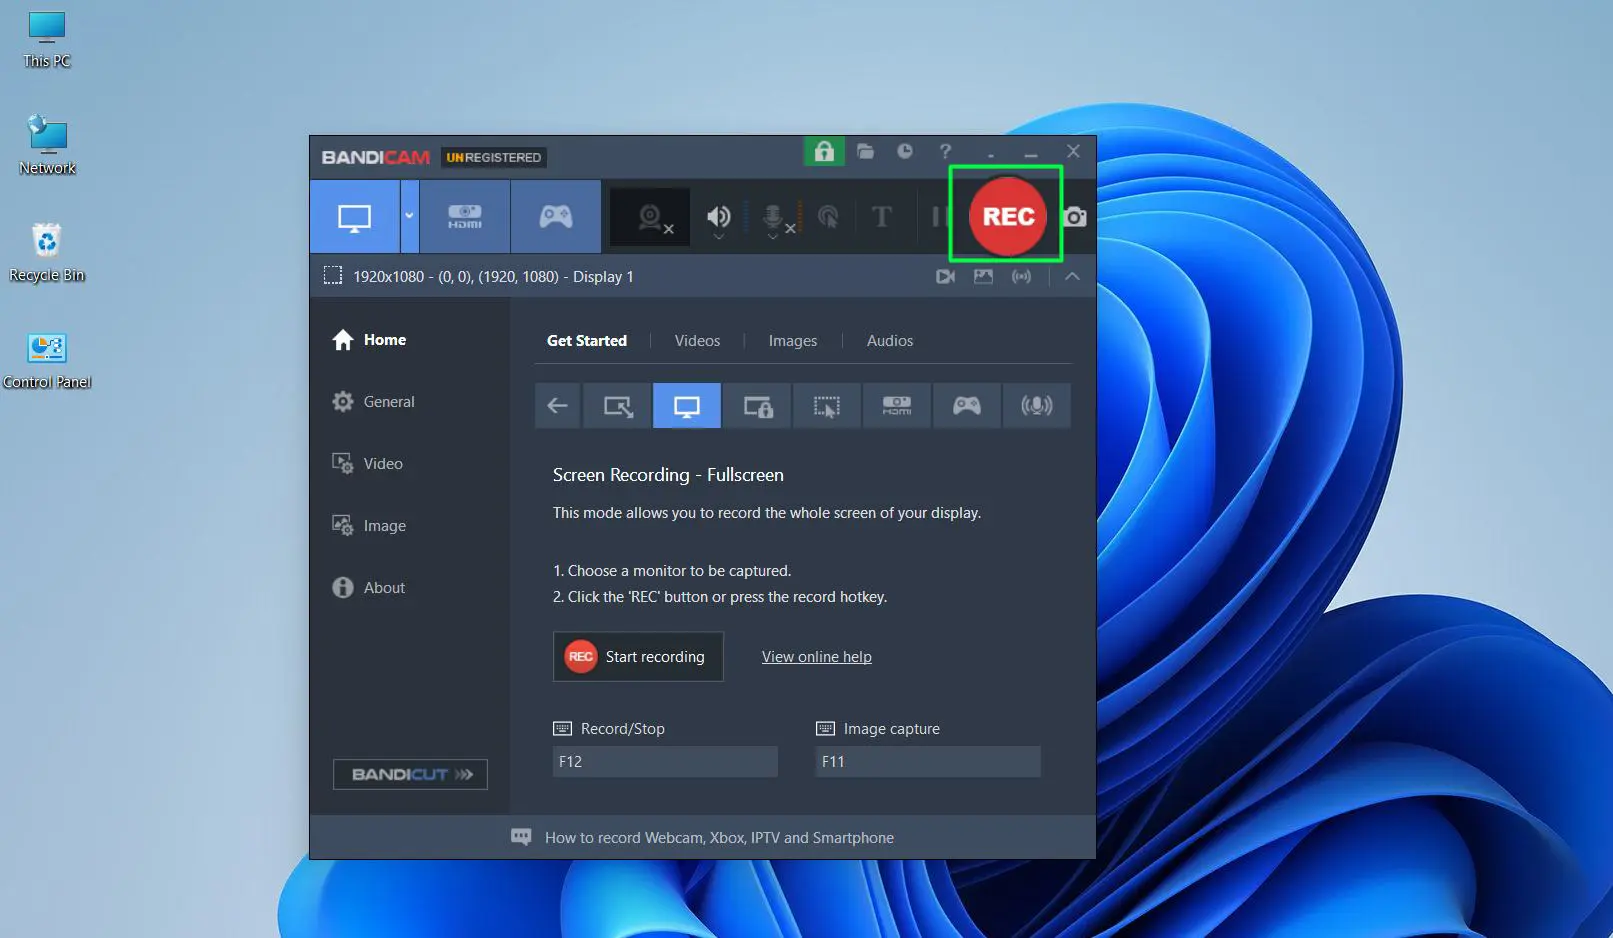
Step 7: A small recording indicator appears on screen. This confirms the recording is active. Press F12 or click the Stop icon again to stop when done.
![]()
Step 8: The tool automatically saves your recording to the Documents > Bandicam folder as an MP4 file
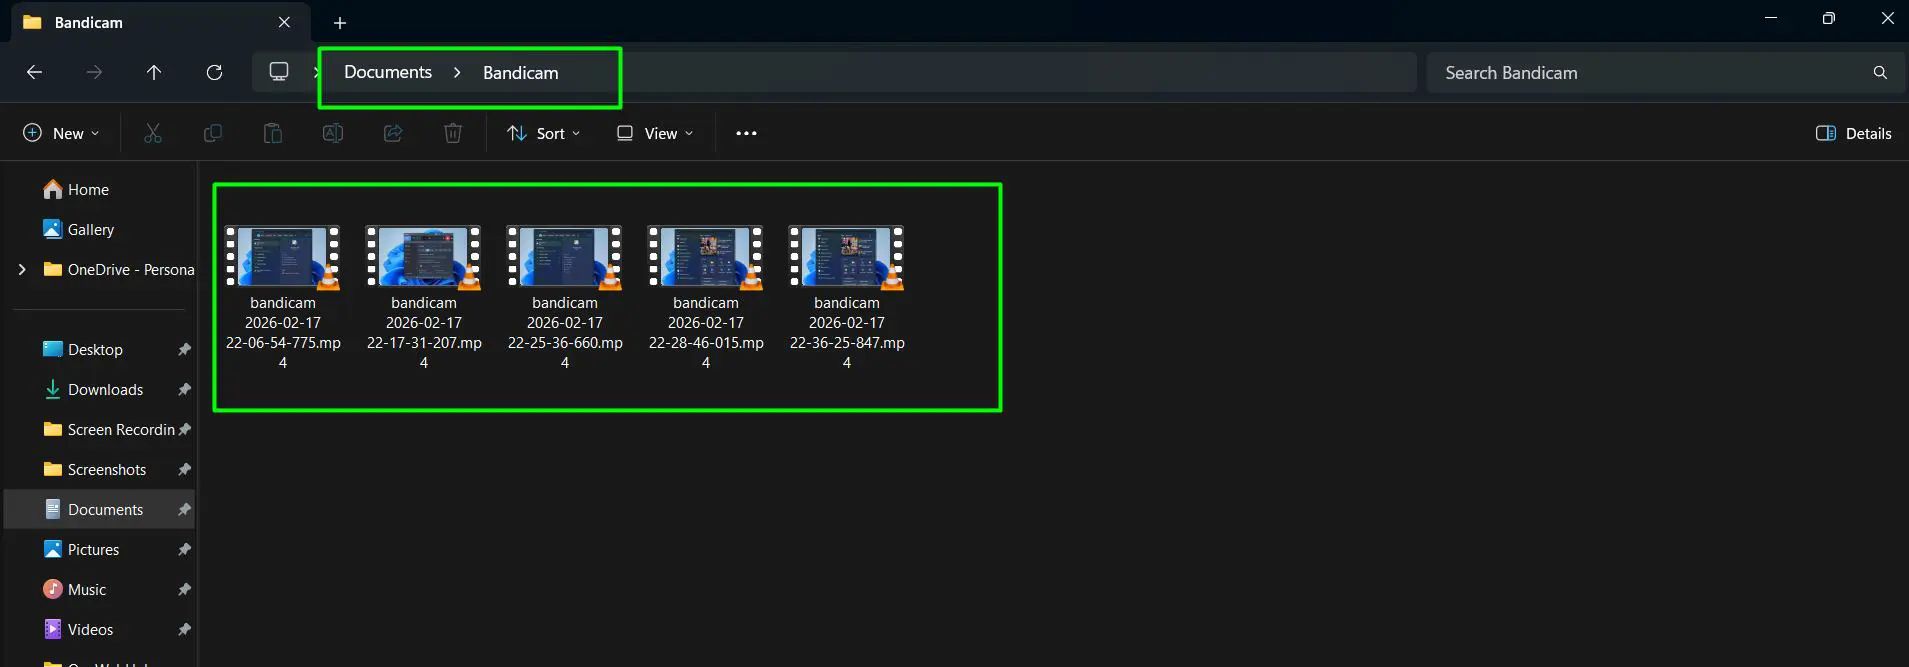
Customizing the Output Location
By default, Bandicam saves recordings to the Documents\Bandicam folder on the local drive. You can change this output path in the General Settings to any preferred location.
This includes an external drive or a specific project folder.
Performance Advantages
Bandicam supports recording at high frame rates, which is particularly useful for capturing fast-moving content smoothly.
The built-in hardware acceleration keeps system performance stable even during longer recording sessions, especially when you record resource-heavy applications or extended tutorials. You won’t experience frame drops or slowdowns.
When to Choose Bandicam
Users who regularly record hardware-intensive applications benefit most from Bandicam. These applications include games, 3D design tools, or video editing software.
Bandicam handles these scenarios noticeably better than the built-in Snipping Tool. Its dedicated performance mode minimizes the recording overhead, ensuring the application being captured continues to run smoothly throughout.
Comparing All Three Methods
Each method has a clear strength depending on what the recording is for:
Windows + Shift + R
Best for speed. Press the shortcut, select the area, click Start. Your recording is underway in under 10 seconds with no app navigation or setup needed.
Snipping Tool (Manual)
Best for users who prefer a visual interface. Its dropdown makes it easy to switch between Rectangle and Window modes before starting, while built-in trimming keeps the workflow contained in one app.
Bandicam
Best for longer or higher-quality recordings. Also ideal for game capture or situations where you need both microphone and system audio recorded simultaneously with independent volume control.
Making the Right Choice
For most everyday screen recording needs on Windows 11, the keyboard shortcut gets the job done with zero setup.
Choose Bandicam when the built-in tools start to feel limiting or when recording quality and audio control are top priorities.
Where Are Screen Recordings Saved on Windows 11?
After finishing a recording, knowing exactly where the file ended up saves unnecessary searching. Here is where each method stores recordings:
Windows + Shift + R and Snipping Tool
Recordings auto-save to Videos > Screen Recordings on the local drive. No manual save step is required. The MP4 file is ready in that folder as soon as the recording stops.
Bandicam
Recordings auto-save to Documents\Bandicam by default. You can fully customize this path in the General Settings panel inside the app.
Universal File Format
All three methods produce MP4 files. This makes recordings universally compatible with video players, editing software, and online platforms right out of the box. You don’t need conversion or extra steps.
Frequently Asked Questions
What is the fastest way to screen record on Windows 11?
Press Windows + Shift + R on the keyboard. This opens the Snipping Tool directly into recording mode. You can select a specific area of the screen and start recording within seconds. You don’t need to open any app first.
Can I record a specific part of the screen instead of the full screen?
Yes. Both the Windows + Shift + R shortcut and the Snipping Tool offer a Rectangle selection mode. This lets you click and drag to define exactly which area of the screen gets recorded.
Window mode is also available. This captures a specific open application window only.
Does screen recording on Windows 11 capture audio?
The Snipping Tool recording mode supports microphone audio. Before pressing Start, click the microphone dropdown in the recording toolbar. This allows you to choose the preferred audio input device.
Bandicam supports both microphone and system audio simultaneously. It offers independent volume controls for each source.
Is Bandicam free to use?
Bandicam has a free version that adds a watermark to all recordings. The paid version removes the watermark and unlocks additional features.
For personal use or testing where the watermark is acceptable, the free version provides the full recording experience.
Where does the Snipping Tool save screen recordings?
Recordings made with the Snipping Tool (including via Windows + Shift + R) automatically save to the Screen Recordings folder inside the Videos folder on the local drive.
No manual save step is needed. The MP4 file is ready in that folder as soon as recording stops.
Does Windows + Shift + R work on all Windows 11 versions?
The Windows + Shift + R shortcut works on Windows 11 version 22H2 and later. The screen recording feature was introduced in that update.
If the shortcut doesn’t respond, run Windows Update and update the Snipping Tool through the Microsoft Store. This will enable the feature.
Can the Snipping Tool trim recordings before saving?
Yes. After stopping a recording, the Snipping Tool shows a playback preview with a timeline at the bottom.
You can drag trim handles on either end of the timeline inward. This removes unwanted footage from the start or end of the clip before saving the final file.